D-Link DCS-910 Product Manual - Page 49
Using & Configuring the DCS-910/920 - 920 remote access
 |
UPC - 790069313776
View all D-Link DCS-910 manuals
Add to My Manuals
Save this manual to your list of manuals |
Page 49 highlights
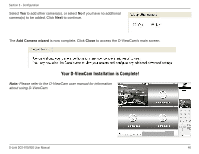
Section 4 - Security Using & Configuring the DCS-910/920 D-Link's DCS-910/920 is a versatile and cost effective Internet Camera offering both video and audio monitoring. It can also serve as a powerful surveillance system in security applications. The DCS-910/920 can be used with any wired or 802.11b/g wireless router (applicable only for the DCS-920). This section explains how to view the camera from either the Internet or from inside your internal network. Materials Needed: • 1 DCS-910/920 Internet Camera • 1 Ethernet Cable • A Wired or Wireless router such as the D-Link DI-624 Wireless Router • Ethernet based PC for system configuration Setting Up the DCS-910/920 For Use Behind a Router Installing a DCS-910/920 Internet Camera on your network is an easy 4-step procedure: 1 Assign a Local IP Address to Your Internet Camera 2 View the Internet Camera Using Your Internet Explorer Web Browser 3 Access the Router with Your Web Browser 4 Open Virtual Server Ports to Enable Remote Image Viewing This section is designed to walk you through the setup process for installing your camera behind a router and enable remote video viewing. For the basic setup of the DCS-910/920, follow the steps outlined in the Quick Installation Guide. D-Link DCS-910/920 User Manual 49
-
 1
1 -
2
-
3
-
4
-
5
-
6
-
7
-
8
-
9
-
10
-
11
-
12
-
13
-
14
-
15
-
16
-
17
-
18
-
19
-
20
-
21
-
22
-
23
-
24
-
25
-
26
-
27
-
28
-
29
-
30
-
31
-
32
-
33
-
34
-
35
-
36
-
37
-
38
-
39
-
40
-
41
-
42
-
43
-
 44
44 -
 45
45 -
 46
46 -
 47
47 -
 48
48 -
 49
49 -
 50
50 -
 51
51 -
 52
52 -
 53
53 -
 54
54 -
55
-
56
-
57
-
58
-
59
-
60
-
61
-
62
-
63
-
64
-
65
-
66
-
67
-
68
-
69
-
70
-
71
-
72
 |
 |
