D-Link DFL-2560G Hardware Installation Guide - Page 4
Installing and Connection - dfl 2560
 |
UPC - 790069335440
View all D-Link DFL-2560G manuals
Add to My Manuals
Save this manual to your list of manuals |
Page 4 highlights
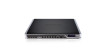
LCD Keypad Controls After Boot-up Next Button Back Button Figure 5. Button Definitions (After Boot-up) Once the DFL-2560/2560G has completed its system startup routine, the LCD panel will be ready to display the device status information. You can use the keypad to select a desired display option. The following table lists the status information that can be displayed on the firewall's LCD panel. Item Model Name: System Status: CPU Load: Connections: Total BPS: Total PPS: Date: Time: Uptime: Mem: Description Device model name System function status CPU utilization and concurrent sessions Concurrent traffic per second Concurrent packets per second Current device date Current device time The amount of time since last restart System memory utilization IDS Sigs: Interface Name: (See Table 4.) Core Version: CPU Temp. System Temp. Fan Status IDS signature information IP address for each interface Current firmware version CPU and system temperature via on board sensor Fan speed Table 4. Device Status Shown on LCD Panel Installing and Connection This chapter describes how to install a DFL-2560/DFL-2560G device in a standard 19-inch equipment rack and how to connect network and power cables to the device. Before You Begin Observe the following precautions to help prevent faults, equipment failures and injuries: -- Before installation, always disconnect the power supply. -- Ensure that the room in which you operate the device has adequate air circulation and that the room temperature does not exceed 40˚C (104˚F). -- Allow 1 meter (3 feet) of clear space from the front and back of the device. -- Do not place the device in an equipment rack frame that blocks the air vents on the sides of the chassis. Ensure that enclosed racks have fans and vented sides. -- Correct any of the following hazardous conditions before any installation: moist or wet floors, leaks, ungrounded/frayed power cables, or missing safety grounds. Installing Equipment You can mount the DFL-2560/DFL-2560G device into a standard 19-inch equipment rack. To install an DFL-2560/DFL-2560G device into a rack: 1. Attach the mounting brackets to each side of the chassis as shown in figure 6 and secure them with the provided screws. 4 D-Link NetDefend Firewall Figure 6. Attaching Rack Mount Brackets
-
 1
1 -
 2
2 -
 3
3 -
 4
4 -
 5
5 -
 6
6 -
 7
7 -
 8
8 -
 9
9 -
 10
10 -
11
-
12
-
13
-
14
-
15
-
16
-
17
-
18
-
19
-
20
-
21
-
22
-
23
-
24
-
25
-
26
-
27
-
28
-
29
-
30
-
31
-
32
-
33
-
34
-
35
-
36
-
37
-
38
-
39
-
40
-
41
-
42
-
43
-
44
 |
 |
