D-Link DFL-700 Product Manual - Page 11
Managing D-Link DFL-700, Resetting the DFL-700 - d link
 |
UPC - 790069264535
View all D-Link DFL-700 manuals
Add to My Manuals
Save this manual to your list of manuals |
Page 11 highlights
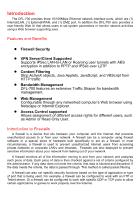
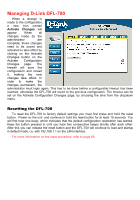
Managing D-Link DFL-700 When a change is made to the configuration, a new icon named Activate Changes will appear. When all changes made by the administrator are complete, those changes need to be saved and activated to take effect by clicking on the Activate Changes button on the Activate Configuration Changes page. The firewall will save the configuration and reload it, making the new changes take effect. In order to make the changes permanent, the administrator must login again. This has to be done before a configurable timeout has been reached, otherwise the DFL-700 will revert to the previous configuration. The timeout can be set on the Activate Configuration Changes page, by choosing the time from the dropdown menu. Resetting the DFL-700 To reset the DFL-700 to factory default settings you must first press and hold the reset button. Power on the unit, and continue to hold the reset button for at least 15 seconds. You will first hear one beep, which indicates that the default configuration restoration has started. Keep the button pressed in until you hear two consecutive beeps shortly after each other. After this you can release the reset button and the DFL-700 will continue to load and startup in default mode, i.e. with 192.168.1.1 on the LAN interface. For more information on the reset procedure, refer to page 69.
-
 1
1 -
2
-
3
-
4
-
5
-
 6
6 -
 7
7 -
 8
8 -
 9
9 -
 10
10 -
 11
11 -
 12
12 -
 13
13 -
 14
14 -
 15
15 -
 16
16 -
17
-
18
-
19
-
20
-
21
-
22
-
23
-
24
-
25
-
26
-
27
-
28
-
29
-
30
-
31
-
32
-
33
-
34
-
35
-
36
-
37
-
38
-
39
-
40
-
41
-
42
-
43
-
44
-
45
-
46
-
47
-
48
-
49
-
50
-
51
-
52
-
53
-
54
-
55
-
56
-
57
-
58
-
59
-
60
-
61
-
62
-
63
-
64
-
65
-
66
-
67
-
68
-
69
-
70
-
71
-
72
-
73
-
74
-
75
-
76
-
77
-
78
-
79
-
80
-
81
-
82
-
83
-
84
-
85
-
86
-
87
-
88
-
89
-
90
-
91
-
92
-
93
-
94
-
95
-
96
-
97
-
98
-
99
-
100
-
101
-
102
-
103
-
104
-
105
-
106
-
107
-
108
-
109
-
110
-
111
-
112
-
113
-
114
-
115
-
116
-
117
-
118
-
119
-
120
-
121
-
122
-
123
-
124
-
125
-
126
-
127
-
128
-
129
-
130
-
131
-
132
-
133
-
134
-
135
-
136
-
137
-
138
 |
 |
