D-Link DGL-4300 Product Manual - Page 25
Add Static DHCP Client, Static DHCP Client List - adapter
 |
UPC - 790069272554
View all D-Link DGL-4300 manuals
Add to My Manuals
Save this manual to your list of manuals |
Page 25 highlights
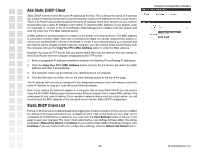
Add Static DHCP Client Static DHCP Clients receive the same IP address all the time. This is almost the same as if a device has a static IP address except that it must still actually request an IP address from the D-Link Router. The D-Link Router will provide the device the same IP address all the time. Servers on your network should either use a static IP address or this option. To input the MAC address of your system, enter it in manually or connect to the D-Link Router's Web-Management interface from the system and click the Copy Your PC's MAC Address button. A MAC address is usually located on a sticker on the bottom of a network device. The MAC address is comprised of twelve digits. Each pair of hexadecimal digits are usually separated by dashes or colons such as 00-0D-88-11-22-33 or 00:0D:88:11:22:33. If your network device is a computer and the network card is already located inside the computer, you can connect to the D-Link Router from the computer and use the Copy Your PC's MAC Address option to enter the MAC address. Example: You have an FTP server that you want to share files over the Internet. You can connect to the D-Link Router from the computer designated as the FTP server. 1. Enter a designated IP address somewhere between the Starting IP and Ending IP addresses. 2. Click the Copy Your PC's MAC Address button and the D-Link Router will detect the MAC address and enter it automatically. 3. The computer name can be entered in for reference but is not required. 4. Click the OK button and then click on the Save Settings button at the top of the page. The IP address will now only be assigned to the designated computer and it will always receive the same IP address as long as it uses the same Ethernet adapter. Note: If you replace the Ethernet adapter in a computer that is using Static DHCP, you will need to Copy the PC's MAC Address again because every Ethernet adapter has a unique MAC address. The same goes for any network device. If you replace a network device such as a print server, you will need to input the MAC address of the new print server into the Static DHCP configuration. Static DHCP Client List Entries on this list can be enabled/disabled by toggling the Enable checkbox. Entries can be modified by clicking on the paper and pencil icon. To delete an entry, click on the trash can icon. After you've completed all modifications or deletions, you must click the Save Settings button at the top of the page to save your changes. The router must reboot before new settings will take effect. You will be prompted to Reboot the Device or Continue. If you need to make additional settings changes, click Continue. If you are finished with your configuration settings, click the Reboot the Device button. Using the Configuration Interface 25 D-Link Systems, Inc.
-
 1
1 -
2
-
3
-
4
-
5
-
6
-
7
-
8
-
9
-
10
-
11
-
12
-
13
-
14
-
15
-
16
-
17
-
18
-
19
-
 20
20 -
 21
21 -
 22
22 -
 23
23 -
 24
24 -
 25
25 -
 26
26 -
 27
27 -
 28
28 -
 29
29 -
 30
30 -
31
-
32
-
33
-
34
-
35
-
36
-
37
-
38
-
39
-
40
-
41
-
42
-
43
-
44
-
45
-
46
-
47
-
48
-
49
-
50
-
51
-
52
-
53
-
54
-
55
-
56
-
57
-
58
-
59
-
60
-
61
-
62
-
63
-
64
-
65
-
66
-
67
-
68
-
69
-
70
-
71
-
72
-
73
-
74
 |
 |
