D-Link DGL-4300 Product Manual - Page 30
Add/Edit Virtual Server, Virtual Servers List - ip address
 |
UPC - 790069272554
View all D-Link DGL-4300 manuals
Add to My Manuals
Save this manual to your list of manuals |
Page 30 highlights
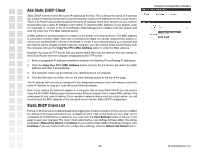
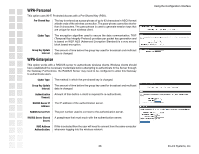
Add/Edit Virtual Server Virtual Server Rule: Name of the virtual server, such as Web Server. IP Address: The IP address of the system on your internal network that will provide the virtual service, such as 192.168.0.50. Protocol: Select the protocol used by the service. Private Port: The port that will be used on your internal network. Public Port: The port that will be accessed from the Internet. Schedule: Select a schedule for when this rule is in effect. If you do not see the schedule you need in the list of schedules, go to the Tools -> Schedules screen and create a new schedule. Save: Saves the new rule or modified existing rule to the Rules list. When you are done editing the settings, you must click the Save Settings button at the top of the page to make the changes effective and permanent. Virtual Servers List Entries on this list can be enabled/disabled by toggling the Enable checkbox. Entries can be modified by clicking on the paper and pencil icon. To delete an entry, click on the trash can icon. After you've completed all modifications or deletions, you must click the Save Settings button at the top of the page to save your changes. The router must reboot before new settings will take effect. You will be prompted to Reboot the Device or Continue. If you need to make additional settings changes, click Continue. If you are finished with your configuration settings, click the Reboot the Device button. Using the Configuration Interface 30 D-Link Systems, Inc.
-
 1
1 -
2
-
3
-
4
-
5
-
6
-
7
-
8
-
9
-
10
-
11
-
12
-
13
-
14
-
15
-
16
-
17
-
18
-
19
-
20
-
21
-
22
-
23
-
24
-
 25
25 -
 26
26 -
 27
27 -
 28
28 -
 29
29 -
 30
30 -
 31
31 -
 32
32 -
 33
33 -
 34
34 -
 35
35 -
36
-
37
-
38
-
39
-
40
-
41
-
42
-
43
-
44
-
45
-
46
-
47
-
48
-
49
-
50
-
51
-
52
-
53
-
54
-
55
-
56
-
57
-
58
-
59
-
60
-
61
-
62
-
63
-
64
-
65
-
66
-
67
-
68
-
69
-
70
-
71
-
72
-
73
-
74
 |
 |
