D-Link DHN-1000 Product Manual
D-Link DHN-1000 Manual
 |
View all D-Link DHN-1000 manuals
Add to My Manuals
Save this manual to your list of manuals |
D-Link DHN-1000 manual content summary:
- D-Link DHN-1000 | Product Manual - Page 1
DHN-1000 HomeLink PhoneLine to Ethernet Bridge User's Manual - D-Link DHN-1000 | Product Manual - Page 2
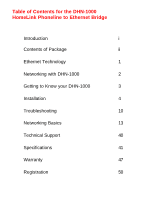
of Contents for the DHN-1000 HomeLink Phoneline to Ethernet Bridge Introduction i Contents of Package ii Ethernet Technology 1 Networking with DHN-1000 2 Getting to Know your DHN-1000 3 Installation 4 Troubleshooting 10 Networking Basics 13 Technical Support 40 Specifications 41 - D-Link DHN-1000 | Product Manual - Page 3
for purchasing D-Link's DHN-1000 HomeLink Phoneline to Ethernet Bridge. The DHN-1000 simplifies Ethernet to Home phone line networking. Being compatible with HPNA 2.0, Internet sharing has never been easier through your Broadband Cable/xDSL modems. A stand-alone device, the DHN-1000 is completely - D-Link DHN-1000 | Product Manual - Page 4
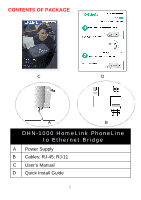
CONTENTS OF PACKAGE C D A B DHN-1000 HomeLink PhoneLine to Ethernet Bridge A Power Supply B Cables: RJ-45; RJ-11 C User's Manual D Quick Install Guide ii - D-Link DHN-1000 | Product Manual - Page 5
ETHERNET TECHNOLOGY Networking today has opened a whole new world in data communications. Networking is simply connecting individual computers in a way so that they can share resources such as files, applications, and peripherals connected to the Local Area network (LAN). The most popular and cost - D-Link DHN-1000 | Product Manual - Page 6
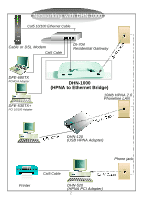
Networking with DHN-1000 Cat5 10/100 Ethernet Cable Cable or DSL Modem Cat5 Cable DI-704 Residential Gateway DFE-680TX PCMCIA Adapter DFE-530TX+ PCI 10/100 Adapter DHN-1000 (HPNA to Ethernet Bridge) 10Mb HPNA 2.0 Phoneline LAN DHN-120 (USB HPNA Adapter) Printer Phone jack Cat5 Cable DHN-520 ( - D-Link DHN-1000 | Product Manual - Page 7
BRIDGE Power Supply Port RJ-45 Port 10/100 Mb Ethernet Switch RJ-11 Port (HPNA) HPNA 2.0 LAN Power HPNA 2.0 RJ-11 port. Connect to your RJ-11 tele phone line outlet. Connect to an Ethernet PC or Residential Gateway 10/100Mb RJ-45 port. Connect your power suply to your DHN-1000 Bridge - D-Link DHN-1000 | Product Manual - Page 8
INSTALLATION Step 1: RJ-45 Cable RJ-11 Cable (Ethernet) (telephone) Figure 1 - Gently insert the RJ-45 Cat5 cable into DHN-1000 4 - D-Link DHN-1000 | Product Manual - Page 9
INSTALLATION continued Step 2: Figure 2 - Insert RJ-11 into HomePNA Port 5 - D-Link DHN-1000 | Product Manual - Page 10
INSTALLATION continued Step 3: Figure 3 - Install DHN-520 HomePNA adapter into the PC and connect RJ-11 6 - D-Link DHN-1000 | Product Manual - Page 11
INSTALLATION continued Step 4: Figure 4 - Connect the RJ-11 phone line from your DHN-1000 to your existing phone line outlet. 7 - D-Link DHN-1000 | Product Manual - Page 12
INSTALLATION continued Step 5: Residential Gateway RJ-45 cable DHN 1000 Figure 5- Connect the DHN-1000 Ethernet port to a DI-704 Residential Gateway. 8 - D-Link DHN-1000 | Product Manual - Page 13
INSTALLATION continued Figure 6 - DHN-1000 Indicator lights DHN-1000 HomePNA Ethernet Bridge l Power indicator l Ethernet port indicator l HPNA HomePNA port l Activity indicator, (when blinking it shows network activity) 9 - D-Link DHN-1000 | Product Manual - Page 14
approach to trouble shooting a network problem is to start at the very simplest level and work your way up. On the following pages we have covered common troubleshooting situations. Please read the following section. (Please see the disclaimer on page 43). UNDERSTANDING INDICATORS DHN-1000 HomePNA - D-Link DHN-1000 | Product Manual - Page 15
TROUBLESHOOTING Problem 1: The LEDs on my DHN-1000 are not lighting up. Solutions · l Make sure the DHN-1000 bridge is plugged into a power strip. · l Make sure that your HPNA network does not exceed 1,000 feet. If your HPNA PC's are more than 1,000 feet - D-Link DHN-1000 | Product Manual - Page 16
TROUBLESHOOTING Problem the DHN-1000 Ethernet port. The DHN-1000 will auto-detect a "straight-through" or "cross-over" cable, and make the appropriate connections. Problem 4: 150 meters (500 feet). However, due to phone line conditions, DLink recommends 5 to 10 PC's on your HPNA network. Note: After - D-Link DHN-1000 | Product Manual - Page 17
new ones. However, this section is not intended to be a comprehensive guide to networking, it is just an outline of a few networking basics. If you D-Link Systems, Inc. http://www.dlink.com D-Link is one of the largest manufacturers of Ethernet products in the world. D-Link's technological - D-Link DHN-1000 | Product Manual - Page 18
NETWORKING BASICS Computer Identification If you had previously given your Windows 98 computers names or if you are using Windows 98, you may need to verify that each computer has a unique name and common workgroup name. A. On your Desktop, right-click the icon "Network Places" and select " - D-Link DHN-1000 | Product Manual - Page 19
NETWORKING BASICS Computer Identification C. Type a unique, identifying name for this particular computer in the "Computer name:" box. This will be the name that other computers on your network will use to communicate with this computer. Each computer's name must be unique on a particular network or - D-Link DHN-1000 | Product Manual - Page 20
NETWORKING BASICS Sharing Files With your computers connected together on a network, you may now open and save files on another computer. You will be able to specify particular folders or disk drives to "share" and even password protect them. The steps below will enable you to share specific files - D-Link DHN-1000 | Product Manual - Page 21
NETWORKING BASICS Sharing Files D. Click to place a check mark next to "I want to be able to give others access to my files." E. Click "OK" on the "File and Print Sharing" dialog box. F. Click "OK" on the "Network" dialog box. G. Provide the Windows 98 installation CD or diskette(s) if prompted or - D-Link DHN-1000 | Product Manual - Page 22
NETWORKING BASICS Sharing Files H. You will now be able to identify a particular folder or disk drive to share. You may want to share a folder that both you and a colleague/family member needs to access occasionally. Or, maybe you want to share a CD-ROM drive so your other computer that does not - D-Link DHN-1000 | Product Manual - Page 23
NETWORKING BASICS Sharing Files K. Select "Share As:" to set the parameters for sharing this particular disk drive or folder. L. The "Share Name:" box is used to identify the disk drive or folder you are sharing to other computers on the network. You can give it any name you wish. However, a - D-Link DHN-1000 | Product Manual - Page 24
NETWORKING BASICS Sharing Files O. "Passwords:" allow you to apply a level of security to your shared disk drives and folders. Another computer (user) will be required to enter the password you designate here before accessing the disk drive or folder. Two passwords are used to give two levels of - D-Link DHN-1000 | Product Manual - Page 25
NETWORKING BASICS Sharing Files Q. You may now access this disk drive or folder from another computer on your network. Do so by double-clicking the "My Network Places" icon on your desktop or inside Windows Explorer. R. Navigate to the computer with the shared disk drive or folder (recognized by the - D-Link DHN-1000 | Product Manual - Page 26
NETWORKING BASICS Sharing Printers "Sharing" a printer connected to one computer with other computers on you network can be very convenient - allowing you to print from any computer on the network. The steps below will enable you to print with other computers on your network. A. On your Desktop, - D-Link DHN-1000 | Product Manual - Page 27
NETWORKING BASICS Sharing Printers B. Click the "File and Print Sharing·" button. C. Click to place a check mark next to "I want to be able to allow others to print to my printer(s)." D. Click "OK" on the "File and Print Sharing" dialog box. E. Click "OK" on the "Network" dialog box. 23 - D-Link DHN-1000 | Product Manual - Page 28
NETWORKING BASICS Sharing Printers F. You may now share any installed printers connected to this computer with other computers on your network. From the Start select Setting then select "Printers". Right click on the printer you want to share with others on the network and select "Sharing·" G. Click - D-Link DHN-1000 | Product Manual - Page 29
printer is connected to must be on to use the printer. If you find this inconvenient, devices known as Network Print Servers are available from D-Link including the DP-301 and DP-101P. A Network Print Server would allow you to directly connect your printer to your network without worrying about - D-Link DHN-1000 | Product Manual - Page 30
NETWORKING BASICS How to Install TCP/IP Go to START > Settings > Control Panel Double click on "Network". 26 - D-Link DHN-1000 | Product Manual - Page 31
NETWORKING BASICS How to Install TCP/IP Select the "D-Link DHN-520 10Mb Home Phoneline NIC" Click on "Add" Select "Protocol" Click "Add" 27 - D-Link DHN-1000 | Product Manual - Page 32
NETWORKING BASICS How to Install TCP/IP Select "Microsoft" Scroll down and Select "TCP/IP" Click "Ok" Now the "TCP/IP for D-Link DHN-520 HPNA Adapter" will be available. The TCP/IP Installation is now complete. 28 - D-Link DHN-1000 | Product Manual - Page 33
NETWORKING BASICS Configuring a Dynamic IP Address When the drivers are installed, the default setting is set to obtain IP dynamically through a DHCP server. If you need to check or change the settings, then do the following: Go to START > Settings > Control Panel Double Click on "Network" 29 - D-Link DHN-1000 | Product Manual - Page 34
NETWORKING BASICS Configuring a Dynamic IP Address Highlight TCP/IP for the DHN-520 Click on "Properties" NOTE: If TCP/IP is not present see Section 1: "How to Install TCP/IP". 30 - D-Link DHN-1000 | Product Manual - Page 35
NETWORKING BASICS Configuring a Dynamic IP Address When the TCP/IP window opens, choose "IP Address" tab. Select "Obtain an IP Address Automatically" Click "OK" When the network properties window comes back up, click "OK". Windows will ask you to reboot and click "Yes". 31 - D-Link DHN-1000 | Product Manual - Page 36
NETWORKING BASICS Configuring a Static IP Address Go to START > Settings > Control Panel Double Click on "Network" 32 - D-Link DHN-1000 | Product Manual - Page 37
NETWORKING BASICS Configuring a Static IP Address Highlight TCP/IP for the DHN-520 Scroll down if you cannot see it Click on "Properties" NOTE: If TCP/IP is not present see Section 1: "How to Install TCP/IP". 33 - D-Link DHN-1000 | Product Manual - Page 38
NETWORKING BASICS Configuring a Static IP Address When the "TCP/IP Properties" window opens, choose "IP Address" tab Select "Specify an IP address" Enter an IP address into the empty field. NOTE: IP Addresses must be assigned sequentially to each computer. Suggested Subnet Mask of 255.255.255.0 - D-Link DHN-1000 | Product Manual - Page 39
NETWORKING BASICS Checking TCP/IP Address of the Wireless Adapter Click on the Start button and click "Run". Figure 11 - Start > Run 35 - D-Link DHN-1000 | Product Manual - Page 40
NETWORKING BASICS Checking TCP/IP Address of the Wireless Adapter Type "winipcfg" in the "Open" box. Click "OK". The IP Configuration screen will be displayed. The IP address will be displayed in the IP Address box. 36 - D-Link DHN-1000 | Product Manual - Page 41
NETWORKING BASICS Checking TCP/IP Address Click on "More Info" to display additional IP information. 37 - D-Link DHN-1000 | Product Manual - Page 42
NETWORKING BASICS Checking the Connection by Pinging Click on the Start button and click "Run". Type "command" in the "Open" box. Click "OK" to get to a DOS prompt. 38 - D-Link DHN-1000 | Product Manual - Page 43
NETWORKING BASICS Checking the Connection by Pinging Type "ping 192.168.0.3", which is the IP address of the Gateway in this case, and hit the "Enter" key. A successful ping will show four replies 39 - D-Link DHN-1000 | Product Manual - Page 44
over the Telephone: (800) 361-5265 Monday to Friday 7:30am to 12:00am EST D-Link Technical Support over the Internet: http://support.dlink.ca email:[email protected] When contacting technical support, please provide the following information: · Serial number of the unit · Model number or product - D-Link DHN-1000 | Product Manual - Page 45
TECHNICAL SPECIFICATIONS Product Name: D-Link DHN-1000 Standards: l HomePNA 1.0 l HomePNA 2.0 l IEEE 802.3; IEEE 802.3u : Ports: l RJ-11 l RJ-45 Speed: l 1MB HomePNA 1.0 l 10MB HomePNA 2.0 l· 10BaseT 10 or 20 Mbps l 100BaseTX 100 - D-Link DHN-1000 | Product Manual - Page 46
refund the actual purchase price paid. Any repair or replacement will be rendered by DLink at an Authorized D-Link Service Office. The replacement hardware need not be new or have an identical make, model or part. D-Link may, at its option, replace the defective Hardware or any part thereof with any - D-Link DHN-1000 | Product Manual - Page 47
registered. • The customer must obtain a Case ID Number from D-Link Technical Support at 1877-453-5465, who will attempt to assist the customer in outside of the package. Do not include any manuals or accessories in the shipping package. DLink will only replace the defective portion of the product - D-Link DHN-1000 | Product Manual - Page 48
for repair, and shipping costs; Operational adjustments covered in the operating manual for the product, and normal maintenance; Damage that occurs in shipment, company, we recommend that you use only an Authorized D-Link Service Office. Improper or incorrectly performed maintenance or repair voids - D-Link DHN-1000 | Product Manual - Page 49
can radiate radio frequency energy and, if not installed and used in accordance with the instructions, may cause harmful interference to radio communication. However, there is no guarantee that products purchased outside the United States, please contact the corresponding local D-Link office. - D-Link DHN-1000 | Product Manual - Page 50
Registration Product registration is entirely voluntary and failure to complete or return this form will not diminish your warranty rights.
-
 1
1 -
 2
2 -
 3
3 -
 4
4 -
 5
5 -
 6
6 -
 7
7 -
8
-
9
-
10
-
11
-
12
-
13
-
14
-
15
-
16
-
17
-
18
-
19
-
20
-
21
-
22
-
23
-
24
-
25
-
26
-
27
-
28
-
29
-
30
-
31
-
32
-
33
-
34
-
35
-
36
-
37
-
38
-
39
-
40
-
41
-
42
-
43
-
44
-
45
-
46
-
47
-
48
-
49
-
50
 |
 |

DHN-1000
HomeLink PhoneLine
to Ethernet Bridge
User's Manual