D-Link DIR-657 Product Manual - Page 67
Wi-Fi Protected Setup (WPS - user guide
 |
View all D-Link DIR-657 manuals
Add to My Manuals
Save this manual to your list of manuals |
Page 67 highlights
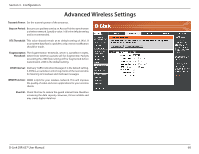
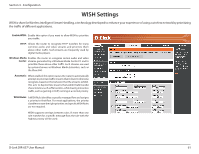
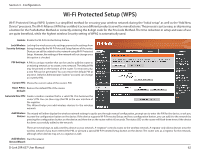
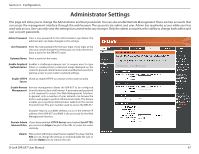
Section 3 - Configuration Wi-Fi Protected Setup (WPS) Wi-Fi Protected Setup (WPS) System is a simplified method for securing your wireless network during the "Initial setup" as well as the "Add New Device"processes. The Wi-Fi Alliance (WFA) has certified it across different products as well as manufactures. The process is just as easy, as depressing a button for the Push-Button Method or correctly entering the 8-digit code for the Pin-Code Method. The time reduction in setup and ease of use are quite beneficial, while the highest wireless Security setting of WPA2 is automatically used. Enable: Enable the Wi-Fi Protected Setup feature. Lock Wireless Locking the wireless security settings prevents the settings from Security Settings: being changed by the Wi-Fi Protected Setup feature of the router. Devices can still be added to the network using Wi-Fi Protected Setup. However, the settings of the network will not change once this option is checked. PIN Settings: A PIN is a unique number that can be used to add the router to an existing network or to create a new network. The default PIN may be printed on the bottom of the router. For extra security, a new PIN can be generated. You can restore the default PIN at any time. Only the Administrator ("admin" account) can change or reset the PIN. Current PIN: Shows the current value of the router's PIN. Reset PIN to Restore the default PIN of the router. Default: Generate New PIN: Create a random number that is a valid PIN. This becomes the router's PIN. You can then copy this PIN to the user interface of the registrar. This Wizard helps you add wireless devices to the wireless network. Add Wireless The wizard will either display the wireless network settings to guide you through manual configuration, prompt you to enter the PIN for the device, or ask you Station: to press the configuration button on the device. If the device supports Wi-Fi Protected Setup and has a configuration button, you can add it to the network by pressing the configuration button on the device and then the on the router within 60 seconds. The status LED on the router will flash three times if the device has been successfully added to the network. There are several ways to add a wireless device to your network. A "registrar" controls access to the wireless network. A registrar only allows devices onto the wireless network if you have entered the PIN, or pressed a special Wi-Fi Protected Setup button on the device. The router acts as a registrar for the network, although other devices may act as a registrar as well. Add Wireless Start the wizard. Device Wizard: D-Link DIR-657 User Manual 62
-
 1
1 -
2
-
3
-
4
-
5
-
6
-
7
-
8
-
9
-
10
-
11
-
12
-
13
-
14
-
15
-
16
-
17
-
18
-
19
-
20
-
21
-
22
-
23
-
24
-
25
-
26
-
27
-
28
-
29
-
30
-
31
-
32
-
33
-
34
-
35
-
36
-
37
-
38
-
39
-
40
-
41
-
42
-
43
-
44
-
45
-
46
-
47
-
48
-
49
-
50
-
51
-
52
-
53
-
54
-
55
-
56
-
57
-
58
-
59
-
60
-
61
-
 62
62 -
 63
63 -
 64
64 -
 65
65 -
 66
66 -
 67
67 -
 68
68 -
 69
69 -
 70
70 -
 71
71 -
 72
72 -
73
-
74
-
75
-
76
-
77
-
78
-
79
-
80
-
81
-
82
-
83
-
84
-
85
-
86
-
87
-
88
-
89
-
90
-
91
-
92
-
93
-
94
-
95
-
96
-
97
-
98
-
99
-
100
-
101
-
102
-
103
-
104
-
105
-
106
-
107
-
108
-
109
-
110
-
111
-
112
-
113
-
114
-
115
-
116
-
117
-
118
-
119
-
120
-
121
-
122
-
123
-
124
-
125
-
126
 |
 |
