D-Link DKVM-8E Product Manual - Page 11
Step 7, Attach the power supply to the DKVM-8E unit and plug
 |
UPC - 790069240249
View all D-Link DKVM-8E manuals
Add to My Manuals
Save this manual to your list of manuals |
Page 11 highlights
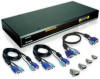
Step 7 Connect the first computer's keyboard cable to the DKVM-8E. Using another PS/2 cable connect one end to PS/2 keyboard port on the computer, and the other end to the PC1 keyboard port on the back of DKVM-8E. If your computer has an AT type keyboard port, you will need a PS/2 to AT keyboard adapter. Back of PC Step 8 Double-check all of the connections. Make sure the keyboard and mouse cables go to the correct ports. Step 9 Repeat step 5 to 8 for the remainder of the computers. Step 10 Attach the power supply to the DKVM-8E unit and plug the other end into an electrical receptacle. Now you will see the LED for Port 1 light up, and you will hear a beep. Switch on your monitor. - 9 -
-
 1
1 -
2
-
3
-
4
-
5
-
 6
6 -
 7
7 -
 8
8 -
 9
9 -
 10
10 -
 11
11 -
 12
12 -
 13
13 -
 14
14 -
 15
15 -
 16
16 -
17
-
18
-
19
-
20
-
21
-
22
-
23
-
24
-
25
-
26
-
27
-
28
-
29
-
30
-
31
-
32
-
33
-
34
-
35
-
36
-
37
-
38
-
39
-
40
-
41
 |
 |

- 9 -
Step 7
Connect the first computer’s keyboard cable to the
DKVM-8E. Using another PS/2 cable connect one end to
PS/2 keyboard port on the computer, and the other end to
the PC1 keyboard port on the back of DKVM-8E. If your
computer has an AT type keyboard port, you will need a
PS/2 to AT keyboard adapter.
Step 8
Double-check all of the connections. Make sure the
keyboard and mouse cables go to the correct ports.
Step 9
Repeat step 5 to 8 for the remainder of the computers.
Step 10
Attach the power supply to the DKVM-8E unit and plug the
other end into an electrical receptacle. Now you will see
the LED for Port 1 light up, and you will hear a beep.
Switch on your monitor.
Back of PC