D-Link DSL-G604T Product Manual - Page 51
Static Routing
 |
UPC - 790069265662
View all D-Link DSL-G604T manuals
Add to My Manuals
Save this manual to your list of manuals |
Page 51 highlights
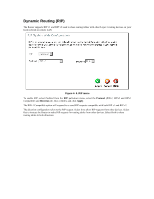
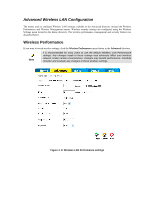
A DoS "denial-of-service" attack is characterized by an explicit attempt by attackers to prevent legitimate users of a service from using that service. Examples include: attempts to "flood" a network, thereby preventing legitimate network traffic, attempts to disrupt connections between two machines, thereby preventing access to a service, attempts to prevent a particular individual from accessing a service, or, attempts to disrupt service to a specific system or person. Port scan protection is designed to block attempts to discover vulnerable ports or services that might be exploited in an attack from the WAN. The Service Filtering options allow you to block FTP, Telnet response, Pings, etc, from the external network. Check the category you want to block to enable filtering of that type of packet. When you have selected the desired Firewall policies, click the Apply button to enforce the policies. Remember to save any configuration changes. Static Routing Use Static Routing to specify a route used for data traffic within your Ethernet LAN or to route data on the WAN. This is used to specify that all packets destined for a particular network or subnet use a predetermined gateway. Figure 4-5. Static Routing menu To add a static route to a specific destination IP on the local network, enter a Destination IP address, Netmask, click the Gateway radio button and type in the Gateway's IP address. Click Apply to enter the new static route in the table below. The route becomes active immediately upon creation. To add a static route to a specific destination IP on the WAN, click the Connection radio button and choose a connection from the pull-down menu, then enter a Destination IP address and Netmask. Click Apply to enter the new static route in the table below. The route becomes active immediately upon creation To remove a static route from the table in the bottom half of the window, choose to Delete it from the table and click the Apply button. Remember to save the configuration changes.
-
 1
1 -
2
-
3
-
4
-
5
-
6
-
7
-
8
-
9
-
10
-
11
-
12
-
13
-
14
-
15
-
16
-
17
-
18
-
19
-
20
-
21
-
22
-
23
-
24
-
25
-
26
-
27
-
28
-
29
-
30
-
31
-
32
-
33
-
34
-
35
-
36
-
37
-
38
-
39
-
40
-
41
-
42
-
43
-
44
-
45
-
 46
46 -
 47
47 -
 48
48 -
 49
49 -
 50
50 -
 51
51 -
 52
52 -
 53
53 -
 54
54 -
 55
55 -
 56
56 -
57
-
58
-
59
-
60
-
61
-
62
-
63
-
64
-
65
-
66
-
67
-
68
-
69
-
70
-
71
-
72
-
73
-
74
-
75
-
76
-
77
-
78
-
79
 |
 |
