D-Link DSL-G604T Product Manual - Page 74
Using DHCP, Changing the IP Address of the Router
 |
UPC - 790069265662
View all D-Link DSL-G604T manuals
Add to My Manuals
Save this manual to your list of manuals |
Page 74 highlights
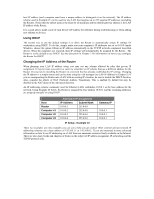
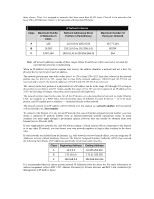
host IP address (each computer must have a unique address to distinguish it on the network). The IP address scheme used in Example #1 can be used for any LAN that requires up to 253 separate IP addresses (excluding the Router). Notice that the subnet mask is the same for all machines and the default gateway address is the LAN IP address of the Router. It is a good idea to make a note of each device's IP address for reference during troubleshooting or when adding new stations or devices. Using DHCP The second way to use the default settings is to allow the Router to automatically assign IP settings for workstation using DHCP. To do this, simply make sure your computer's IP addresses are set to 0.0.0.0 (under Windows, choose the option Obtain an IP address automatically in the TCP/IP network component described above). When the computers are restarted, their IP settings will automatically be assigned by the Router. The Router is set by default to use DHCP. See the discussion in Chapter 3 for information on how to use configure the Router for DHCP. Changing the IP Address of the Router When planning your LAN IP address setup, you may use any scheme allowed by rules that govern IP assignment. It may be more convenient or easier to remember an IP scheme that use a different address for the Router. Or you may be installing the Router on a network that has already established the IP settings. Changing the IP address is a simple matter and can be done using the web manager (see LAN IP Address in Chapter 5). If you are incorporating the Router into a LAN with an existing IP structure, be sure to disable the DHCP function. Also, consider the effects of NAT (Network Address Translation). This is enabled by default but may be disabled in the NAT menu of the Advanced directory. An IP addressing scheme commonly used for Ethernet LANs establishes 10.0.0.1 as the base address for the network. Using Example #2 below, the Router is assigned the base address 10.0.0.1 and the remaining addresses are assigned manually or using DHCP. Host Router Computer #1 Computer #2 Computer #3 Alternative IP Assignment IP Address Subnet Mask 10.0.0.1 255.0.0.0 10.0.0.2 255.0.0.0 10.0.0.3 255.0.0.0 10.0.0.4 255.0.0.0 Gateway IP 10.0.0.1 10.0.0.1 10.0.0.1 IP Setup - Example #2 These two examples are only examples you can use to help you get started. Other common private network IP addressing schemes use a base address of 192.168.1.1 or 192.168.0.1. If you are interested in more advanced information on how to use IP addressing on a LAN there are numerous resources freely available on the Internet. There are also many books and chapters of books on the subject of IP address assignment, IP networking and the TCP/IP protocol suite.
-
 1
1 -
2
-
3
-
4
-
5
-
6
-
7
-
8
-
9
-
10
-
11
-
12
-
13
-
14
-
15
-
16
-
17
-
18
-
19
-
20
-
21
-
22
-
23
-
24
-
25
-
26
-
27
-
28
-
29
-
30
-
31
-
32
-
33
-
34
-
35
-
36
-
37
-
38
-
39
-
40
-
41
-
42
-
43
-
44
-
45
-
46
-
47
-
48
-
49
-
50
-
51
-
52
-
53
-
54
-
55
-
56
-
57
-
58
-
59
-
60
-
61
-
62
-
63
-
64
-
65
-
66
-
67
-
68
-
 69
69 -
 70
70 -
 71
71 -
 72
72 -
 73
73 -
 74
74 -
 75
75 -
 76
76 -
 77
77 -
 78
78 -
 79
79
 |
 |
