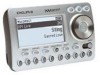
DELPHI SA10101 Installation Guide - Page 13
Routing the Cable - parts
 |
UPC - 956235124205
View all DELPHI SA10101 manuals
Add to My Manuals
Save this manual to your list of manuals |
Page 13 highlights
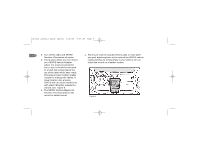
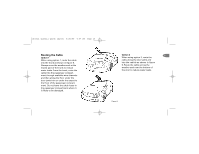
SKYFi2 install guide layout 6/20/06 4:47 PM Page 14 Routing the Cable Option 1 When using option 1, route the cable into the trunk as shown in figure 6. Always cross the weather seal at the lowest part of the trunk to reduce water leaks. From the trunk, route the cable into the passenger compartment through available wire channels and then along the floor under the door jamb trim or under the carpet to the front of the passenger compartment. Do not leave the cable loose in the passenger compartment where it is likely to be damaged. Option 2 1 3 When using option 2, route the cable along the door jamb and into the vehicle as shown in figure 6. Route the cable across the weather seal near the bottom of the door to reduce water leaks. Figure 6.
-
 1
1 -
2
-
3
-
4
-
5
-
6
-
7
-
 8
8 -
 9
9 -
 10
10 -
 11
11 -
 12
12 -
 13
13 -
 14
14 -
 15
15 -
 16
16 -
 17
17 -
 18
18 -
19
-
20
 |
 |
