DELPHI SA10226 User Guide - Page 9
Mounting Your SKYFi, Swivel Mount, Vent Mount - vehicle kit
 |
UPC - 689604165287
View all DELPHI SA10226 manuals
Add to My Manuals
Save this manual to your list of manuals |
Page 9 highlights
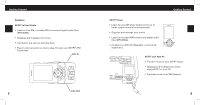
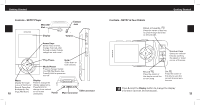
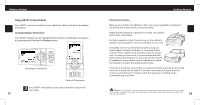
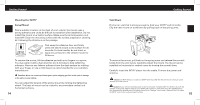
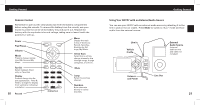
Getting Started Mounting Your SKYFi3 Swivel Mount Find a suitable location on the dash of your vehicle; the mount uses a strong adhesive and could be difficult to reposition after installation. Do not install this mount on a leather surface. Make sure the air temperature is at least 60°F. Clean the mounting surface with the surface preparation cleaning kit, following the directions on the package. Peel away the adhesive liner and firmly press the swivel mount to the surface for 30 seconds. For best results, do not touch or 5V DC ANT apply any pressure to the vehicle mount for 24 hours. To remove the mount, lift the adhesive pad with your fingers or a spoon. You may warm it with a hair dryer for 2 to 3 minutes to help soften the adhesive. Remove any leftover adhesive from the dash surface by rubbing with your finger, or use a mild cleaner as recommended by your vehicle's manufacturer. Caution: Never use a commercial heat gun or paint-stripping gun. This could result in damage to the unit or to your vehicle. You can adjust the tension of the swivel mount by turning the tightening wheel. The base of mount can be rotated to accommodate vertical and horizontal surfaces. 14 Getting Started Vent Mount Find an air vent that is strong enough to hold your SKYFi3 and its cradle. Clip the vent mount on to the vent by pulling back on the spring arms. To remove the mount, pull back on the spring arms and release the mount's hooks from the vent vanes. Carefully extract the mount. The mount can be installed on horizontal or vertical vanes by turning the mount's base. Carefully insert the SKYFi3 player into the cradle. Connect the power and antenna. Caution: DO NOT attempt to rotate your SKYFI3 while mounted with the vent mount. Doing so could damage your vent louvers. Caution: If your vehicle maintains power to the 12 volt power recepticle after the vehicle is shut off (the red light on the power adapter stays lit), your SKYFI3 will continue to draw power from the vehicle's battery. You can enable the delayed power off feature (found in the "Settings" menu under "Date and Time") to make the SKYFI3 turn off after a selected period of time. 15
-
 1
1 -
2
-
3
-
 4
4 -
 5
5 -
 6
6 -
 7
7 -
 8
8 -
 9
9 -
 10
10 -
 11
11 -
 12
12 -
 13
13 -
 14
14 -
15
-
16
-
17
-
18
-
19
-
20
-
21
-
22
-
23
-
24
-
25
-
26
-
27
-
28
-
29
-
30
-
31
-
32
-
33
-
34
-
35
-
36
-
37
-
38
 |
 |
