Dacor ER48D Use & Care Manuals - Page 9
Control Panel Layout
 |
View all Dacor ER48D manuals
Add to My Manuals
Save this manual to your list of manuals |
Page 9 highlights
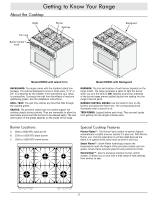
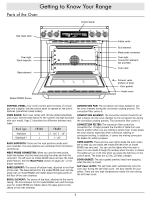
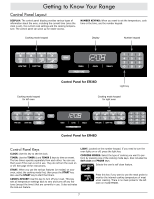
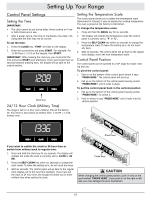
Getting to Know Your Range Control Panel Layout DISPLAY: The control panel display provides various types of information about the oven, including the current time (once the clock is set), the current cook settings and the cooking temperature. The control panel can pivot up for easier access. NUMBER KEYPAD: When you want to set the temperature, cook time or the time, use the number keypad. Cooking mode keypad Display Number keypad Cooking mode keypad for left oven Control Panel for ER36D Light key Cooking mode keypad for right oven Control Panel for ER48D Control Panel Keys CLOCK: Use this key to set the clock. TIMER: Use the TIMER 1 and TIMER 2 keys to time an event. The two timers operate separately from each other. You can use them even if the oven is not in use. They do not turn the oven on or off. See page 18 for instructions. START: When you use the various features (or modes) on your oven, select the cooking mode first, then press the START key. Also use the START key to start the timers. CANCEL-SECURE: Use this key to turn off your oven. This key sets all temperature settings back to zero and turns off any features (except the timer) that are currently in use. It also activates the lock-out feature. LIGHT: Located on the number keypad. If you need to turn the oven lights on or off, press the light key. COOKING MODES: Select the type of cooking you want to perform by pressing one of the cooking mode keys. Also includes the Self clean and PROBE keys. Selects the oven's self clean feature. Press this key if you want to use the meat probe to monitor the internal cooking temperature of meat when roasting. There is no meat probe for the left oven on model ER48D. 7
-
 1
1 -
2
-
3
-
 4
4 -
 5
5 -
 6
6 -
 7
7 -
 8
8 -
 9
9 -
 10
10 -
 11
11 -
 12
12 -
 13
13 -
 14
14 -
15
-
16
-
17
-
18
-
19
-
20
-
21
-
22
-
23
-
24
-
25
-
26
-
27
-
28
-
29
-
30
-
31
-
32
-
33
-
34
-
35
-
36
-
37
-
38
-
39
-
40
 |
 |
