Dacor RV30 Installation Instructions - Page 13
Installing the Vent in the Cutout
 |
View all Dacor RV30 manuals
Add to My Manuals
Save this manual to your list of manuals |
Page 13 highlights
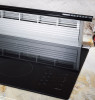
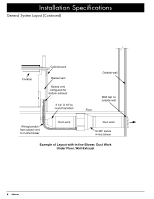
Installation Instructions Installing the Vent in the Cutout NOTE: The raised vent installs in the back of the cutout, separate from the cooktop. It is installed prior to final installation of the cooktop. Installing the Raised Vent 1. Cut a hole in the cabinet to allow the duct work to pass through to the floor or wall for the planned duct system layout. Use the dimensions on pages 3 and 8 to determine the hole center line locations. Rear corner of cutout (back of raised vent) plumbed down ILHSF or REMP Series Blower Installation If using a ILHSF or REMP series blower, install it according to the blower installation instructions. Cabinet Blower Installation If using cabinet blower (model CABP3): 1. Locate the foam tape supplied with the raised vent. Place the blower on the floor in the orientation it will be mounted on the front of the raised vent. Peel the backing off the tape and attach it to the right and left flanges of the blower base plate. 2. Remove and retain the three (3) wing nuts from the top retainer bracket on the front of the unit. Remove the bracket. 3. Slide the bottom flange of the blower base plate into the bottom of the retaining bracket with the blower exhaust in the desired orientation. 4. Cover the opening on the front of the unit by pushing the blower against it. Make sure that the foam tape on both sides of the base plate creates a good seal on the right and left side of the opening. Center the blower base plate horizontally over the opening on the front of the raised vent. IMPORTANT: To prevent interference with the internal moving parts, make sure the blower assembly is properly centered over the opening. 5. Reinstall the top vent retainer bracket over the blower base plate flange. Secure it in place with the three (3) wing nuts removed in step 2. Possible Duct Hole Locations 2. Gently slide the vent into the rear of the countertop cut- out with the electrical access panel toward the front. 3. Adjust the anchoring leg height so that the end caps are gently resting on the counter, then tighten the hex nuts. 4. Secure the anchoring legs to the cabinet floor with the supplied wood screws. Flange Top retainer bracket Anchor leg Top of vent resting on countertop Front of raised vent (shown configured for use with ILHSF or REMP series blower) Electrical access panel Floor Attach foam to right/left flanges CABP3 Bottom retainer bracket Insert bottom flange into bottom retainer bracket Cabinet Blower Installation 11
-
 1
1 -
2
-
3
-
4
-
5
-
6
-
7
-
 8
8 -
 9
9 -
 10
10 -
 11
11 -
 12
12 -
 13
13 -
 14
14 -
 15
15 -
 16
16 -
 17
17 -
 18
18 -
19
-
20
 |
 |
