Danby DAC15009EE Product Manual - Page 8
Features Cont'd, Installation - window air conditioner
 |
View all Danby DAC15009EE manuals
Add to My Manuals
Save this manual to your list of manuals |
Page 8 highlights
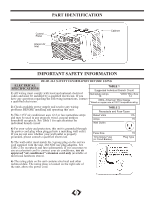
FEATURES (cont'd) ADJUSTING AIR FLOW The 4-way air directional louvers allow you to direct the air flow Up or Down and Left or Right throughout the room as needed. Recommendation: When cooling, adjust blades to face upward. If you orient the air flow blades downward and the unit operates in cool mode for long periods of time, dew may form and drip from the surface of the blades Left or Right Up or Down INSTALLATION TOOLS REQUIRED Fig. 1 • Large flat blade screwdriver • Pencil • Socket wrenches • Level • Adjustable wrench or pliers • Tape measure • Phillips screwdriver Electric Shock Hazard: To avoid the possibility of personal injury, disconnect power to the unit before installing or surfacing. BEFORE INSTALLING • Check window opening size against dimensions of your unit ( see Unit Specifications pg. 2). • Check condition of window; all wood parts of window must be in good shape and able to firmly hold the needed screws. If not, make repairs before installing unit. • Check for anything that could block airflow; check area outside window for things such as shrubs, trees, or awnings. Inside, be sure furniture, drapes or blinds will not stop proper airflow. (See Fig. 2 pg. 7) • Carefully unpack air conditioner. Remove all packing material, and check for all included installation hardware. Fig. 1 INSTALLATION HARDWARE 7/16" locking screw & flat washer for window panels 2 each 3/4" long Hex-head 4 screw Safety Lock 1 1/2" long screw and locknut 3/4" long flat head bolt and locknut 4 each 2 each Sill Angle Bracket 2 5/6" long Hex-head locking screw 10 for top angle, side retainer. 7
-
 1
1 -
2
-
 3
3 -
 4
4 -
 5
5 -
 6
6 -
 7
7 -
 8
8 -
 9
9 -
 10
10 -
 11
11 -
 12
12 -
 13
13 -
14
-
15
-
16
-
17
-
18
-
19
-
20
-
21
-
22
-
23
-
24
-
25
-
26
 |
 |
