Danby DCR34 Product Manual - Page 3
Lista, Partes
 |
View all Danby DCR34 manuals
Add to My Manuals
Save this manual to your list of manuals |
Page 3 highlights
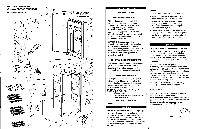
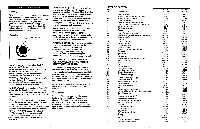
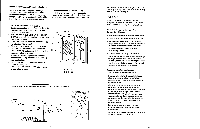
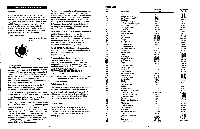
Care and Maintenance Cleaning To clean the inside, use a soft cloth and a solution of a tablespoon of baking soda to one quart of water, or a mild soap suds solution, or some mild detergent. Wash ice cube tray, drip tray, and glide out shelves in a mild detergent solution, then dry and wipe with a soft cloth. Clean the outside with a soft damp cloth and some mild detergent or appliance cleaner Defrosting Push Button Defrost Fig.B This refrigerator is equipped with a "Push Button" (semi-automatic) defrost thermostat system. To activate the defrost cycle, simply push ( in ) the red defrost button located in the center of the control knob/dial. ( do not turn the control knob/dial to zero =off } The defrost cycle is initiated immediately.When defrosting is complete, the "Push Button" will release (pop-out) automatically and resume normal operating conditions at the same temperature setting. NOTE:If the "push Button" is activated (pushed-in) accidentally, it will not be possible to "manually" pull-out the push button. (deactivate the defrost cycle) You must either let the defrost cycle run it's course or. * Apply (hold) a dishcloth soaked in hot water against the thermostat capillary fine and bracket, located on the underside of the freezer compartment. The heat transfer from the dish cloth will cause a temperature rise on the thermostat capillary, (sensing line) causing the internal contacts to close. This will resume normal operating conditions. It may take several minutes and/or repeat applications before the push button will release. Defrosting of your refrigerator should take place whenever ice build-up inside the freezer compartment reaches 1/4" (6mm) thick. Defrosting may take a few hours, depending on the amount of accumulatedice and ambient indoor temperature. To speed-up the defrosting process, remove all frozen foods from the freezer section. Leaving the door partially ajar for a "short" period of time will also speed-up the process. IMPORTANT: You must remember to close the refrigerator door before the defrost cycle terminates and normal operating conditions resume automatically. The drip tray should be in position directly below the freezer compartment to catch evaporated water during defrosting. IMPORTANT NOTICE: Never use sharp or pointed instruments to defrosVremove ice from the evaporator/freezer compartment. The evaporator/freezer compartment contains refrigerated gas lines and if accidentlly punched/pierced,will render the refrigerator inoperable and "void" the manufacturers warranty. DO NO ALLOW THE REFRIGERATOR TO CONTINUE OPERATION IF THE FREEZER COMPARTMENT IS PIERCED. After defrosting is complete,set the control to maximum for 2 to 3 hours before turning to the desired position. When the refrigerator is not to be used for a long period of time, disconnect the appliance from the electrical supply and leave the door partially open.This will help to reduce mold and mildew build-up. NOTE: Wait 3 to 5 minutes before attempting to restart the refrigerator if operation has been interrupted Vacation Time For short vacation periods, leave the control knobs at their usual settings. During longer absences, (a) remove all foods, (b) disconnect from electrical outlet, (c) clean the refrigerator thoroughly, including defrost pan, (d) leave door open to avoid possible formations of condensate, mold or odors. 3 LISTA DE PARTES ILus. No. Descripcion 1 Paleta dei huevo 2 Barre del estante superior de la puerta 3A Soporte para latas(vertedor) 38 Soporte pare latas 4 Barre del estante radio de la puerta 5 Barre del estante inferior de la puerla(2litros) 6 Junta para la puerta 7 Tornillo autorroscante 8 Repisa 9 Placa de soporte 10 Bisagra superior de fa puerta 11A Tornillo de bisagra de puerta superior e inferior 11B Arandela trabante 11C Arandela 12A Arandela trabante 12B Pasador de bisagra 13 Caja del termostato 14 Perilla de mando 15 Descongelacian da mando de baton 16 Termostato 17 Bisagra inferior 18 Arandela 19 Pie graduable 20A Tornillo de refuerzo de /a place superior 20B Arandela trabante 20C Arandela 21 Pie 22 Tomilio de pie fijo 23 Cordon de corriente 24 Brida del cordon electric° 25 Grampa de cable de carga 26 Tornillo autorroscante 27A Anaqueles dividios(1) 27B Estante de lamella grande(2) 28 Tornillo pars metales 29 Bandeja colectora de gotas 30 Caja de empalmes 31 Puerta del evaporador 32 Arandela 33 Bandeja pare cubos de hielo 34 Arandela aislante de la puerta del evaporador(2) 35 Base del compresor 36 Perno de la base del compresor 37 Arandela aislante de caucho 38 Arandela aislante de caucho 39 Arandela del pemo del compresor 40 Perno del compresor 41 Compresor 42 Protector de sobrecarga 43 Resistencia PTC 44 Tapa del rele 45 Helen de la tapa del reto 46 Seceder 47 Unidad del evaporador 48 Puerta 49 Forro para la puerta(Can Storm') 50 Tapon de bisagra (puerta) 20 DCR34W part No. 34.1 34.2 432.2A 432.2B 34.3 34.4 34.5(LG) 432.6 34.6 34.7 054.9 054.10A 054.10B 054.10C 054.10B 432.11 34.8 432.13 432.14 432.15 34.9(VV) 432.18 432.19 432.20A 432.20B 432.20C 432.21 432.22 432.23 432.26 432.27 432.28 34.10A 34.10B 432.31 34.11 432.32 34.12 432.34 432.35 432.36 054.33(W) 432.38 432.39 432.40 432.41 432.42 432.43 432.44 432.45 432.46 432.49 432.47 34.13 34.14(W) 34.15 432.54(W) DCR34BL Part No. 34.1 34.2 432.2A 432.26 34.3 34.4 34.5(6) 432.6 34.6 34.7 054.9 054.10A 054.10B 054.10C 054.10B 432.11 34.8 432.13 432.14 432.15 34.9(13L) 432.18 432.19 432.20A 432.20B 432.20C 432.21 432.22 432.23 432.26 432.27 432.28 34.10A 34.10B 432.31 34.11 432.32 34.12 432.34 432.35 432.36 054.33(BL) 432.38 432.39 432.40 432.41 432.42 432.43 432.44 432.45 432.46 432.49 432.47 34.13 34.14(614 34.15 432.54(BL)
-
 1
1 -
 2
2 -
 3
3 -
 4
4 -
 5
5 -
 6
6 -
 7
7 -
 8
8 -
 9
9 -
10
 |
 |
