Danby DPAC13009 Product Manual - Page 6
Operating Instructions
 |
View all Danby DPAC13009 manuals
Add to My Manuals
Save this manual to your list of manuals |
Page 6 highlights
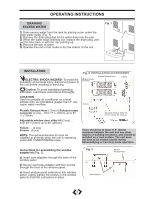
OPERATING INSTRUCTIONS DRAINING EXCESS WATER 1) Drain excess water from the tank by placing a pan under the drain water outlet. (Fig. 1) 2) Remove the drain plug and let the water drain into the pan. 3) When the water stops draining out, replace the drain plug, and put the tube back in with the clip pointing up. 4) Remove the pan of water. 5) Operate the unit in Fan mode to dry the interior of the unit. Fig. 1 INSTALLATION ELECTRIC SHOCK HAZARD: To avoid the possibility of personal injury, disconnect power to the unit before installing or servicing. Fig. 2 INSTALLATION ACCESSORIES Exhaust Nozzle Connector Flexible Exhaust Hose Fixture Caution: To avoid installation/operation difficulties, read these instructions thoroughly. LOCATION Use this portable air conditioner on a level surface only, as inclinations greater than 3° can cause water overflow. Screws Flexible Exhaust Hose (13cm) & Exhaust nozzle connector (2 pcs)... from 17 /7 10 (45cm) up to 53 1/6" (135cm) Adjustable window door slider kit (3 pcs)..... from 28 1/3"(72cm) up to 80" (203cm) Fixture..... (2 pcs) Screws...(8 pcs) NOTE: The exhaust/window kit must be installed at all times when the unit is operating under AIR CONDITIONING mode. Adjustable Window Slider Kit: 28 1/3" (72cm)- 80" (203cm) There should be at least 11.8" (30cm) clearance between the unit and any other objects or building structures, and should be installed on a level surface. The unit does not have to be vented outside during Dehumidifying or Fan Only mode operation. Instructions for assembling the window adapter kit (Fig. 3). a) Insert tube adapters through the back of the window panel. b) Secure each tube adapter with four screws through the front of the window panel. c) Insert window panel extensions into window panel. Lightly tighten the screws in the window panel to hold the extensions in place. Fig. 3 Tube Adapters Back of Window Panel 5
-
 1
1 -
 2
2 -
 3
3 -
 4
4 -
 5
5 -
 6
6 -
 7
7 -
 8
8 -
 9
9 -
 10
10 -
 11
11 -
 12
12 -
13
-
14
-
15
-
16
-
17
-
18
-
19
-
20
-
21
-
22
-
23
-
24
-
25
-
26
 |
 |
