DeLonghi PAC T110P Owner Manual - Page 5
Installing your portable, air-conditioner - pinguino
 |
View all DeLonghi PAC T110P manuals
Add to My Manuals
Save this manual to your list of manuals |
Page 5 highlights
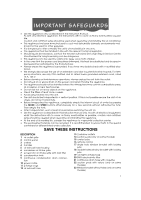
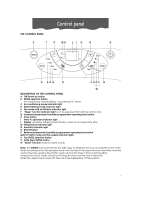
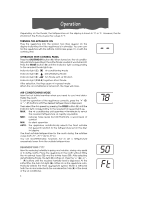
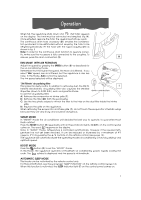
Installing your portable air-conditioner ELECTRICAL CONNECTIONS Before plugging the appliance into the electrical socket, check that: • the power supply corresponds to the value indicated on the rating plate on the back of the appliance; • the socket and electrical circuit are adequate for the appliance; • the socket matches the plug. If this is not the case, have the plug replaced; • the socket is adequately grounded. Failure to follow these important safety instructions absolves the manufacturer of all liability. The power cord must be replaced by a qualified professional only. The instructions below will enable you to prepare your air conditioning unit for operation as efficiently as possible. Before use, make sure the air intake and outlet grilles are unobstructed. NON PERMANENT INSTALLATION Just a few simple steps and your comfort is ensured with Pinguino: • Fit the air exhaust hose (12) in the housing (5) at the back of the appliance. Insert it as shown in figure A. In order to improve the performance of the appliance in air conditioning and boost (super-conditioning) modes, you can also fit the intake hose accessory (19) in its housing in the back of the appliance as shown in figure A1. This step is optional. bracket by using the locking pin then lower the window onto the bracket. Insert the window outlet (13) of the exhaust hose (12) into the slot, then connect the hose to the air conditioner (fig. B and B1). Thanks to the locking pins, it's possible to use the window bracket also for sliding windows. Position the hole of the bracket so to allow a correct installation of the exhaust hose. B B1 12 A A1 • Fit the window outlets (13) to the end of the hose (12/19). • Place the air conditioning unit near a window or French window. • Make sure the air exhaust hose is unobstructed. Keep air hoses as short and free of curves as possible to avoid constrictions. Sash window For optimum results: • If you have a sash window, place the bracket (17) or (18) according to your needs, on the window sill, extend the bracket fully within the window frame, fix the If the windows are large, use the window bar without holes (23) (if provided) to cover your window aperture, extending it to the required length, then blocking it with the locking pins supplied (see figure below). Make sure you do not cover the hole or holes for the window outlet. 2 1 3 5
-
 1
1 -
 2
2 -
 3
3 -
 4
4 -
 5
5 -
 6
6 -
 7
7 -
 8
8 -
 9
9 -
 10
10 -
 11
11 -
12
-
13
-
14
-
15
-
16
-
17
-
18
-
19
 |
 |