Dell 1600n Dell Laser Multi-Function Printer 1600n User's Guide - Page 131
Cleaning Your Multi-Function Printer, Cleaning the Exterior
 |
UPC - 708562765640
View all Dell 1600n manuals
Add to My Manuals
Save this manual to your list of manuals |
Page 131 highlights
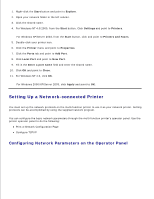
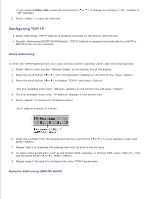
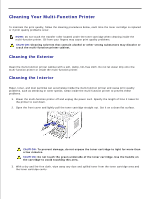
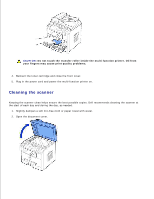
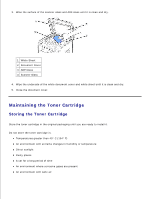
Cleaning Your Multi-Function Printer To maintain the print quality, follow the cleaning procedures below, each time the toner cartridge is replaced or if print quality problems occur. NOTE: Do not touch the transfer roller located under the toner cartridge when cleaning inside the multi-function printer. Oil from your fingers may cause print quality problems. CAUTION: Cleaning solvents that contain alcohol or other strong substances may discolor or crack the multi-function printer cabinet. Cleaning the Exterior Clean the multi-function printer cabinet with a soft, damp, lint-free cloth. Do not let water drip onto the multi-function printer or inside the multi-function printer. Cleaning the Interior Paper, toner, and dust particles can accumulate inside the multi-function printer and cause print quality problems, such as smearing or toner specks. Clean inside the multi-function printer to prevent these problems. 1. Power the multi-function printer off and unplug the power cord. Specify the length of time it takes for the printer to cool down. 2. Open the front cover and lightly pull the toner cartridge straight out. Set it on a clean flat surface. CAUTION: To prevent damage, do not expose the toner cartridge to light for more than a few minutes. CAUTION: Do not touch the green underside of the toner cartridge. Use the handle on the cartridge to avoid touching this area. 3. With a dry and lint-free cloth, wipe away any dust and spilled toner from the toner cartridge area and the toner cartridge cavity.
-
 1
1 -
2
-
3
-
4
-
5
-
6
-
7
-
8
-
9
-
10
-
11
-
12
-
13
-
14
-
15
-
16
-
17
-
18
-
19
-
20
-
21
-
22
-
23
-
24
-
25
-
26
-
27
-
28
-
29
-
30
-
31
-
32
-
33
-
34
-
35
-
36
-
37
-
38
-
39
-
40
-
41
-
42
-
43
-
44
-
45
-
46
-
47
-
48
-
49
-
50
-
51
-
52
-
53
-
54
-
55
-
56
-
57
-
58
-
59
-
60
-
61
-
62
-
63
-
64
-
65
-
66
-
67
-
68
-
69
-
70
-
71
-
72
-
73
-
74
-
75
-
76
-
77
-
78
-
79
-
80
-
81
-
82
-
83
-
84
-
85
-
86
-
87
-
88
-
89
-
90
-
91
-
92
-
93
-
94
-
95
-
96
-
97
-
98
-
99
-
100
-
101
-
102
-
103
-
104
-
105
-
106
-
107
-
108
-
109
-
110
-
111
-
112
-
113
-
114
-
115
-
116
-
117
-
118
-
119
-
120
-
121
-
122
-
123
-
124
-
125
-
 126
126 -
 127
127 -
 128
128 -
 129
129 -
 130
130 -
 131
131 -
 132
132 -
 133
133 -
 134
134 -
 135
135 -
 136
136 -
137
-
138
-
139
-
140
-
141
-
142
-
143
-
144
-
145
-
146
-
147
-
148
-
149
-
150
-
151
-
152
-
153
-
154
-
155
-
156
-
157
-
158
-
159
-
160
-
161
-
162
-
163
-
164
-
165
-
166
-
167
-
168
-
169
-
170
-
171
-
172
-
173
-
174
-
175
-
176
-
177
-
178
-
179
-
180
-
181
-
182
-
183
-
184
-
185
-
186
-
187
-
188
 |
 |