Dell 2135cn Color Laser Printer User Guide - Page 155
Option Problem
 |
View all Dell 2135cn Color Laser Printer manuals
Add to My Manuals
Save this manual to your list of manuals |
Page 155 highlights
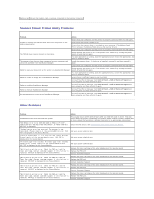
Ensure the document's paper type meets the specifications for the printer. See "Supported Paper Types" for more information. Document misfeeds or multiple feeds occur in the Automatic Document Feeder (ADF). Check whether the document is properly loaded in the ADF. Ensure that the document guides are adjusted properly. Ensure that the number of document sheets do not exceed the maximum capacity of the ADF. Ensure that the document is not curled. Fan the document well before loading it in the ADF. Vertical stripes appear on the output when scanned using the ADF. Clean the ADF glass. A smear appears at the same location on the output when scanned using the document glass. Clean the document glass. Images are skewed. Ensure that the document is loaded straight in the ADF or on the document glass. Diagonal lines appear jagged when scanned using the ADF. If the document uses thick media, try scanning it from the document glass. Message appears on your computer screen: l "Device can't be set to the H/W mode you want." l "Port is being used by another program." l "Port is Disabled." l "Scanner is busy receiving or printing data. When the current job is completed, try again." l "Invalid handle." l "Scanning has failed." There may be a copying or printing job in progress. When the current job is complete, try the job again. The selected port is currently being used. Restart your computer and try again. The printer's cable may be improperly connected or the power may be off. The scanner driver is not installed or an operating environment is not set up properly. Ensure that the port is properly connected and the power is turned on. Then restart your computer. Check if the USB cable is properly connected. Check if the following settings have been set correctly on the Dell Printer Configuration Web Tool. Scan to Network Check the following settings under Address Book ® Server Address: The printer does not properly transfer scan data to a specified destination via the Scan to E-mail or Scan to Network feature. l Server Address l Server Path l Share Name l Login Name l Login Password Scan to E-mail Check the following setting under Address Book ® E-Mail Address: l Address Cannot scan using WIA on a Windows Server 2003 computer. Enable WIA on the computer. To enable WIA: 1. Click Start, point to Administrative Tools, and then click Services. 2. Right-click Windows Image Acquisition (WIA), and then click Start. Cannot scan using TWAIN or WIA on a Windows Server 2008 computer. Install the Desktop Experience feature on the computer. To install Desktop Experience: 1. Click Start, point to Administrative Tools, and then click Server Manager. 2. Under Features Summary, click Add Features. 3. Select the Desktop Experience check box, click Next, and then click Install. 4. Restart the computer. Option Problem If an option does not operate correctly following installation or stops working: l Turn off the printer, wait for 10 seconds, and then turn on the printer. If this does not fix the problem, unplug the printer, and check the connection between the option and the printer. l Print the System Settings page to see if the option is listed in the Installed Options list. If the option is not listed, reinstall it. See "Printing a System Settings Page". l Ensure the option is selected in the printer driver you are using. The following table lists printer's option and corrective action for related problem. If the suggested corrective action does not correct the problem, call customer service. Problem Action
-
 1
1 -
2
-
3
-
4
-
5
-
6
-
7
-
8
-
9
-
10
-
11
-
12
-
13
-
14
-
15
-
16
-
17
-
18
-
19
-
20
-
21
-
22
-
23
-
24
-
25
-
26
-
27
-
28
-
29
-
30
-
31
-
32
-
33
-
34
-
35
-
36
-
37
-
38
-
39
-
40
-
41
-
42
-
43
-
44
-
45
-
46
-
47
-
48
-
49
-
50
-
51
-
52
-
53
-
54
-
55
-
56
-
57
-
58
-
59
-
60
-
61
-
62
-
63
-
64
-
65
-
66
-
67
-
68
-
69
-
70
-
71
-
72
-
73
-
74
-
75
-
76
-
77
-
78
-
79
-
80
-
81
-
82
-
83
-
84
-
85
-
86
-
87
-
88
-
89
-
90
-
91
-
92
-
93
-
94
-
95
-
96
-
97
-
98
-
99
-
100
-
101
-
102
-
103
-
104
-
105
-
106
-
107
-
108
-
109
-
110
-
111
-
112
-
113
-
114
-
115
-
116
-
117
-
118
-
119
-
120
-
121
-
122
-
123
-
124
-
125
-
126
-
127
-
128
-
129
-
130
-
131
-
132
-
133
-
134
-
135
-
136
-
137
-
138
-
139
-
140
-
141
-
142
-
143
-
144
-
145
-
146
-
147
-
148
-
149
-
 150
150 -
 151
151 -
 152
152 -
 153
153 -
 154
154 -
 155
155 -
 156
156 -
 157
157 -
 158
158 -
 159
159 -
 160
160 -
161
-
162
-
163
-
164
-
165
-
166
-
167
-
168
-
169
-
170
-
171
-
172
-
173
-
174
-
175
-
176
-
177
-
178
-
179
-
180
-
181
-
182
-
183
-
184
-
185
-
186
-
187
-
188
-
189
-
190
-
191
-
192
-
193
-
194
-
195
-
196
-
197
-
198
-
199
-
200
-
201
-
202
-
203
-
204
-
205
-
206
-
207
-
208
-
209
-
210
-
211
-
212
-
213
-
214
-
215
-
216
-
217
-
218
-
219
-
220
-
221
-
222
-
223
-
224
-
225
-
226
-
227
-
228
-
229
-
230
-
231
-
232
-
233
-
234
-
235
-
236
-
237
-
238
-
239
-
240
-
241
-
242
-
243
-
244
-
245
-
246
-
247
-
248
-
249
-
250
-
251
-
252
-
253
-
254
-
255
-
256
-
257
-
258
-
259
-
260
 |
 |
