Dell 2135cn Color Laser Printer User Guide - Page 99
Apply New Settings, Server Type, Server, Address, Server Port, Number, Login Name, Login, Password, - checks
 |
View all Dell 2135cn Color Laser Printer manuals
Add to My Manuals
Save this manual to your list of manuals |
Page 99 highlights
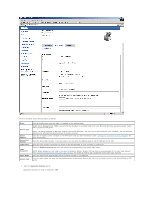
To fill in the fields, enter the information as follows: Name Server Type Server Address Server Port Number Login Name Login Password Share Name Server Path Enter a friendly name that you want it to appear on the address book. Select Server Message Block (SMB) if you storing the document in a shared folder from your Microsoft Windows operating system. Select FTP if you have a FTP server. NOTE: FTP Server depends on Microsoft Internet Information Services (IIS) and may not be installed on your computer. See the Microsoft document for detailed instructions on how to setup FTP server. Enter the IP address of the computer or the FTP server that you have shared out. (See "Locating the IP Address of Your Computer" for more information) Enter the Server Port Number. If you are unsure, you can enter the default value of 139 for SMB and 21 for FTP. Enter the user account name that has access to the shared folder on your computer or FTP server. Check on Enable Password and enter the password corresponding to the above login name. NOTE: Empty password is not valid in the Scan to Computer feature. Ensure that you have a valid password for the user login account. (See "Creating a Password for Your User Login Account" for details on how to add a password in your user login account). Enter the name of the shared folder on the recipient computer. For SMB only. Enter the path where you want the scanned document to be stored. Ensure that the path is already created in the shared folder or FTP server. 4. Click the Apply New Settings button. Example of an entry for Scan to Computer, SMB.
-
 1
1 -
2
-
3
-
4
-
5
-
6
-
7
-
8
-
9
-
10
-
11
-
12
-
13
-
14
-
15
-
16
-
17
-
18
-
19
-
20
-
21
-
22
-
23
-
24
-
25
-
26
-
27
-
28
-
29
-
30
-
31
-
32
-
33
-
34
-
35
-
36
-
37
-
38
-
39
-
40
-
41
-
42
-
43
-
44
-
45
-
46
-
47
-
48
-
49
-
50
-
51
-
52
-
53
-
54
-
55
-
56
-
57
-
58
-
59
-
60
-
61
-
62
-
63
-
64
-
65
-
66
-
67
-
68
-
69
-
70
-
71
-
72
-
73
-
74
-
75
-
76
-
77
-
78
-
79
-
80
-
81
-
82
-
83
-
84
-
85
-
86
-
87
-
88
-
89
-
90
-
91
-
92
-
93
-
 94
94 -
 95
95 -
 96
96 -
 97
97 -
 98
98 -
 99
99 -
 100
100 -
 101
101 -
 102
102 -
 103
103 -
 104
104 -
105
-
106
-
107
-
108
-
109
-
110
-
111
-
112
-
113
-
114
-
115
-
116
-
117
-
118
-
119
-
120
-
121
-
122
-
123
-
124
-
125
-
126
-
127
-
128
-
129
-
130
-
131
-
132
-
133
-
134
-
135
-
136
-
137
-
138
-
139
-
140
-
141
-
142
-
143
-
144
-
145
-
146
-
147
-
148
-
149
-
150
-
151
-
152
-
153
-
154
-
155
-
156
-
157
-
158
-
159
-
160
-
161
-
162
-
163
-
164
-
165
-
166
-
167
-
168
-
169
-
170
-
171
-
172
-
173
-
174
-
175
-
176
-
177
-
178
-
179
-
180
-
181
-
182
-
183
-
184
-
185
-
186
-
187
-
188
-
189
-
190
-
191
-
192
-
193
-
194
-
195
-
196
-
197
-
198
-
199
-
200
-
201
-
202
-
203
-
204
-
205
-
206
-
207
-
208
-
209
-
210
-
211
-
212
-
213
-
214
-
215
-
216
-
217
-
218
-
219
-
220
-
221
-
222
-
223
-
224
-
225
-
226
-
227
-
228
-
229
-
230
-
231
-
232
-
233
-
234
-
235
-
236
-
237
-
238
-
239
-
240
-
241
-
242
-
243
-
244
-
245
-
246
-
247
-
248
-
249
-
250
-
251
-
252
-
253
-
254
-
255
-
256
-
257
-
258
-
259
-
260
 |
 |
