Dell 2335dn Multifunctional Laser Printer Dell™ 2335dn MFP User's Gu - Page 147
Install the Shared Printer on Client Computers, Devices and Printers
 |
View all Dell 2335dn Multifunctional Laser Printer manuals
Add to My Manuals
Save this manual to your list of manuals |
Page 147 highlights
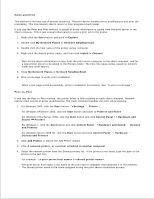
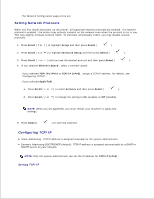
1. For Windows XP/Server 2003, click the Start button and point to Printers and Faxes . For Windows Vista/Server 2008, click the Start button and click Control Panel Hardware and Sound Printers . For Windows 7, click the Start button and click Control Panel Hardware and Sound Devices and Printers . For Windows Server 2008 R2, click the Start button and click Control Panel Hardware Devices and Printers . 2. Double-click your printer icon. 3. Click the Printer menu and point to Sharing . 4. If you are using Windows Vista, you may be prompted to change the sharing options before you can continue. Press the Change Sharing Options button, and the press Continue on the next dialog box. 5. For Windows 2000, check the Shared As box. For Windows XP/Server 2003/Server 2008/Vista/7/Server 2008 R2, check the Share this printer box. 6. Fill in the Share Name field. 7. Click Additional Drivers , and select the operating systems of all network clients printing to this printer. 8. Click OK . If you are missing files, you are prompted to insert the server operating system CD. a. Insert the DRIVERS AND UTILITIES CD , ensure that the drive letter is correct for your CD-ROM drive, and then click OK . b. If you are using Windows Vista/7: Brows to a client computer running the operating system, and then click OK . If you are using any other Windows version: Insert the operating system CD, ensure that the drive letter is correct for your CD-ROM drive, and then click OK . 9. Click Close . To check that the printer was successfully shared: Make sure the printer object in the Printers folder shows it is shared. For example, in Windows 2000, a hand is shown underneath the printer icon. Browse My Network Places or Network Neighborhood . Find the host name of the server, and look for the shared name you assigned to the printer. Now that the printer is shared, you can install the printer on network clients using the point and print method or the Peer-to-Peer method. Install the Shared Printer on Client Computers
-
 1
1 -
2
-
3
-
4
-
5
-
6
-
7
-
8
-
9
-
10
-
11
-
12
-
13
-
14
-
15
-
16
-
17
-
18
-
19
-
20
-
21
-
22
-
23
-
24
-
25
-
26
-
27
-
28
-
29
-
30
-
31
-
32
-
33
-
34
-
35
-
36
-
37
-
38
-
39
-
40
-
41
-
42
-
43
-
44
-
45
-
46
-
47
-
48
-
49
-
50
-
51
-
52
-
53
-
54
-
55
-
56
-
57
-
58
-
59
-
60
-
61
-
62
-
63
-
64
-
65
-
66
-
67
-
68
-
69
-
70
-
71
-
72
-
73
-
74
-
75
-
76
-
77
-
78
-
79
-
80
-
81
-
82
-
83
-
84
-
85
-
86
-
87
-
88
-
89
-
90
-
91
-
92
-
93
-
94
-
95
-
96
-
97
-
98
-
99
-
100
-
101
-
102
-
103
-
104
-
105
-
106
-
107
-
108
-
109
-
110
-
111
-
112
-
113
-
114
-
115
-
116
-
117
-
118
-
119
-
120
-
121
-
122
-
123
-
124
-
125
-
126
-
127
-
128
-
129
-
130
-
131
-
132
-
133
-
134
-
135
-
136
-
137
-
138
-
139
-
140
-
141
-
 142
142 -
 143
143 -
 144
144 -
 145
145 -
 146
146 -
 147
147 -
 148
148 -
 149
149 -
 150
150 -
 151
151 -
 152
152 -
153
-
154
-
155
-
156
-
157
-
158
-
159
-
160
-
161
-
162
-
163
-
164
-
165
-
166
-
167
-
168
-
169
-
170
-
171
-
172
-
173
-
174
-
175
-
176
-
177
-
178
-
179
-
180
-
181
-
182
-
183
-
184
-
185
-
186
-
187
-
188
-
189
-
190
-
191
-
192
-
193
-
194
-
195
-
196
-
197
-
198
-
199
-
200
-
201
-
202
-
203
-
204
-
205
-
206
-
207
-
208
-
209
-
210
-
211
-
212
-
213
-
214
-
215
-
216
-
217
-
218
-
219
-
220
-
221
-
222
-
223
-
224
-
225
-
226
-
227
-
228
-
229
-
230
-
231
-
232
-
233
-
234
-
235
-
236
-
237
-
238
-
239
-
240
-
241
-
242
-
243
-
244
-
245
-
246
-
247
-
248
-
249
-
250
-
251
-
252
-
253
-
254
-
255
-
256
-
257
-
258
-
259
-
260
-
261
-
262
-
263
-
264
-
265
-
266
-
267
-
268
-
269
-
270
-
271
-
272
-
273
-
274
-
275
-
276
-
277
-
278
-
279
-
280
-
281
-
282
-
283
-
284
 |
 |
