Dell 2335dn Multifunctional Laser Printer Dell™ 2335dn MFP User's Gu - Page 48
The Directory The Fax Setting Printer Settings Utility, Directory, Phonebook
 |
View all Dell 2335dn Multifunctional Laser Printer manuals
Add to My Manuals
Save this manual to your list of manuals |
Page 48 highlights
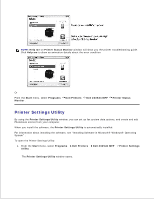
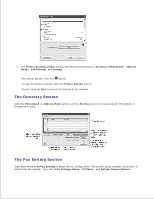
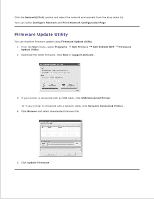
2. The Printer Settings Utility window provides several features; Directory (Phonebook , Address Book ), Fax Setting , and Setting . For further details, click the button. To use the default settings, click the Printer Default button. To exit, click the Exit button at the bottom of the window. The Directory Section Click the Phonebook or Address Book section and the Setting button to create and edit Phonebook or Emailbook entries. The Fax Setting Section Click each items underFax Setting to setup the fax configuration. The printer setup contains the printer ID and printer fax number. Your can select Printger Setup , Toll Save , and Default Output Options .
-
 1
1 -
2
-
3
-
4
-
5
-
6
-
7
-
8
-
9
-
10
-
11
-
12
-
13
-
14
-
15
-
16
-
17
-
18
-
19
-
20
-
21
-
22
-
23
-
24
-
25
-
26
-
27
-
28
-
29
-
30
-
31
-
32
-
33
-
34
-
35
-
36
-
37
-
38
-
39
-
40
-
41
-
42
-
 43
43 -
 44
44 -
 45
45 -
 46
46 -
 47
47 -
 48
48 -
 49
49 -
 50
50 -
 51
51 -
 52
52 -
 53
53 -
54
-
55
-
56
-
57
-
58
-
59
-
60
-
61
-
62
-
63
-
64
-
65
-
66
-
67
-
68
-
69
-
70
-
71
-
72
-
73
-
74
-
75
-
76
-
77
-
78
-
79
-
80
-
81
-
82
-
83
-
84
-
85
-
86
-
87
-
88
-
89
-
90
-
91
-
92
-
93
-
94
-
95
-
96
-
97
-
98
-
99
-
100
-
101
-
102
-
103
-
104
-
105
-
106
-
107
-
108
-
109
-
110
-
111
-
112
-
113
-
114
-
115
-
116
-
117
-
118
-
119
-
120
-
121
-
122
-
123
-
124
-
125
-
126
-
127
-
128
-
129
-
130
-
131
-
132
-
133
-
134
-
135
-
136
-
137
-
138
-
139
-
140
-
141
-
142
-
143
-
144
-
145
-
146
-
147
-
148
-
149
-
150
-
151
-
152
-
153
-
154
-
155
-
156
-
157
-
158
-
159
-
160
-
161
-
162
-
163
-
164
-
165
-
166
-
167
-
168
-
169
-
170
-
171
-
172
-
173
-
174
-
175
-
176
-
177
-
178
-
179
-
180
-
181
-
182
-
183
-
184
-
185
-
186
-
187
-
188
-
189
-
190
-
191
-
192
-
193
-
194
-
195
-
196
-
197
-
198
-
199
-
200
-
201
-
202
-
203
-
204
-
205
-
206
-
207
-
208
-
209
-
210
-
211
-
212
-
213
-
214
-
215
-
216
-
217
-
218
-
219
-
220
-
221
-
222
-
223
-
224
-
225
-
226
-
227
-
228
-
229
-
230
-
231
-
232
-
233
-
234
-
235
-
236
-
237
-
238
-
239
-
240
-
241
-
242
-
243
-
244
-
245
-
246
-
247
-
248
-
249
-
250
-
251
-
252
-
253
-
254
-
255
-
256
-
257
-
258
-
259
-
260
-
261
-
262
-
263
-
264
-
265
-
266
-
267
-
268
-
269
-
270
-
271
-
272
-
273
-
274
-
275
-
276
-
277
-
278
-
279
-
280
-
281
-
282
-
283
-
284
 |
 |

The
Printer Settings Utility
window provides several features;
Directory
(
Phonebook
,
Address
Book
),
Fax Setting
, and
Setting
.
2.
For further details, click the
button.
To use the default settings, click the
Printer Default
button.
To exit, click the
Exit
button at the bottom of the window.
The Directory Section
Click the
Phonebook
or
Address Book
section and the
Setting
button to create and edit Phonebook or
Emailbook entries.
The Fax Setting Section
Click each items under
Fax Setting
to setup the fax configuration. The printer setup contains the printer ID
and printer fax number. Your can select
Printger Setup
,
Toll Save
, and
Default Output Options
.