Dell 2335dn Multifunctional Laser Printer Dell™ 2335dn MFP User's Gu - Page 238
Paper Feed Jam (tray 1), Location of Jam
 |
View all Dell 2335dn Multifunctional Laser Printer manuals
Add to My Manuals
Save this manual to your list of manuals |
Page 238 highlights
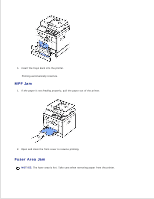
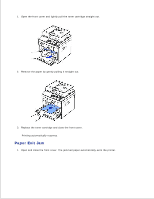
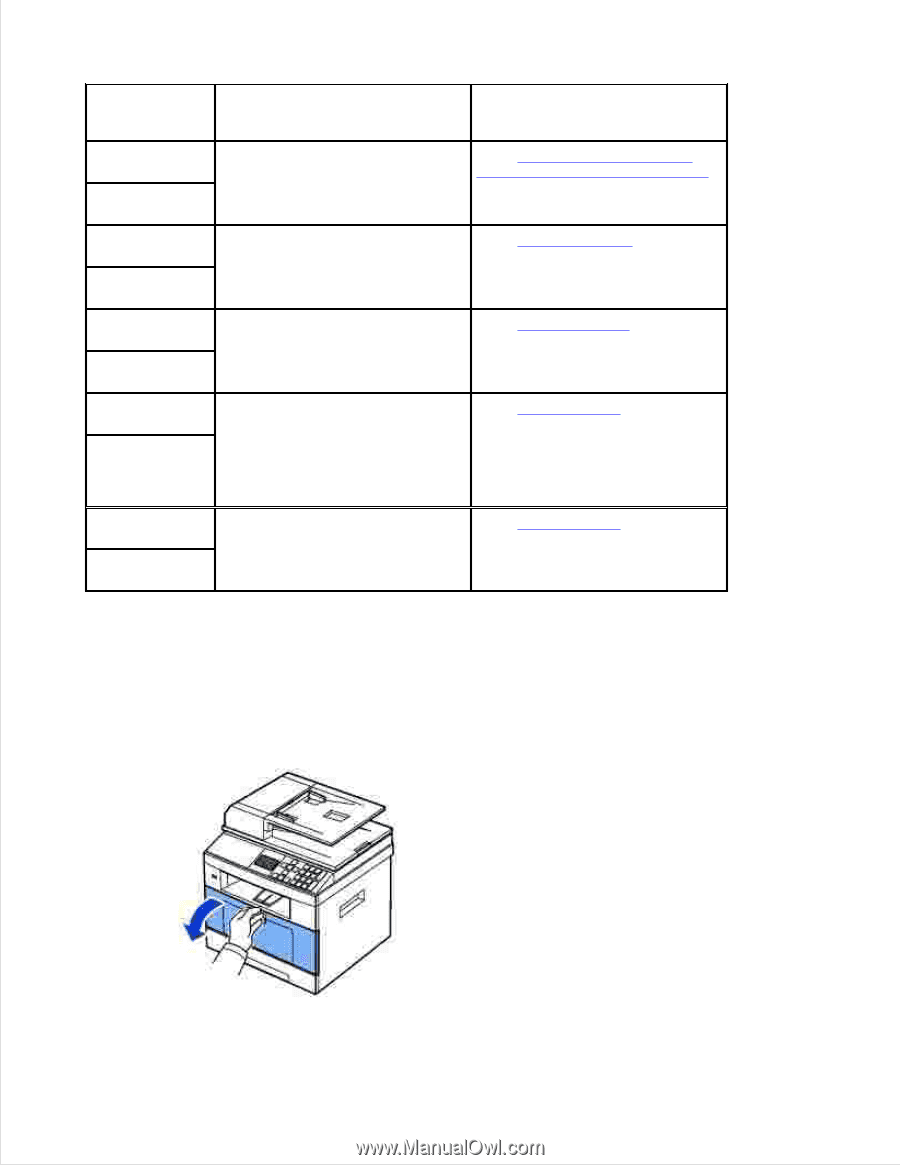
Operator Panel Message Location of Jam Go to Paper Jam 0 Open Tray 2) 1 Paper Feed Jam (tray 1) "Paper Feed Jam (tray 1)" or "Paper Feed Jam (optional tray 2)". Paper Feed Jam (optional tray Paper Jam 1 Fuser Area Jam "Fuser Area Jam". Remove Cartridge Paper Jam 2 Paper Exit Jam "Paper Exit Jam". Open Rear Door Duplex Jam 0 between the duplex unit and fuser area "Duplex Jam 0". Remove paper & Open/Close Front Door Duplex Jam 1 in the duplex unit "Duplex Jam 1". Open Rear Door To avoid tearing the paper, pull the jammed paper out gently and slowly. Follow the steps below to clear the jam. Paper Feed Jam (tray 1) 1. Open and close the front cover. The jammed paper automatically exits the printer.
-
 1
1 -
2
-
3
-
4
-
5
-
6
-
7
-
8
-
9
-
10
-
11
-
12
-
13
-
14
-
15
-
16
-
17
-
18
-
19
-
20
-
21
-
22
-
23
-
24
-
25
-
26
-
27
-
28
-
29
-
30
-
31
-
32
-
33
-
34
-
35
-
36
-
37
-
38
-
39
-
40
-
41
-
42
-
43
-
44
-
45
-
46
-
47
-
48
-
49
-
50
-
51
-
52
-
53
-
54
-
55
-
56
-
57
-
58
-
59
-
60
-
61
-
62
-
63
-
64
-
65
-
66
-
67
-
68
-
69
-
70
-
71
-
72
-
73
-
74
-
75
-
76
-
77
-
78
-
79
-
80
-
81
-
82
-
83
-
84
-
85
-
86
-
87
-
88
-
89
-
90
-
91
-
92
-
93
-
94
-
95
-
96
-
97
-
98
-
99
-
100
-
101
-
102
-
103
-
104
-
105
-
106
-
107
-
108
-
109
-
110
-
111
-
112
-
113
-
114
-
115
-
116
-
117
-
118
-
119
-
120
-
121
-
122
-
123
-
124
-
125
-
126
-
127
-
128
-
129
-
130
-
131
-
132
-
133
-
134
-
135
-
136
-
137
-
138
-
139
-
140
-
141
-
142
-
143
-
144
-
145
-
146
-
147
-
148
-
149
-
150
-
151
-
152
-
153
-
154
-
155
-
156
-
157
-
158
-
159
-
160
-
161
-
162
-
163
-
164
-
165
-
166
-
167
-
168
-
169
-
170
-
171
-
172
-
173
-
174
-
175
-
176
-
177
-
178
-
179
-
180
-
181
-
182
-
183
-
184
-
185
-
186
-
187
-
188
-
189
-
190
-
191
-
192
-
193
-
194
-
195
-
196
-
197
-
198
-
199
-
200
-
201
-
202
-
203
-
204
-
205
-
206
-
207
-
208
-
209
-
210
-
211
-
212
-
213
-
214
-
215
-
216
-
217
-
218
-
219
-
220
-
221
-
222
-
223
-
224
-
225
-
226
-
227
-
228
-
229
-
230
-
231
-
232
-
 233
233 -
 234
234 -
 235
235 -
 236
236 -
 237
237 -
 238
238 -
 239
239 -
 240
240 -
 241
241 -
 242
242 -
 243
243 -
244
-
245
-
246
-
247
-
248
-
249
-
250
-
251
-
252
-
253
-
254
-
255
-
256
-
257
-
258
-
259
-
260
-
261
-
262
-
263
-
264
-
265
-
266
-
267
-
268
-
269
-
270
-
271
-
272
-
273
-
274
-
275
-
276
-
277
-
278
-
279
-
280
-
281
-
282
-
283
-
284
 |
 |
Operator
Panel Message
Location of Jam
Go to
Paper
Jam 0
Paper Feed Jam (tray 1)
Paper Feed Jam (optional tray
2)
"Paper Feed Jam (tray 1)"
or
"Paper Feed Jam (optional tray 2)"
.
Open Tray
1
Paper
Jam 1
Fuser Area Jam
"Fuser Area Jam"
.
Remove
Cartridge
Paper
Jam 2
Paper Exit Jam
"Paper Exit Jam"
.
Open
Rear Door
Duplex
Jam 0
between the duplex unit and
fuser area
"Duplex Jam 0"
.
Remove
paper &
Open/Close
Front Door
Duplex
Jam 1
in the duplex unit
"Duplex Jam 1"
.
Open
Rear Door
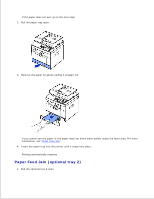
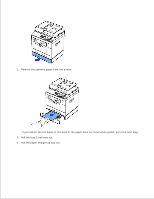
To avoid tearing the paper, pull the jammed paper out gently and slowly. Follow the steps below to clear the
jam.
Paper Feed Jam (tray 1)
Open and close the front cover. The jammed paper automatically exits the printer.
1.