Dell Alienware Aurora ALX Service Manual (English only) - Page 26
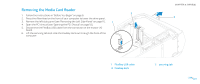
Replacing the Optical Drive(s
 |
View all Dell Alienware Aurora ALX manuals
Add to My Manuals
Save this manual to your list of manuals |
Page 26 highlights
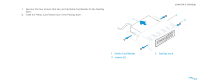
Replacing the Optical Drive(s) 1. Follow the instructions in "Before You Begin" on page 6. 2. Remove the new optical drive from its packaging. Save the original packaging for storing or shipping the optical drive. 3. Remove the optical-drive bay filler (if applicable). 4. Lift the securing tab and slide the optical drive through the front of the computer until the securing tab snaps into place. 5. Connect the power and data cables to the optical drive (if applicable). 6. Close the PCI shroud (see "Closing the PCI Shroud" on page 18). 7. Replace the left side-panel (see "Replacing the Left Side-Panel" on page 11). 8. Lift the drive panel towards the top of your computer. 9. Connect your computer and devices to electrical outlets and then turn them on. CHAPTER 5: DRIVE(S) 026 /026
-
 1
1 -
2
-
3
-
4
-
5
-
6
-
7
-
8
-
9
-
10
-
11
-
12
-
13
-
14
-
15
-
16
-
17
-
18
-
19
-
20
-
 21
21 -
 22
22 -
 23
23 -
 24
24 -
 25
25 -
 26
26 -
 27
27 -
 28
28 -
 29
29 -
 30
30 -
 31
31 -
32
-
33
-
34
-
35
-
36
-
37
-
38
-
39
-
40
-
41
-
42
-
43
-
44
-
45
-
46
-
47
-
48
-
49
-
50
-
51
-
52
-
53
-
54
-
55
-
56
-
57
-
58
-
59
-
60
-
61
-
62
-
63
-
64
-
65
-
66
-
67
-
68
-
69
-
70
-
71
-
72
-
73
-
74
-
75
-
76
-
77
-
78
-
79
-
80
-
81
-
82
-
83
-
84
-
85
-
86
-
87
-
88
-
89
-
90
-
91
-
92
-
93
-
94
-
95
-
96
-
97
-
98
-
99
-
100
-
101
-
102
-
103
-
104
-
105
-
106
-
107
-
108
-
109
-
110
-
111
-
112
-
113
-
114
-
115
-
116
-
117
 |
 |
