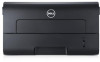
Dell B1260dn Laser Dell B1260dn Users Guide - Page 18
Installing the driver locally
 |
View all Dell B1260dn Laser manuals
Add to My Manuals
Save this manual to your list of manuals |
Page 18 highlights
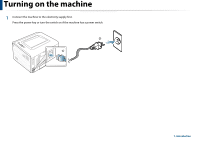
Installing the driver locally A locally connected machine is a machine directly attached to your computer using the cable. If your machine is attached to a network, skip the following steps below and go on to installing a network connected machine's driver (see "Installing driver over the network" on page 81). • If you are a Macintosh, Linux, or Unix OS user, refer to the "Software installation" on page 71. • The installation window in this User's Guide may differ depending on the machine and interface in use. • Selecting Custom Installation allows you to choose which programs to install. • Only use a USB cable no longer than 3 meters (118 inches). 2 Insert the supplied software CD into your CD-ROM drive. The software CD should automatically run and an installation window will appear. If the installation window does not appear, click Start > All programs > Accessories > Run. X:\Setup.exe replacing "X" with the letter, which represents your CDROM drive and click OK. 3 Select Next. 12 Windows 1 Make sure that the machine is connected to your computer and powered on. If the "Found New Hardware Wizard" appears during the installation procedure, click Cancel to close the window. 1. Introduction 18
-
 1
1 -
2
-
3
-
4
-
5
-
6
-
7
-
8
-
9
-
10
-
11
-
12
-
 13
13 -
 14
14 -
 15
15 -
 16
16 -
 17
17 -
 18
18 -
 19
19 -
 20
20 -
 21
21 -
 22
22 -
 23
23 -
24
-
25
-
26
-
27
-
28
-
29
-
30
-
31
-
32
-
33
-
34
-
35
-
36
-
37
-
38
-
39
-
40
-
41
-
42
-
43
-
44
-
45
-
46
-
47
-
48
-
49
-
50
-
51
-
52
-
53
-
54
-
55
-
56
-
57
-
58
-
59
-
60
-
61
-
62
-
63
-
64
-
65
-
66
-
67
-
68
-
69
-
70
-
71
-
72
-
73
-
74
-
75
-
76
-
77
-
78
-
79
-
80
-
81
-
82
-
83
-
84
-
85
-
86
-
87
-
88
-
89
-
90
-
91
-
92
-
93
-
94
-
95
-
96
-
97
-
98
-
99
-
100
-
101
-
102
-
103
-
104
-
105
-
106
-
107
-
108
-
109
-
110
-
111
-
112
-
113
-
114
-
115
-
116
-
117
-
118
-
119
-
120
-
121
-
122
-
123
-
124
-
125
-
126
-
127
-
128
-
129
-
130
-
131
-
132
-
133
-
134
-
135
-
136
-
137
-
138
-
139
-
140
-
141
-
142
-
143
-
144
-
145
-
146
-
147
-
148
-
149
-
150
-
151
 |
 |
