Dell B1265dfw Dell Users Guide - Page 140
Charms, Settings, Change PC settings, Devices, Add a device, Windows Update, Finder, MAC_Installer - software download
 |
View all Dell B1265dfw manuals
Add to My Manuals
Save this manual to your list of manuals |
Page 140 highlights
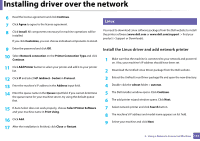
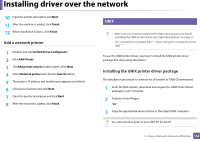
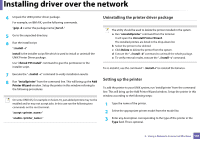
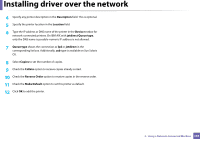
Installing driver over the network From the Windows 8 Start Screen 4 Click the model name or host name you wish to use. • Dell Printer Experience app can only be used in the Start screen when V4 driver is installed. The V4 driver is automatically downloaded from the Windows Update if your computer is connected to the Internet. If not, you can manually download the V4 driver from Dell website, www.Dell.com > find your product > Support or downloads. • You can download Dell Printer Experience app from the Windows Store. You need have a Microsoft account to use the Windows Store. a From Charms, select Search. b Click Store. c Search and click Dell Printer Experience. d Click Install. • If you install the driver using the supplied software CD, V4 driver is not installed. If you want to use the V4 driver in the Desktop screen, you can download from the Dell website, www.Dell.com >find your product > Support or downloads. • If you want to install Dell's printer management tools, you need to install them using the supplied software CD. You can print a Network Configuration Report from the machine's control panel that will show the current machine's host name. 5 The driver is automatically installed from the Windows Update. 6 Mac 1 Make sure that the machine is connected to your network and powered on. 2 Insert the supplied software CD into your CD-ROM drive. 1 Make sure that the machine is connected to the network and powered on. Also, your machine's IP address should have been set (see "Setting IP address" on page 135). 2 From Charms, select Settings > Change PC settings > Devices. 3 Click Add a device. Discovered machines will be shown on the screen. 3 Double-click the CD-ROM icon that appears on your Mac desktop. • For Mac OS X 10.8, double-click the CD-ROM that appears on Finder. 4 Double-click the MAC_Installer folder > Installer OS X icon. 5 Click Continue. 2. Using a Network-Connected Machine 140
-
 1
1 -
2
-
3
-
4
-
5
-
6
-
7
-
8
-
9
-
10
-
11
-
12
-
13
-
14
-
15
-
16
-
17
-
18
-
19
-
20
-
21
-
22
-
23
-
24
-
25
-
26
-
27
-
28
-
29
-
30
-
31
-
32
-
33
-
34
-
35
-
36
-
37
-
38
-
39
-
40
-
41
-
42
-
43
-
44
-
45
-
46
-
47
-
48
-
49
-
50
-
51
-
52
-
53
-
54
-
55
-
56
-
57
-
58
-
59
-
60
-
61
-
62
-
63
-
64
-
65
-
66
-
67
-
68
-
69
-
70
-
71
-
72
-
73
-
74
-
75
-
76
-
77
-
78
-
79
-
80
-
81
-
82
-
83
-
84
-
85
-
86
-
87
-
88
-
89
-
90
-
91
-
92
-
93
-
94
-
95
-
96
-
97
-
98
-
99
-
100
-
101
-
102
-
103
-
104
-
105
-
106
-
107
-
108
-
109
-
110
-
111
-
112
-
113
-
114
-
115
-
116
-
117
-
118
-
119
-
120
-
121
-
122
-
123
-
124
-
125
-
126
-
127
-
128
-
129
-
130
-
131
-
132
-
133
-
134
-
 135
135 -
 136
136 -
 137
137 -
 138
138 -
 139
139 -
 140
140 -
 141
141 -
 142
142 -
 143
143 -
 144
144 -
 145
145 -
146
-
147
-
148
-
149
-
150
-
151
-
152
-
153
-
154
-
155
-
156
-
157
-
158
-
159
-
160
-
161
-
162
-
163
-
164
-
165
-
166
-
167
-
168
-
169
-
170
-
171
-
172
-
173
-
174
-
175
-
176
-
177
-
178
-
179
-
180
-
181
-
182
-
183
-
184
-
185
-
186
-
187
-
188
-
189
-
190
-
191
-
192
-
193
-
194
-
195
-
196
-
197
-
198
-
199
-
200
-
201
-
202
-
203
-
204
-
205
-
206
-
207
-
208
-
209
-
210
-
211
-
212
-
213
-
214
-
215
-
216
-
217
-
218
-
219
-
220
-
221
-
222
-
223
-
224
-
225
-
226
-
227
-
228
-
229
-
230
-
231
-
232
-
233
-
234
-
235
-
236
-
237
-
238
-
239
-
240
-
241
-
242
-
243
-
244
-
245
-
246
-
247
-
248
-
249
-
250
-
251
-
252
-
253
-
254
-
255
-
256
-
257
-
258
-
259
-
260
-
261
-
262
-
263
-
264
-
265
-
266
-
267
-
268
-
269
-
270
-
271
-
272
-
273
-
274
-
275
-
276
-
277
-
278
-
279
-
280
-
281
-
282
-
283
-
284
 |
 |
