Dell B1265dfw Dell Users Guide - Page 141
Install the Linux driver and add network printer, HP Jetdirect - Socket - driver windows 10
 |
View all Dell B1265dfw manuals
Add to My Manuals
Save this manual to your list of manuals |
Page 141 highlights
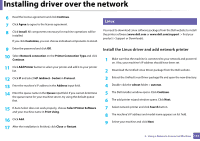
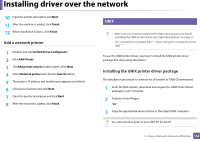
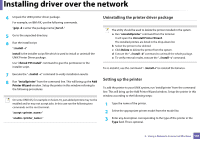
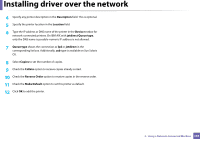
Installing driver over the network 6 Read the license agreement and click Continue. 7 Click Agree to agree to the license agreement. 8 Click Install. All components necessary for machine operations will be installed. If you click Customize, you can choose individual components to install. 7 Linux You need to download Linux software packages from the Dell website to install the printer software (www.dell.com or www.dell.com/support > find your product > Support or Downloads). 9 Enter the password and click OK. 10 Select Network connection on the Printer Connection Type and click Continue. 11 Click Add Printer button to select your printer and add it to your printer list. 12 Click IP and select HP Jetdirect - Socket in Protocol. 13 Enter the machine's IP address in the Address input field. 14 Enter the queue name in the Queue input field. If you cannot determine the queue name for your machine server, try using the default queue first. 15 If Auto Select does not work properly, choose Select Printer Software and your machine name in Print Using. 16 Click Add. 17 After the installation is finished, click Close or Restart. Install the Linux driver and add network printer 1 Make sure that the machine is connected to your network and powered on. Also, your machine's IP address should have been set. 2 Download the Unified Linux Driver package from the Dell website. 3 Extract the Unified Linux Driver package file and open the new directory. 4 Double-click the cdroot folder > autorun. 5 The Dell installer window opens. Click Continue. 6 The add printer wizard window opens. Click Next. 7 Select network printer and click Search button. 8 The machine's IP address and model name appears on list field. 9 Select your machine and click Next. 2. Using a Network-Connected Machine 141
-
 1
1 -
2
-
3
-
4
-
5
-
6
-
7
-
8
-
9
-
10
-
11
-
12
-
13
-
14
-
15
-
16
-
17
-
18
-
19
-
20
-
21
-
22
-
23
-
24
-
25
-
26
-
27
-
28
-
29
-
30
-
31
-
32
-
33
-
34
-
35
-
36
-
37
-
38
-
39
-
40
-
41
-
42
-
43
-
44
-
45
-
46
-
47
-
48
-
49
-
50
-
51
-
52
-
53
-
54
-
55
-
56
-
57
-
58
-
59
-
60
-
61
-
62
-
63
-
64
-
65
-
66
-
67
-
68
-
69
-
70
-
71
-
72
-
73
-
74
-
75
-
76
-
77
-
78
-
79
-
80
-
81
-
82
-
83
-
84
-
85
-
86
-
87
-
88
-
89
-
90
-
91
-
92
-
93
-
94
-
95
-
96
-
97
-
98
-
99
-
100
-
101
-
102
-
103
-
104
-
105
-
106
-
107
-
108
-
109
-
110
-
111
-
112
-
113
-
114
-
115
-
116
-
117
-
118
-
119
-
120
-
121
-
122
-
123
-
124
-
125
-
126
-
127
-
128
-
129
-
130
-
131
-
132
-
133
-
134
-
135
-
 136
136 -
 137
137 -
 138
138 -
 139
139 -
 140
140 -
 141
141 -
 142
142 -
 143
143 -
 144
144 -
 145
145 -
 146
146 -
147
-
148
-
149
-
150
-
151
-
152
-
153
-
154
-
155
-
156
-
157
-
158
-
159
-
160
-
161
-
162
-
163
-
164
-
165
-
166
-
167
-
168
-
169
-
170
-
171
-
172
-
173
-
174
-
175
-
176
-
177
-
178
-
179
-
180
-
181
-
182
-
183
-
184
-
185
-
186
-
187
-
188
-
189
-
190
-
191
-
192
-
193
-
194
-
195
-
196
-
197
-
198
-
199
-
200
-
201
-
202
-
203
-
204
-
205
-
206
-
207
-
208
-
209
-
210
-
211
-
212
-
213
-
214
-
215
-
216
-
217
-
218
-
219
-
220
-
221
-
222
-
223
-
224
-
225
-
226
-
227
-
228
-
229
-
230
-
231
-
232
-
233
-
234
-
235
-
236
-
237
-
238
-
239
-
240
-
241
-
242
-
243
-
244
-
245
-
246
-
247
-
248
-
249
-
250
-
251
-
252
-
253
-
254
-
255
-
256
-
257
-
258
-
259
-
260
-
261
-
262
-
263
-
264
-
265
-
266
-
267
-
268
-
269
-
270
-
271
-
272
-
273
-
274
-
275
-
276
-
277
-
278
-
279
-
280
-
281
-
282
-
283
-
284
 |
 |
