Dell Brocade 300 QuickStart Guide
Dell Brocade 300 Manual
 |
View all Dell Brocade 300 manuals
Add to My Manuals
Save this manual to your list of manuals |
Dell Brocade 300 manual content summary:
- Dell Brocade 300 | QuickStart Guide - Page 1
53-1000425-01 12 Jan 2007 Supporting Fabric OS v5.2.1 Supporting Brocade 5000 Brocade 5000 QuickStart Guide *53-1000425-01* - Dell Brocade 300 | QuickStart Guide - Page 2
informational purposes only and does not set forth any warranty, expressed or implied, concerning any equipment, equipment feature, or service offered or to be offered by Brocade. Brocade reserves the right to make changes to this document at any time, without notice, and assumes no responsibility - Dell Brocade 300 | QuickStart Guide - Page 3
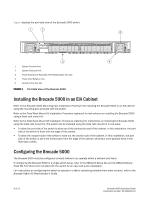
document. • In an EIA cabinet using the Mounting Ears provided with the switch. For detailed instructions, refer to the Brocade 5000 Rack Mounting Ears Installation Procedure. • In an EIA cabinet using the Fixed Rack Mount Kit (optional). For detailed instructions, refer to the Brocade Fixed Rack - Dell Brocade 300 | QuickStart Guide - Page 4
IP addresses Installing Ethernet cables and configuring the Brocade 5000 switch name, policies, domain ID, PIDs, or additional system parameters Installing SFP optical transceivers Attaching fiber-optic cables, cable ties, and cable guides 30 minutes Refer to the Brocade Slide Rack Mount Kit - Dell Brocade 300 | QuickStart Guide - Page 5
The Brocade 5000 switch, containing two power supply/fan assembly units • One accessory kit, containing the following items: - The Brocade Documentation CD-ROM - 32 SFP (small-form-factor pluggable) transceivers (optional) - Mounting ears and screws - Rubber mounting feet (to be used when setting up - Dell Brocade 300 | QuickStart Guide - Page 6
using a fixed rack mount kit. Refer to the Slide Rack Mount Kit Installation Procedure (optional) for instructions on installing the Brocade 5000 using the slide rack mount kit. The switch can be installed using the slide rack mount kit in two ways: • To allow the port side of the switch to slide - Dell Brocade 300 | QuickStart Guide - Page 7
not connect the switch to the network until the IP address is correctly set. For instructions on how to set the IP address, see "Configuring the Brocade 5000" on page 8. PROVIDING POWER TO THE SWITCH To provide electrical power to the Brocade 5000: 1. Connect the power cords to both power supplies - Dell Brocade 300 | QuickStart Guide - Page 8
Fibre Channel Subnetmask [0.0.0.0]: Gateway IP Address [0.0.0.0]:10.32.48.1 Set IP address now? [y = set now, n = next reboot]:y IP address being changed... Committing configuration...Done. switch:admin> 2. Optionally, verify that the address was correctly set by typing the ipAddrShow command - Dell Brocade 300 | QuickStart Guide - Page 9
. 4. Install the SFP transceivers in the Fibre Channel ports, as required. The ports selected for use in trunking groups must meet specific requirements. For a list of these requirements, refer to the Brocade Fabric OS Administrator's Guide. a. Remove the plugs from the ports to be used. b. Position - Dell Brocade 300 | QuickStart Guide - Page 10
is available for downloading to a replacement switch. For specific instructions about how to back up the configuration, refer to the Fabric OS Administrator's Guide. The switchShow, fabricShow, and configUpload commands are described in detail in the Fabric OS Command Reference. 12 of 12
-
 1
1 -
 2
2 -
 3
3 -
 4
4 -
 5
5 -
 6
6 -
 7
7 -
8
-
9
-
10
 |
 |

53-1000425-01
12 Jan 2007
Brocade 5000
QuickStart Guide
Supporting Fabric OS v5.2.1
Supporting Brocade 5000
*53-1000425-01*