Dell C3760n Color Laser Printer User's Guide - Page 46
Updating Your Driver to Detect 550-Sheet Feeder, Tray2 550 Sheet Feeder, Printer Options
 |
View all Dell C3760n Color Laser Printer manuals
Add to My Manuals
Save this manual to your list of manuals |
Page 46 highlights
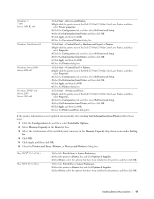
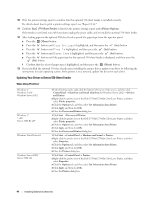
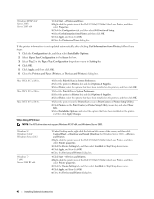
10 Print the printer settings report to confirm that the optional 550-sheet feeder is installed correctly. For details about how to print a printer settings report, see "Report / List." 11 Confirm Tray2 (550 Sheet Feeder) is listed in the printer settings report under Printer Options. If the feeder is not listed, turn off the printer, unplug the power cable, and re-install the optional 550-sheet feeder. 12 After loading paper in the optional 550-sheet feeder, specify the paper type from the operator panel. a Press the (Menu) button. b Press the button until Tray Settings is highlighted, and then press the (Set) button. c Press the button until Tray 2 is highlighted, and then press the (Set) button. d Press the button until Paper Type is highlighted, and then press the (Set) button. e Press the button until the paper type for the optional 550-sheet feeder is displayed, and then press the (Set) button. f Confirm that the selected paper type is highlighted, and then press the (Menu) button. 13 If you installed the optional 550-sheet feeder after installing the printer driver, update your driver by following the instructions for each operating system. If the printer is on a network, update the driver for each client. Updating Your Driver to Detect 550-Sheet Feeder When Using PCL Driver Windows 8/ Windows 8 x64/ Windows Server 2012 Windows 7/ 7 x64/ Server 2008 R2 x64 Windows Vista/Vista x64 Windows Server 2008/ Server 2008 x64 1 Under Desktop mode, right-click the bottom left corner of the screen, and then click Control Panel → Hardware and Sound (Hardware for Windows Server 2012) → Devices and Printers. 2 Right-click the printer icon of the Dell C3760n/C3760dn Color Laser Printer, and then select Printer properties. 3 Click the Options tab, and then select Get Information from Printer. 4 Click Apply, and then click OK. 5 Close the Devices and Printers dialog box. 1 Click Start → Devices and Printers. 2 Right-click the printer icon of the Dell C3760n/C3760dn Color Laser Printer, and then select Printer properties. 3 Click the Options tab, and then select Get Information from Printer. 4 Click Apply, and then click OK. 5 Close the Devices and Printers dialog box. 1 Click Start → Control Panel → Hardware and Sound → Printers. 2 Right-click the printer icon of the Dell C3760n/C3760dn Color Laser Printer, and then select Properties. 3 Click the Options tab, and then select Get Information from Printer. 4 Click Apply, and then click OK. 5 Close the Printers dialog box. 1 Click Start → Control Panel → Printers. 2 Right-click the printer icon of the Dell C3760n/C3760dn Color Laser Printer, and then select Properties. 3 Click the Options tab, and then select Get Information from Printer. 4 Click Apply, and then click OK. 5 Close the Printers dialog box. 44 Installing Optional Accessories
-
 1
1 -
2
-
3
-
4
-
5
-
6
-
7
-
8
-
9
-
10
-
11
-
12
-
13
-
14
-
15
-
16
-
17
-
18
-
19
-
20
-
21
-
22
-
23
-
24
-
25
-
26
-
27
-
28
-
29
-
30
-
31
-
32
-
33
-
34
-
35
-
36
-
37
-
38
-
39
-
40
-
 41
41 -
 42
42 -
 43
43 -
 44
44 -
 45
45 -
 46
46 -
 47
47 -
 48
48 -
 49
49 -
 50
50 -
 51
51 -
52
-
53
-
54
-
55
-
56
-
57
-
58
-
59
-
60
-
61
-
62
-
63
-
64
-
65
-
66
-
67
-
68
-
69
-
70
-
71
-
72
-
73
-
74
-
75
-
76
-
77
-
78
-
79
-
80
-
81
-
82
-
83
-
84
-
85
-
86
-
87
-
88
-
89
-
90
-
91
-
92
-
93
-
94
-
95
-
96
-
97
-
98
-
99
-
100
-
101
-
102
-
103
-
104
-
105
-
106
-
107
-
108
-
109
-
110
-
111
-
112
-
113
-
114
-
115
-
116
-
117
-
118
-
119
-
120
-
121
-
122
-
123
-
124
-
125
-
126
-
127
-
128
-
129
-
130
-
131
-
132
-
133
-
134
-
135
-
136
-
137
-
138
-
139
-
140
-
141
-
142
-
143
-
144
-
145
-
146
-
147
-
148
-
149
-
150
-
151
-
152
-
153
-
154
-
155
-
156
-
157
-
158
-
159
-
160
-
161
-
162
-
163
-
164
-
165
-
166
-
167
-
168
-
169
-
170
-
171
-
172
-
173
-
174
-
175
-
176
-
177
-
178
-
179
-
180
-
181
-
182
-
183
-
184
-
185
-
186
-
187
-
188
-
189
-
190
-
191
-
192
-
193
-
194
-
195
-
196
-
197
-
198
-
199
-
200
-
201
-
202
-
203
-
204
-
205
-
206
-
207
-
208
-
209
-
210
-
211
-
212
-
213
-
214
-
215
-
216
-
217
-
218
-
219
-
220
-
221
-
222
-
223
-
224
-
225
-
226
-
227
-
228
-
229
-
230
-
231
-
232
-
233
-
234
-
235
-
236
-
237
-
238
-
239
-
240
-
241
-
242
-
243
-
244
-
245
-
246
-
247
-
248
-
249
-
250
-
251
-
252
-
253
-
254
-
255
-
256
-
257
-
258
-
259
-
260
-
261
-
262
-
263
-
264
-
265
-
266
-
267
-
268
-
269
-
270
-
271
-
272
-
273
-
274
-
275
-
276
-
277
-
278
-
279
-
280
-
281
-
282
-
283
-
284
-
285
-
286
-
287
-
288
-
289
-
290
-
291
-
292
-
293
-
294
-
295
-
296
-
297
-
298
-
299
-
300
-
301
-
302
-
303
-
304
-
305
-
306
-
307
-
308
-
309
-
310
-
311
-
312
-
313
-
314
-
315
-
316
-
317
-
318
-
319
-
320
-
321
-
322
-
323
-
324
-
325
-
326
-
327
-
328
-
329
-
330
-
331
-
332
-
333
-
334
-
335
-
336
-
337
-
338
-
339
-
340
-
341
-
342
-
343
-
344
-
345
-
346
-
347
-
348
-
349
-
350
-
351
-
352
-
353
-
354
-
355
-
356
-
357
-
358
-
359
-
360
-
361
-
362
-
363
-
364
-
365
-
366
-
367
-
368
-
369
-
370
-
371
-
372
-
373
-
374
-
375
-
376
-
377
-
378
-
379
-
380
-
381
-
382
-
383
-
384
-
385
-
386
-
387
-
388
-
389
-
390
-
391
-
392
-
393
-
394
-
395
-
396
-
397
-
398
-
399
-
400
-
401
-
402
-
403
-
404
-
405
-
406
-
407
-
408
-
409
-
410
-
411
-
412
 |
 |