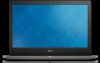
Dell Chromebook 7310 Chromebook 13 - 7310 Disassembly and Reassembly Guide - F
Dell Chromebook 7310 Manual
 |
View all Dell Chromebook 7310 manuals
Add to My Manuals
Save this manual to your list of manuals |
Dell Chromebook 7310 manual content summary:
- Dell Chromebook 7310 | Chromebook 13 - 7310 Disassembly and Reassembly Guide - F - Page 1
Dell Chromebook 13 - 7310 Disassembly and Reassembly Guide Warning: This manual is intended for use by a Dell Certified Technician. Damage due to servicing that is not authorized by Dell is not covered by your warranty. Read and follow the safety instructions that came with the product. - Dell Chromebook 7310 | Chromebook 13 - 7310 Disassembly and Reassembly Guide - F - Page 2
potential damage to hardware or loss of data and tells you how to avoid the problem. WARNING: A WARNING indicates a potential for property damage, personal injury, or death. Copyright © 2015 Dell Inc. All rights reserved. This product is protected by U.S. and international copyright and intellectual - Dell Chromebook 7310 | Chromebook 13 - 7310 Disassembly and Reassembly Guide - F - Page 3
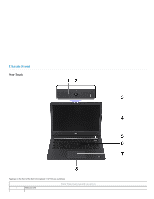
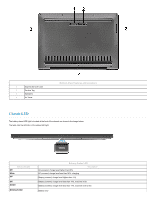
Chassis Front NonTouch Features on the front of the Dell Chromebook 13 (7310) are as follows: 1 Webcam LED Front View Features and Locations - Dell Chromebook 7310 | Chromebook 13 - 7310 Disassembly and Reassembly Guide - F - Page 4
: For more information about the Status LED, refer to the Chassis LED page. Touch Features on the front of the Dell Chromebook 13 (7310) are as follows: 1 Webcam 2 Microphones 3 LCD Display 4 Power Button 5 Keyboard 6 Touch Pad Status LED Front View Features and Locations 7 NOTE - Dell Chromebook 7310 | Chromebook 13 - 7310 Disassembly and Reassembly Guide - F - Page 5
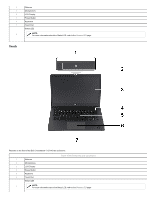
as follows: 1 USB 2.0 2 Security Cable Slot (Noble Lock) Left View Features and Locations Chassis Right Features on the right of the Dell Chromebook 13 (7310) are as follows: 1 DCin Jack 2 HDMI 3 USB 3.0 4 Universal Audio Jack 5 Micro SD Card Slot Right View Features and Locations - Dell Chromebook 7310 | Chromebook 13 - 7310 Disassembly and Reassembly Guide - F - Page 6
1 Express Service Code 2 Service Tag 3 Speakers 4 Air Vents Bottom View Features and Locations Chassis LED The battery status LED light is located at the front of the chassis, as - Dell Chromebook 7310 | Chromebook 13 - 7310 Disassembly and Reassembly Guide - F - Page 7
in an electrical accident. Standby Power Dell products with standby power must be that may not be obvious, such as intermittent problems or a shortened product lifespan. As the Of these two types, the more difficult to recognize and troubleshoot is the "Intermittent" (also called Latent or "walking - Dell Chromebook 7310 | Chromebook 13 - 7310 Disassembly and Reassembly Guide - F - Page 8
bags for safe transport. ESD Protection Summary It is strongly suggested that all field service engineers use the traditional "wired" ESD grounding wrist strap and protective antistatic mat at all times when servicing Dell products. In addition, it is critical that the engineer keep sensitive parts - Dell Chromebook 7310 | Chromebook 13 - 7310 Disassembly and Reassembly Guide - F - Page 9
your knees. Do not bend at the waist. 3. Tighten stomach muscles. Abdominal muscles support your spine when you lift, offsetting the force of the load. 4. Lift with your A set of simple tools are required to service Dell Chromebook 13 (7310). The following image illustrates the Required tools. - Dell Chromebook 7310 | Chromebook 13 - 7310 Disassembly and Reassembly Guide - F - Page 10
Bottom Cover - Dell Chromebook 7310 | Chromebook 13 - 7310 Disassembly and Reassembly Guide - F - Page 11
visual reference. (To download, please rightclick on the link above and select "Save Target As" or "Save Link As") 1. PreRemoval Instructions Bottom Cover Disassembly Steps Before removing the Bottom Cover: 1. During installation or removal of any hardware always ensure all data is backed up - Dell Chromebook 7310 | Chromebook 13 - 7310 Disassembly and Reassembly Guide - F - Page 12
3. Remove the eleven screws securing the bottom cover. 4. Gently pry loose the bottom cover, beginning from the hinge area, and remove the bottom cover from the system. - Dell Chromebook 7310 | Chromebook 13 - 7310 Disassembly and Reassembly Guide - F - Page 13
5. Complete. Bottom Cover Reassembly Steps 1. Align and attach the bottom cover onto the system chassis, beginning from the front of the system. 2. Push the edges of bottom cover into the chassis clips until it is fully engaged. 3. Tighten the eleven screws to secure the bottom cover. - Dell Chromebook 7310 | Chromebook 13 - 7310 Disassembly and Reassembly Guide - F - Page 14
visual reference. (To download, please rightclick on the link above and select "Save Target As" or "Save Link As") 1. PreRemoval Instructions Battery Disassembly Steps Before removing the Battery: 1. During installation or removal of any hardware always ensure all data is backed up properly - Dell Chromebook 7310 | Chromebook 13 - 7310 Disassembly and Reassembly Guide - F - Page 15
2. Establishing image. 3. Disconnect the battery cable from system board. 4. Remove the four screws securing the battery. - Dell Chromebook 7310 | Chromebook 13 - 7310 Disassembly and Reassembly Guide - F - Page 16
5. Remove the battery from the system. 6. Disconnect the battery cable from the battery. - Dell Chromebook 7310 | Chromebook 13 - 7310 Disassembly and Reassembly Guide - F - Page 17
7. Complete. - Dell Chromebook 7310 | Chromebook 13 - 7310 Disassembly and Reassembly Guide - F - Page 18
Validation Steps 1. Power up the system. 2. Click on the bottomright corner of the Chrome OS desktop area to check battery status. M.2 SSD M.2 SSD Disassembly Video The following video contains the brief disassembly procedure, for use by the learner as an additional visual reference. (To download - Dell Chromebook 7310 | Chromebook 13 - 7310 Disassembly and Reassembly Guide - F - Page 19
1. PreRemoval Instructions Before removing the M.2 SSD: 1. During installation or removal of any hardware always ensure all data is backed up properly. 2. Disconnect any electrical outlets. 4. Remove the Bottom Cover, Battery. 2. Establishing image. 3. Remove the single screw securing the M.2 SSD. - Dell Chromebook 7310 | Chromebook 13 - 7310 Disassembly and Reassembly Guide - F - Page 20
4. Remove the M.2 SSD from the system board. 5. Complete. - Dell Chromebook 7310 | Chromebook 13 - 7310 Disassembly and Reassembly Guide - F - Page 21
in place. 3. Reinstall the preremoval part(s) in descending order. M.2 SSD Validation Steps 1. Power on the system and ensure system completes the POST and booting up cycle. WLAN Card WLAN Card Disassembly Video The following video - Dell Chromebook 7310 | Chromebook 13 - 7310 Disassembly and Reassembly Guide - F - Page 22
(To download, please rightclick on the link above and select "Save Target As" or "Save Link As") 1. PreRemoval Instructions WLAN Card Disassembly Steps Before removing the WLAN Card: 1. During installation or removal of any hardware always ensure all data is backed up properly. 2. Disconnect - Dell Chromebook 7310 | Chromebook 13 - 7310 Disassembly and Reassembly Guide - F - Page 23
3. Remove the single screw securing the WLAN bracket. 4. Remove the WLAN bracket from the system. - Dell Chromebook 7310 | Chromebook 13 - 7310 Disassembly and Reassembly Guide - F - Page 24
5. Disconnect any antennas that may be connected to the WLAN card. - Dell Chromebook 7310 | Chromebook 13 - 7310 Disassembly and Reassembly Guide - F - Page 25
6. Remove the WLAN card from the system board. 7. Complete. - Dell Chromebook 7310 | Chromebook 13 - 7310 Disassembly and Reassembly Guide - F - Page 26
WLAN Card Reassembly Steps 1. Slide the WLAN card into its slot. 2. Reconnect the antennas to the connectors on the WLAN card. 3. Align the WLAN bracket on the WLAN card. 4. Tighten the single screw securing the WLAN card in place. 5. Reinstall the preremoval part(s) in descending order. WLAN Card - Dell Chromebook 7310 | Chromebook 13 - 7310 Disassembly and Reassembly Guide - F - Page 27
(To download, please rightclick on the link above and select "Save Target As" or "Save Link As") 1. PreRemoval Instructions I/O Board with Cable Disassembly Steps Before removing the I/O Board with Cable: 1. During installation or removal of any hardware always ensure all data is backed up - Dell Chromebook 7310 | Chromebook 13 - 7310 Disassembly and Reassembly Guide - F - Page 28
3. Disconnect the I/O board cable from the system board. 4. Remove the single screw securing the I/O board in place. - Dell Chromebook 7310 | Chromebook 13 - 7310 Disassembly and Reassembly Guide - F - Page 29
5. Lift up and remove the I/O board. 6. Disconnect the I/O board cable from the I/O board. - Dell Chromebook 7310 | Chromebook 13 - 7310 Disassembly and Reassembly Guide - F - Page 30
7. Complete. I/O Board with Cable Reassembly Steps 1. Connect the I/O board cable to the I/O board. 2. Place the I/O board into the system and ensure it engages in place. 3. Tighten the single screw to secure the I/O board in place. 4. Connect the I/O board cable to the system board and secure the - Dell Chromebook 7310 | Chromebook 13 - 7310 Disassembly and Reassembly Guide - F - Page 31
additional visual reference. (To download, please rightclick on the link above and select "Save Target As" or "Save Link As") 1. PreRemoval Instructions CPU Fan Disassembly Steps Before removing the CPU Fan: 1. During installation or removal of any hardware always ensure all data is backed up - Dell Chromebook 7310 | Chromebook 13 - 7310 Disassembly and Reassembly Guide - F - Page 32
2. Establishing image. 3. Disconnect the fan cable from the system board. - Dell Chromebook 7310 | Chromebook 13 - 7310 Disassembly and Reassembly Guide - F - Page 33
4. Remove the two screws securing the fan in place. 5. Lift up and remove the fan. - Dell Chromebook 7310 | Chromebook 13 - 7310 Disassembly and Reassembly Guide - F - Page 34
6. Complete. - Dell Chromebook 7310 | Chromebook 13 - 7310 Disassembly and Reassembly Guide - F - Page 35
CPU Fan Reassembly Steps 1. Position the CPU fan into its compartment. 2. Tighten the two screws to secure the CPU fan in place. 3. Attach the fan cable into its connector on the system board. 4. Reinstall the preremoval part(s) in descending order. CPU Fan Validation Steps 1. Power on the system - Dell Chromebook 7310 | Chromebook 13 - 7310 Disassembly and Reassembly Guide - F - Page 36
(To download, please rightclick on the link above and select "Save Target As" or "Save Link As") 1. PreRemoval Instructions Heat Sink Disassembly Steps Before removing the Heat Sink: 1. During installation or removal of any hardware always ensure all data is backed up properly. 2. Disconnect - Dell Chromebook 7310 | Chromebook 13 - 7310 Disassembly and Reassembly Guide - F - Page 37
4. Lift up and remove the heat sink. 5. Complete. - Dell Chromebook 7310 | Chromebook 13 - 7310 Disassembly and Reassembly Guide - F - Page 38
Heat Sink Reassembly Steps 1. Place the heatsink on the system board. 2. Tighten the four captive screws to secure the heatsink in place. 3. Reinstall the preremoval part(s) in descending order. Heat Sink Validation Steps 1. Power on the system and ensure there is no fan warning error message - Dell Chromebook 7310 | Chromebook 13 - 7310 Disassembly and Reassembly Guide - F - Page 39
(To download, please rightclick on the link above and select "Save Target As" or "Save Link As") 1. PreRemoval Instructions DC-in Jack Disassembly Steps Before removing the DCin Jack: 1. During installation or removal of any hardware always ensure all data is backed up - Dell Chromebook 7310 | Chromebook 13 - 7310 Disassembly and Reassembly Guide - F - Page 40
3. Disconnect the DCin cable from the system board. 4. Remove the single screw securing the DCin cable in place. - Dell Chromebook 7310 | Chromebook 13 - 7310 Disassembly and Reassembly Guide - F - Page 41
5. Lift up and remove the DCin jack from the system. 6. Complete. - Dell Chromebook 7310 | Chromebook 13 - 7310 Disassembly and Reassembly Guide - F - Page 42
DC-in Jack Reassembly Steps 1. Place the DCin jack in the system. 2. Tighten the single screw securing the DCin jack in place. 3. Connect the DCin jack cable into its connector on the system board. 4. Reinstall the preremoval part(s) in descending order. DC-in Jack Validation Steps 1. Power on - Dell Chromebook 7310 | Chromebook 13 - 7310 Disassembly and Reassembly Guide - F - Page 43
(To download, please rightclick on the link above and select "Save Target As" or "Save Link As") 1. PreRemoval Instructions Speakers Disassembly Steps Before removing the Speakers: 1. During installation or removal of any hardware always ensure all data is backed up properly. 2. Disconnect any - Dell Chromebook 7310 | Chromebook 13 - 7310 Disassembly and Reassembly Guide - F - Page 44
3. Disconnect the (1) touchpad cable, (2) LED board cable and (3) speaker cable from the system board. 4. Lift up and remove both speakers from the system. - Dell Chromebook 7310 | Chromebook 13 - 7310 Disassembly and Reassembly Guide - F - Page 45
5. Complete. Speakers Reassembly Steps 1. Place both speakers into its compartment on the system. 2. Reroute the speaker cable into the routing channel. 3. Connect the speaker cable, LED board cable and touchpad cable into their connectors on the system board. 4. Reinstall the preremoval part(s) - Dell Chromebook 7310 | Chromebook 13 - 7310 Disassembly and Reassembly Guide - F - Page 46
or "Save Link As") System Board Disassembly Steps 1. PreRemoval Instructions Before removing the System Board: 1. During installation or removal of any devices from their electrical outlets. 4. Remove the Bottom Cover, Battery, M.2 SSD, WLAN Card, Heat Sink. NOTE: In the event of hardware change, - Dell Chromebook 7310 | Chromebook 13 - 7310 Disassembly and Reassembly Guide - F - Page 47
2. Establishing image. 3. Disconnect the (1) fan cable, (2) I/O board cable, (3) touchpad cable, (4) keyboard backlight cable, (5) LED board cable, (6) speaker cable, (7) DCin cable and (8) eDP cable from the system board. - Dell Chromebook 7310 | Chromebook 13 - 7310 Disassembly and Reassembly Guide - F - Page 48
5. Remove two screws securing the system board in place. NOTE: Dell Chromebook 13 has a unique hardware writeprotect screw. The hardware writeprotect write VPD (Vendor Product Data, e.g. Serial Number, Keyboard Part Code, Service Tag, Asset Tag, Model Name, Region), else Shop Floor Tests would - Dell Chromebook 7310 | Chromebook 13 - 7310 Disassembly and Reassembly Guide - F - Page 49
6. Lift up and remove the system board. 7. Complete. - Dell Chromebook 7310 | Chromebook 13 - 7310 Disassembly and Reassembly Guide - F - Page 50
System Board Reassembly Steps 1. Place the system board into its compartment on the chassis, making sure all the cables are not under the system board. 2. Tighten the two screws to secure the system board in place. 3. Connect the keyboard cable to its connectors on the system board, and press down - Dell Chromebook 7310 | Chromebook 13 - 7310 Disassembly and Reassembly Guide - F - Page 51
select "Save Target As" or "Save Link As") 1. PreRemoval Instructions Keyboard Disassembly Steps Before removing the Keyboard: 1. During installation or removal of outlets. 4. Remove the Bottom Cover, Battery, M.2 SSD, WLAN Card, CPU Fan, Heat Sink, System Board. 2. Establishing image. - Dell Chromebook 7310 | Chromebook 13 - 7310 Disassembly and Reassembly Guide - F - Page 52
3. Remove the thirtyseven screws securing the keyboard to the palmrest. 4. Lift up and remove the keyboard from the palmrest. - Dell Chromebook 7310 | Chromebook 13 - 7310 Disassembly and Reassembly Guide - F - Page 53
5. Complete. Keyboard Reassembly Steps 1. Place the keyboard onto the palmrest. 2. Tighten the thirtyseven screws to secure the keyboard in place. 3. Reinstall the preremoval part(s) in descending order. Keyboard Validation Steps - Dell Chromebook 7310 | Chromebook 13 - 7310 Disassembly and Reassembly Guide - F - Page 54
above and select "Save Target As" or "Save Link As") 1. PreRemoval Instructions LCD Assembly Disassembly Steps Before removing the LCD Assembly: 1. During installation or removal of outlets. 4. Remove the Bottom Cover, Battery, M.2 SSD, WLAN Card, Heat Sink, System Board. Offline video. - Dell Chromebook 7310 | Chromebook 13 - 7310 Disassembly and Reassembly Guide - F - Page 55
2. Establishing image. 3. Release the antennas from the routing channel. - Dell Chromebook 7310 | Chromebook 13 - 7310 Disassembly and Reassembly Guide - F - Page 56
4. Remove the four screws securing the LCD assembly to the system. 5. Gently open the palmrest. - Dell Chromebook 7310 | Chromebook 13 - 7310 Disassembly and Reassembly Guide - F - Page 57
6. Separate the palmrest from the LCD assembly. 7. Complete. - Dell Chromebook 7310 | Chromebook 13 - 7310 Disassembly and Reassembly Guide - F - Page 58
NOTE: For models with a touchscreen, this is the last step and no further disassembly is required. LCD Assembly Reassembly Steps 1. Install the palmrest into the LCD assembly. 2. Push the left and right hinges of the LCD assembly to fit the palmrest assembly. 3. Tighten the four screws to secure the - Dell Chromebook 7310 | Chromebook 13 - 7310 Disassembly and Reassembly Guide - F - Page 59
select "Save Target As" or "Save Link As") 1. PreRemoval Instructions Hinge Cover Disassembly Steps Before removing the Hinge Cover: 1. During installation or electrical outlets. 4. Remove the Bottom Cover, Battery, M.2 SSD, WLAN Card, CPU Fan, Heat Sink, System Board, LCD Assembly. Offline - Dell Chromebook 7310 | Chromebook 13 - 7310 Disassembly and Reassembly Guide - F - Page 60
3. Use a plastic scribe to gently pry the hinge cover off the LCD assembly. 4. Complete. - Dell Chromebook 7310 | Chromebook 13 - 7310 Disassembly and Reassembly Guide - F - Page 61
Hinge Cover Reassembly Steps 1. Align and place the hinge cover on the LCD assembly. 2. Pinch the hinge cover and make sure all the clips latch into place. 3. Reinstall the preremoval part(s) in descending order. Hinge Cover Validation Steps 1. Physically look at the edges of the hinge cover. Make - Dell Chromebook 7310 | Chromebook 13 - 7310 Disassembly and Reassembly Guide - F - Page 62
select "Save Target As" or "Save Link As") 1. PreRemoval Instructions LCD Bezel Disassembly Steps Before removing the LCD Bezel: 1. During installation devices from their electrical outlets. 4. Remove the Bottom Cover, Battery, M.2 SSD, WLAN Card, CPU Fan, Heat Sink, System Board, LCD Assembly - Dell Chromebook 7310 | Chromebook 13 - 7310 Disassembly and Reassembly Guide - F - Page 63
3. Gently pry the LCD bezel beginning from the bottom of the bezel. 4. Remove the LCD bezel from the LCD assembly. - Dell Chromebook 7310 | Chromebook 13 - 7310 Disassembly and Reassembly Guide - F - Page 64
5. Complete. LCD Bezel Reassembly Steps 1. Align and place the LCD bezel on the LCD assembly. 2. Press down gently on all sides until the latches clip into place. 3. Reinstall the preremoval part(s) in descending order. LCD Bezel Validation Steps - Dell Chromebook 7310 | Chromebook 13 - 7310 Disassembly and Reassembly Guide - F - Page 65
"Save Target As" or "Save Link As") 1. PreRemoval Instructions Camera Disassembly Steps Before removing the Camera: 1. During installation or removal devices from their electrical outlets. 4. Remove the Bottom Cover, Battery, M.2 SSD, WLAN Card, CPU Fan, Heat Sink, System Board, LCD Assembly , - Dell Chromebook 7310 | Chromebook 13 - 7310 Disassembly and Reassembly Guide - F - Page 66
3. Disconnect the camera cable. 4. Use a plastic scribe to gently pry the camera off the LCD cover. - Dell Chromebook 7310 | Chromebook 13 - 7310 Disassembly and Reassembly Guide - F - Page 67
5. Complete. - Dell Chromebook 7310 | Chromebook 13 - 7310 Disassembly and Reassembly Guide - F - Page 68
visual reference. (To download, please rightclick on the link above and select "Save Target As" or "Save Link As") 1. PreRemoval Instructions LCD Hinges Disassembly Steps Before removing the LCD Hinges: 1. During installation or removal of any hardware always ensure all data is backed up - Dell Chromebook 7310 | Chromebook 13 - 7310 Disassembly and Reassembly Guide - F - Page 69
, or USB cables from the computer. 3. Disconnect the computer and all attached devices from their electrical outlets. 4. Remove the Bottom Cover, Battery, M.2 SSD, WLAN Card, CPU Fan, Heat Sink, System Board, LCD Assembly , Hinge Cover, LCD Bezel. 2. Establishing image. 3. Remove the three screws - Dell Chromebook 7310 | Chromebook 13 - 7310 Disassembly and Reassembly Guide - F - Page 70
4. Remove the left LCD hinge. 5. Release the antenna cables from the right LCD hinge hook. - Dell Chromebook 7310 | Chromebook 13 - 7310 Disassembly and Reassembly Guide - F - Page 71
6. Remove the three screws securing the right LCD hinge to the LCD cover. 7. Remove the right LCD hinge. - Dell Chromebook 7310 | Chromebook 13 - 7310 Disassembly and Reassembly Guide - F - Page 72
8. Complete. LCD Hinges Reassembly Steps 1. Place the LCD hinges into their respective compartments in the LCD cover. 2. Tighten the six screws to secure the LCD hinges to the LCD cover. 3. Reroute the antenna cables on the right LCD hinge hook. 4. Reinstall the preremoval part(s) in descending - Dell Chromebook 7310 | Chromebook 13 - 7310 Disassembly and Reassembly Guide - F - Page 73
select "Save Target As" or "Save Link As") 1. PreRemoval Instructions LCD Panel Disassembly Steps Before removing the LCD Panel: 1. During installation from their electrical outlets. 4. Remove the Bottom Cover, Battery, M.2 SSD, WLAN Card, CPU Fan, Heat Sink, System Board, LCD Assembly , - Dell Chromebook 7310 | Chromebook 13 - 7310 Disassembly and Reassembly Guide - F - Page 74
2. Establishing image. 3. Remove the four screws securing the LCD panel to the LCD assembly. - Dell Chromebook 7310 | Chromebook 13 - 7310 Disassembly and Reassembly Guide - F - Page 75
4. Carefully flip over the LCD panel. 5. Peel off the adhesive tape securing the eDP cable. - Dell Chromebook 7310 | Chromebook 13 - 7310 Disassembly and Reassembly Guide - F - Page 76
6. Unlock the metal clip securing the eDP connector. 7. Disconnect the eDP cable. - Dell Chromebook 7310 | Chromebook 13 - 7310 Disassembly and Reassembly Guide - F - Page 77
8. Remove the LCD panel from the LCD assembly. - Dell Chromebook 7310 | Chromebook 13 - 7310 Disassembly and Reassembly Guide - F - Page 78
9. Complete. - Dell Chromebook 7310 | Chromebook 13 - 7310 Disassembly and Reassembly Guide - F - Page 79
as an additional visual reference. (To download, please rightclick on the link above and select "Save Target As" or "Save Link As") 1. PreRemoval Instructions Before removing the eDP Cable: eDP Cable Disassembly Steps Offline video. - Dell Chromebook 7310 | Chromebook 13 - 7310 Disassembly and Reassembly Guide - F - Page 80
, or USB cables from the computer. 3. Disconnect the computer and all attached devices from their electrical outlets. 4. Remove the Bottom Cover, Battery, M.2 SSD, WLAN Card, CPU Fan, Heat Sink, System Board, LCD Assembly , Hinge Cover, LCD Bezel, LCD Panel. 2. Establishing image. 3. Peel open the - Dell Chromebook 7310 | Chromebook 13 - 7310 Disassembly and Reassembly Guide - F - Page 81
4. Peel open the cloth tape. 5. Release the eDP cable from the routing channel. - Dell Chromebook 7310 | Chromebook 13 - 7310 Disassembly and Reassembly Guide - F - Page 82
6. Disconnect the camera cable. 7. Remove the eDP cable from the LCD cover. - Dell Chromebook 7310 | Chromebook 13 - 7310 Disassembly and Reassembly Guide - F - Page 83
8. Complete. - Dell Chromebook 7310 | Chromebook 13 - 7310 Disassembly and Reassembly Guide - F - Page 84
properly. LCD Cover LCD Cover Disassembly Steps 1. PreRemoval Instructions Before removing the LCD Cover: 1. During installation or removal attached devices from their electrical outlets. 4. Remove the Bottom Cover, Battery, M.2 SSD, WLAN Card, CPU Fan, Heat Sink, System Board, LCD Assembly , Hinge - Dell Chromebook 7310 | Chromebook 13 - 7310 Disassembly and Reassembly Guide - F - Page 85
Palmrest Palmrest Disassembly Steps 1. PreRemoval Instructions Before removing the Palmrest: 1. During installation computer and all attached devices from their electrical outlets. 4. Remove the Bottom Cover, Battery, M.2 SSD, WLAN Card, I/O Board with Cable, CPU Fan, Heat Sink, DCin Jack, Speakers - Dell Chromebook 7310 | Chromebook 13 - 7310 Disassembly and Reassembly Guide - F - Page 86
-
 1
1 -
 2
2 -
 3
3 -
 4
4 -
 5
5 -
 6
6 -
 7
7 -
8
-
9
-
10
-
11
-
12
-
13
-
14
-
15
-
16
-
17
-
18
-
19
-
20
-
21
-
22
-
23
-
24
-
25
-
26
-
27
-
28
-
29
-
30
-
31
-
32
-
33
-
34
-
35
-
36
-
37
-
38
-
39
-
40
-
41
-
42
-
43
-
44
-
45
-
46
-
47
-
48
-
49
-
50
-
51
-
52
-
53
-
54
-
55
-
56
-
57
-
58
-
59
-
60
-
61
-
62
-
63
-
64
-
65
-
66
-
67
-
68
-
69
-
70
-
71
-
72
-
73
-
74
-
75
-
76
-
77
-
78
-
79
-
80
-
81
-
82
-
83
-
84
-
85
-
86
 |
 |

Dell Chromebook 13 - 7310
Disassembly and Reassembly Guide
Warning: This manual is intended for use by a Dell Certified Technician.
Damage due to servicing that is not authorized by Dell is not covered by
your warranty. Read and follow the safety instructions that came with the
product.