Dell DAE Setup Guide - Page 11
Step 5 - Start DAE2s, Start DAE2s - emc
 |
View all Dell DAE manuals
Add to My Manuals
Save this manual to your list of manuals |
Page 11 highlights
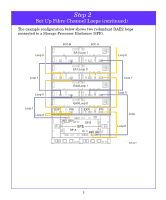
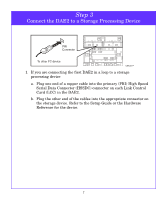
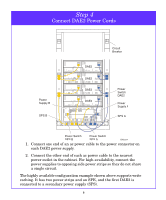
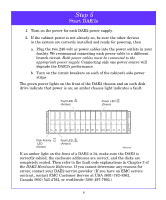
Step 5 Start DAE2s 1. Turn on the power for each DAE2 power supply. 2. If the cabinet power is not already on, be sure the other devices in the system are correctly installed and ready for powerup, then a. Plug the two 240-volt ac power cables into the power outlets in your facility. We recommend connecting each power cable to a different branch circuit. Both power cables must be connected to the appropriate power supply. Connecting only one power source will degrade the DAE2's performance. b. Turn on the circuit breakers on each of the cabinet's side power strips. The green power lights on the front of the DAE2 chassis and on each disk drive indicate that power is on; an amber chassis light indicates a fault. Fault LED (Amber) Power LED (Green) Disk Activity LED (Green) Fault LED (Amber) EMC2166 If an amber light on the front of a DAE2 is lit, make sure the DAE2 is correctly cabled, the enclosure addresses are correct, and the disks are completely seated. Then refer to the fault code explanations in Chapter 3 of the DAE2 Hardware Reference. If you cannot determine any reasons for errors, contact your DAE2 service provider. (If you have an EMC service contract, contact EMC Customer Service at USA (800) 782-4362, Canada (800) 543-4782, or worldwide (508) 497-7901.) 9
-
 1
1 -
2
-
3
-
4
-
5
-
 6
6 -
 7
7 -
 8
8 -
 9
9 -
 10
10 -
 11
11 -
 12
12 -
 13
13 -
 14
14
 |
 |