Dell DR2000v Veeam - Setting up the DR Series System on Veeam
Dell DR2000v Manual
 |
View all Dell DR2000v manuals
Add to My Manuals
Save this manual to your list of manuals |
Dell DR2000v manual content summary:
- Dell DR2000v | Veeam - Setting up the DR Series System on Veeam - Page 1
Setting Up the Dell™ DR Series System on Veeam Dell Engineering April 2016 A Dell Technical White Paper - Dell DR2000v | Veeam - Setting up the DR Series System on Veeam - Page 2
party products does not necessarily constitute Dell's recommendation of those products. Please consult your Dell representative for additional information. Trademarks used in this text: Dell™, the Dell logo, PowerVault™, EqualLogic™ are trademarks of Dell Inc. Other Dell trademarks may be used in - Dell DR2000v | Veeam - Setting up the DR Series System on Veeam - Page 3
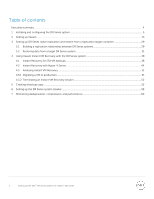
VM Recovery session ...52 5 Creating a backup copy ...53 6 Setting up the DR Series system cleaner...59 7 Monitoring deduplication, compression, and performance 60 3 Setting Up the Dell™ DR Series System on Veeam | April 2016 - Dell DR2000v | Veeam - Setting up the DR Series System on Veeam - Page 4
see the DR Series system documentation and other data management application best practices whitepapers for your specific DR Series system at: http://www.dell.com/support/home Note: The DR Series system and Veeam screenshots used in this document may vary slightly, depending on the DR Series system - Dell DR2000v | Veeam - Setting up the DR Series System on Veeam - Page 5
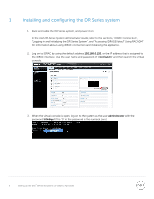
the DR Series system, and power it on. In the Dell DR Series System Administrator Guide, refer to the sections, "iDRAC Connection", "Logging in and by using the default address 192.168.0.120, or the IP address that is assigned to the iDRAC interface. Use the user name and password of "root/calvin - Dell DR2000v | Veeam - Setting up the DR Series System on Veeam - Page 6
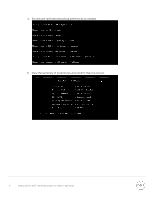
4. Set the user-defined networking preferences as needed. 5. View the summary of preferences and confirm that it is correct. 6 Setting Up the Dell™ DR Series System on Veeam | April 2016 - Dell DR2000v | Veeam - Setting up the DR Series System on Veeam - Page 7
St0r@ge! (The "0" in the password is the numeral zero.). 7. Join the DR Series system into the Active Directory domain. Note: if you do not want to add the DR Series System to Active Directory, see the DR Series System Owner's Manual for guest logon instructions. a. Under System Configuration in the - Dell DR2000v | Veeam - Setting up the DR Series System on Veeam - Page 8
8. To create the container, in the left navigation area, click Containers and then click the Create link at the top of the page. 9. Enter a Container Name, and click Next. 8 Setting Up the Dell™ DR Series System on Veeam | April 2016 - Dell DR2000v | Veeam - Setting up the DR Series System on Veeam - Page 9
10. Select the access protocol (NAS (NFS, CIFS)). 11. For CIFS, select the CIFS check box, set the marker type as None, and then click Next. 9 Setting Up the Dell™ DR Series System on Veeam | April 2016 - Dell DR2000v | Veeam - Setting up the DR Series System on Veeam - Page 10
For NFS, select the NFS check box and then click Next. 12. For CIFS, set the preferred client access credentials, and then click Next 10 Setting Up the Dell™ DR Series System on Veeam | April 2016 - Dell DR2000v | Veeam - Setting up the DR Series System on Veeam - Page 11
For NFS, set the following preferred client access credentials and then click Next 13. Check the configuration summary, and then click Create a New Container. 11 Setting Up the Dell™ DR Series System on Veeam | April 2016 - Dell DR2000v | Veeam - Setting up the DR Series System on Veeam - Page 12
14. Confirm that the container is successfully added. 12 Setting Up the Dell™ DR Series System on Veeam | April 2016 - Dell DR2000v | Veeam - Setting up the DR Series System on Veeam - Page 13
2 Setting up Veeam Notes: To maximize the DR Series system and Veeam deduplication savings, Dell recommends to use the exact settings in this guide for all the data being backed up. The backup data will change format completely when backup settings are changed. Hence, to get accurate savings numbers - Dell DR2000v | Veeam - Setting up the DR Series System on Veeam - Page 14
3. Enter a name for the DR Series system container repository, and click Next. 4. For a CIFS container, do the following: a. Select Shared folder as the type of backup repository, and click Next. 14 Setting Up the Dell™ DR Series System on Veeam | April 2016 - Dell DR2000v | Veeam - Setting up the DR Series System on Veeam - Page 15
b. In the Shared folder field, enter the DR Series system container share UNC path (or TCP/IP address to replace hostname), select the Gateway Server, and click Next. 15 Setting Up the Dell™ DR Series System on Veeam | April 2016 - Dell DR2000v | Veeam - Setting up the DR Series System on Veeam - Page 16
an NFS repository (for a Linux server), do the following: Note: The Veeam Server is supported on a Windows platform only; therefore, to configure an NFS container from a DR Series system from the list if one has been added already. 16 Setting Up the Dell™ DR Series System on Veeam | April 2016 - Dell DR2000v | Veeam - Setting up the DR Series System on Veeam - Page 17
c. Mount the DR Series system NFS container on this Linux server, and enter the container mount path as the Backup Repository. 6. To customize the repository settings, click Advanced. 17 Setting Up the Dell™ DR Series System on Veeam | April 2016 - Dell DR2000v | Veeam - Setting up the DR Series System on Veeam - Page 18
: Refer to the latest Dell DR Series System Interoperability Guide for the maximum concurrent jobs supported for CIFS/NFS based on these settings after the data has been written to the DR Series system. WARNING: Dell recommends that you do not change the setting for the option, Align backup file - Dell DR2000v | Veeam - Setting up the DR Series System on Veeam - Page 19
setting enables multiple write streams within a single job with parallel processing enabled. Enabling multiple streams dramatically improves overall job backup performance. Dell recommends that you use the per-VM backup files option for better backup throughput. 9. Click Next. 19 Setting Up the - Dell DR2000v | Veeam - Setting up the DR Series System on Veeam - Page 20
10. For Instant Recovery to work, select the option, Enable vPower NFS Server. For CIFS, enable the option as below - For NFS, enable the option as below - 20 Setting Up the Dell™ DR Series System on Veeam | April 2016 - Dell DR2000v | Veeam - Setting up the DR Series System on Veeam - Page 21
11. On the review page, verify the settings, and click Next to apply changes. For a CIFS Container Repository, the Review page will appear similar to the following example. 21 Setting Up the Dell™ DR Series System on Veeam | April 2016 - Dell DR2000v | Veeam - Setting up the DR Series System on Veeam - Page 22
For an NFS Container Repository, the Review page will appear similar to the following example. 22 Setting Up the Dell™ DR Series System on Veeam | April 2016 - Dell DR2000v | Veeam - Setting up the DR Series System on Veeam - Page 23
12. Click Finish. 13. On the Backup & Replication menu, go to Jobs > Backup, and right-click Backup to create a new backup job. 23 Setting Up the Dell™ DR Series System on Veeam | April 2016 - Dell DR2000v | Veeam - Setting up the DR Series System on Veeam - Page 24
14. Enter the name for the backup job, and click Next. 15. For the backup, select one or more virtual machines, data stores, resource pools, vApps, SCVMM clusters, and so on, as needed, and then click Add. 24 Setting Up the Dell™ DR Series System on Veeam | April 2016 - Dell DR2000v | Veeam - Setting up the DR Series System on Veeam - Page 25
16. Select the DR Series system container share as the Backup Repository for this job, and click Advanced. 17. On the Backup tab, ensure Incremental is selected. 25 Setting Up the Dell™ DR Series System on Veeam | April 2016 - Dell DR2000v | Veeam - Setting up the DR Series System on Veeam - Page 26
that you select the options for all of the backup jobs. Generally, Dell recommends turning off encryption, compression, and deduplication settings. However, with Veeam, Dell recommends that you enable deduplication. Veeam runs deduplication for data block sizes 512 KB or above, and deduplication - Dell DR2000v | Veeam - Setting up the DR Series System on Veeam - Page 27
19. Click Next. 20. Schedule the backup and click Create. 27 Setting Up the Dell™ DR Series System on Veeam | April 2016 - Dell DR2000v | Veeam - Setting up the DR Series System on Veeam - Page 28
21. Click Finish. 22. To run the backup manually, right-click the configured backup job, and select Start. 28 Setting Up the Dell™ DR Series System on Veeam | April 2016 - Dell DR2000v | Veeam - Setting up the DR Series System on Veeam - Page 29
, in the left navigation area, go to Storage > Replication, and then click the Create link at the top of the page. 29 Setting Up the Dell™ DR Series System on Veeam | April 2016 - Dell DR2000v | Veeam - Setting up the DR Series System on Veeam - Page 30
the replication session. NOTE: - Make sure the replication session has a Peer Status as Online if restore from replication target is needed, 30 Setting Up the Dell™ DR Series System on Veeam | April 2016 - Dell DR2000v | Veeam - Setting up the DR Series System on Veeam - Page 31
connection(s) enabled. 1. Add the target DR Series system container to the Veeam repository. For instructions, see the section, "Setting up Veeam." 2. Update all backup jobs that use the the appropriate Restore from backup option. 31 Setting Up the Dell™ DR Series System on Veeam | April 2016 - Dell DR2000v | Veeam - Setting up the DR Series System on Veeam - Page 32
4. Click Add VM and select "From backup". Select the VM to be restored and click Add. 32 Setting Up the Dell™ DR Series System on Veeam | April 2016 - Dell DR2000v | Veeam - Setting up the DR Series System on Veeam - Page 33
5. Select the Restore Mode and click Next. 6. Provide the Host details as needed, and click Next. 33 Setting Up the Dell™ DR Series System on Veeam | April 2016 - Dell DR2000v | Veeam - Setting up the DR Series System on Veeam - Page 34
7. Select the resource Pool and click Next. 8. Select the datastore and disk type, and click Next. 34 Setting Up the Dell™ DR Series System on Veeam | April 2016 - Dell DR2000v | Veeam - Setting up the DR Series System on Veeam - Page 35
9. Enter the new name for the restored VM and click Next. 10. Select the network location and click Next. 35 Setting Up the Dell™ DR Series System on Veeam | April 2016 - Dell DR2000v | Veeam - Setting up the DR Series System on Veeam - Page 36
11. Enter text that describes the reason for the restore and click Next. 12. Click Finish. 36 Setting Up the Dell™ DR Series System on Veeam | April 2016 - Dell DR2000v | Veeam - Setting up the DR Series System on Veeam - Page 37
13. After the restore job has been created, you can run the job and monitor it from the Backup & Replication menu. 37 Setting Up the Dell™ DR Series System on Veeam | April 2016 - Dell DR2000v | Veeam - Setting up the DR Series System on Veeam - Page 38
from a compressed and deduplicated backup file. By default, all changes to virtual disks that take place migrated back to production storage. The Veeam vPower NFS service is a Windows service that runs on a windows backup repository server and enables Dell™ DR Series System on Veeam | April 2016 - Dell DR2000v | Veeam - Setting up the DR Series System on Veeam - Page 39
2. To perform the instant recovery, click the Restore Wizard option. Select the VMware option and then select Instant VM recovery. 3. Select the Virtual Machine to be recovered and click Next. 39 Setting Up the Dell™ DR Series System on Veeam | April 2016 - Dell DR2000v | Veeam - Setting up the DR Series System on Veeam - Page 40
4. At the Restore point step, select the point to which you want to restore the VM and then click Next. 5. At the Restore Mode step, select the option, Restore to a new location, or with different settings, and then click Next. 40 Setting Up the Dell™ DR Series System on Veeam | April 2016 - Dell DR2000v | Veeam - Setting up the DR Series System on Veeam - Page 41
the restored VM should belong. c. In the Restored VM name field, add the _restored suffix to the VM name. d. Click Next. 41 Setting Up the Dell™ DR Series System on Veeam | April 2016 - Dell DR2000v | Veeam - Setting up the DR Series System on Veeam - Page 42
is recovered from the backup. 8. Select the checkboxes Connect VM to network and Power on VM automatically, and then click Next. 42 Setting Up the Dell™ DR Series System on Veeam | April 2016 - Dell DR2000v | Veeam - Setting up the DR Series System on Veeam - Page 43
9. Click Finish to start the Instant VM Recovery 10. Open the vSphere client and make sure that the restored VM is started on the ESX host you selected. 43 Setting Up the Dell™ DR Series System on Veeam | April 2016 - Dell DR2000v | Veeam - Setting up the DR Series System on Veeam - Page 44
Hyper-V server, cached data is directly stored at the Hyper-V server's datastore location and not to the NFS data store path. 44 Setting Up the Dell™ DR Series System on Veeam | April 2016 - Dell DR2000v | Veeam - Setting up the DR Series System on Veeam - Page 45
2. To perform Instant Recovery, on the Veeam console, click the Restore Wizard option, select Hyper-V and then select Instant VM recovery. 45 Setting Up the Dell™ DR Series System on Veeam | April 2016 - Dell DR2000v | Veeam - Setting up the DR Series System on Veeam - Page 46
3. Select the Virtual Machine to be recovered. 4. Add the VM which need to be recovered. 46 Setting Up the Dell™ DR Series System on Veeam | April 2016 - Dell DR2000v | Veeam - Setting up the DR Series System on Veeam - Page 47
5. At the Restore Mode step, select Restore to a new location, or with different settings, and then click Next. 6. Select the Host to which to recover the VM. 47 Setting Up the Dell™ DR Series System on Veeam | April 2016 - Dell DR2000v | Veeam - Setting up the DR Series System on Veeam - Page 48
7. At the Datastore step, provide the details of cache data that need to be stored. 8. Enter the details of the path where VM cache data is stored. 48 Setting Up the Dell™ DR Series System on Veeam | April 2016 - Dell DR2000v | Veeam - Setting up the DR Series System on Veeam - Page 49
9. Select the Virtual Networks that map to each other between the original and new VM locations. 10. In the Restored VM name field, add the _restored suffix to the VM name. 49 Setting Up the Dell™ DR Series System on Veeam | April 2016 - Dell DR2000v | Veeam - Setting up the DR Series System on Veeam - Page 50
11. Click Finish to start the recovery. 12. Open the Hyper-v Client and make sure that the restored VM is started on the host you selected. 50 Setting Up the Dell™ DR Series System on Veeam | April 2016 - Dell DR2000v | Veeam - Setting up the DR Series System on Veeam - Page 51
pane, select Instant Recovery. 3. In the working area, right-click the name of the recovered VM and select Migrate to production. 51 Setting Up the Dell™ DR Series System on Veeam | April 2016 - Dell DR2000v | Veeam - Setting up the DR Series System on Veeam - Page 52
Inventory pane, select Instant Recovery. 3. In the working area, right-click the name of the recovered VM and select Stop publishing. 52 Setting Up the Dell™ DR Series System on Veeam | April 2016 - Dell DR2000v | Veeam - Setting up the DR Series System on Veeam - Page 53
steps to create a backup copy job. 1. Click the backup copy in Auxiliary jobs, enter a name of the job, and click Next. 53 Setting Up the Dell™ DR Series System on Veeam | April 2016 - Dell DR2000v | Veeam - Setting up the DR Series System on Veeam - Page 54
2. Add the Virtual Machine from the backup Jobs. 54 Setting Up the Dell™ DR Series System on Veeam | April 2016 - Dell DR2000v | Veeam - Setting up the DR Series System on Veeam - Page 55
3. Select the backup repository, click Advanced, and then do the following: a. Select the Storage tab. b. Select the Compression level as None. c. Click OK. 55 Setting Up the Dell™ DR Series System on Veeam | April 2016 - Dell DR2000v | Veeam - Setting up the DR Series System on Veeam - Page 56
4. Select the type of data transfer and click Next. 5. Schedule the job as needed. 56 Setting Up the Dell™ DR Series System on Veeam | April 2016 - Dell DR2000v | Veeam - Setting up the DR Series System on Veeam - Page 57
6. Click Finish. 57 Setting Up the Dell™ DR Series System on Veeam | April 2016 - Dell DR2000v | Veeam - Setting up the DR Series System on Veeam - Page 58
backup files will be created by copying the most recent VM state data from the primary backup storage in its entirety. 58 Setting Up the Dell™ DR Series System on Veeam | April 2016 - Dell DR2000v | Veeam - Setting up the DR Series System on Veeam - Page 59
DR Series system cleaner should run at least 40 hours per week when backups are not taking place, and generally after a backup job has completed. Dell recommends scheduling the cleaner at a separate time from backup and replication jobs. 59 Setting Up the - Dell DR2000v | Veeam - Setting up the DR Series System on Veeam - Page 60
backup jobs are completed, the ratios will increase. Backup jobs with a 12-week retention will average a 15x ratio, in most cases. 60 Setting Up the Dell™ DR Series System on Veeam | April 2016
-
 1
1 -
 2
2 -
 3
3 -
 4
4 -
 5
5 -
 6
6 -
 7
7 -
8
-
9
-
10
-
11
-
12
-
13
-
14
-
15
-
16
-
17
-
18
-
19
-
20
-
21
-
22
-
23
-
24
-
25
-
26
-
27
-
28
-
29
-
30
-
31
-
32
-
33
-
34
-
35
-
36
-
37
-
38
-
39
-
40
-
41
-
42
-
43
-
44
-
45
-
46
-
47
-
48
-
49
-
50
-
51
-
52
-
53
-
54
-
55
-
56
-
57
-
58
-
59
-
60
 |
 |

A Dell Technical White Paper
Setting Up the Dell
™
DR Series System on
Veeam
Dell Engineering
April 2016