Dell Dimension XPS 50 Reference Guide - Page 101
CD-ROM and DVD-ROM Drives, Hard-Disk Drive, System Board, Resolving Software and Hardware
 |
View all Dell Dimension XPS 50 manuals
Add to My Manuals
Save this manual to your list of manuals |
Page 101 highlights
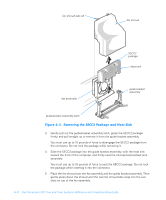
4. Replace the computer cover and support beam, connect all external cables, and turn on the system. The following subsections provide troubleshooting checks for some specific types of drives. If you completed the basic drive checks (refer to "Drives" in Chapter 4 and this chapter) and suspect a problem with a CD-ROM or DVD-ROM drive, perform the following checks: Check for hardware conflicts as described in "Resolving Software and Hardware Incompatibilities" in Chapter 5. If you have Windows 98, double-click the System icon in the Control Panel and check the Performance tab for any abnormal indications. If you have Windows 2000, double-click the Administrative Tools icon in the Control Panel and check the Event Viewer. Clear NVRAM as described in "Clearing NVRAM" in Appendix B. If you completed the basic drive checks (refer to "Drives" in Chapter 4 and this chapter) and suspect a problem with a hard-disk drive, perform the following checks: Clear NVRAM as described in "Clearing NVRAM" in Appendix B. Disconnect other devices on the same interface cable. A system board problem can result from a defective system board component, a faulty power supply, or a defective component connected to the system board. If an error message indicates a system board problem, the boot routine does not complete (refer to "Boot Routine" in Chapter 4), or if the power supply fan does not spin when power is on, perform the following steps: 1. Verify that the electrical outlet to which the computer is connected is properly functioning. Test the electrical outlet with another electrical device, such as a lamp. 2. Remove the computer cover and support beam as described in "Removing and Replacing the Computer Cover and Support Beam" in Chapter 2. 3. Remove all expansion cards except the video card as described in "Removing Expansion Cards" in Chapter 2. Make sure the video card is fully seated in its connector (see Figure 6-1). support.dell.com Checking Inside Your Computer 6-7
-
 1
1 -
2
-
3
-
4
-
5
-
6
-
7
-
8
-
9
-
10
-
11
-
12
-
13
-
14
-
15
-
16
-
17
-
18
-
19
-
20
-
21
-
22
-
23
-
24
-
25
-
26
-
27
-
28
-
29
-
30
-
31
-
32
-
33
-
34
-
35
-
36
-
37
-
38
-
39
-
40
-
41
-
42
-
43
-
44
-
45
-
46
-
47
-
48
-
49
-
50
-
51
-
52
-
53
-
54
-
55
-
56
-
57
-
58
-
59
-
60
-
61
-
62
-
63
-
64
-
65
-
66
-
67
-
68
-
69
-
70
-
71
-
72
-
73
-
74
-
75
-
76
-
77
-
78
-
79
-
80
-
81
-
82
-
83
-
84
-
85
-
86
-
87
-
88
-
89
-
90
-
91
-
92
-
93
-
94
-
95
-
 96
96 -
 97
97 -
 98
98 -
 99
99 -
 100
100 -
 101
101 -
 102
102 -
 103
103 -
 104
104 -
 105
105 -
 106
106 -
107
-
108
-
109
-
110
-
111
-
112
-
113
-
114
-
115
-
116
-
117
-
118
-
119
-
120
-
121
-
122
-
123
-
124
-
125
-
126
-
127
-
128
-
129
-
130
-
131
-
132
-
133
-
134
-
135
-
136
-
137
-
138
-
139
-
140
-
141
-
142
-
143
-
144
-
145
-
146
-
147
-
148
-
149
-
150
-
151
-
152
-
153
-
154
-
155
-
156
-
157
-
158
-
159
-
160
-
161
-
162
-
163
-
164
-
165
-
166
-
167
-
168
-
169
-
170
-
171
-
172
-
173
-
174
-
175
-
176
-
177
-
178
-
179
-
180
-
181
-
182
-
183
-
184
-
185
-
186
-
187
-
188
-
189
-
190
-
191
-
192
-
193
-
194
-
195
-
196
 |
 |