Dell Dimension XPS 50 Reference Guide - Page 104
You must use up to 25 pounds of force to seat the SECC2 package. Do not rock
 |
View all Dell Dimension XPS 50 manuals
Add to My Manuals
Save this manual to your list of manuals |
Page 104 highlights
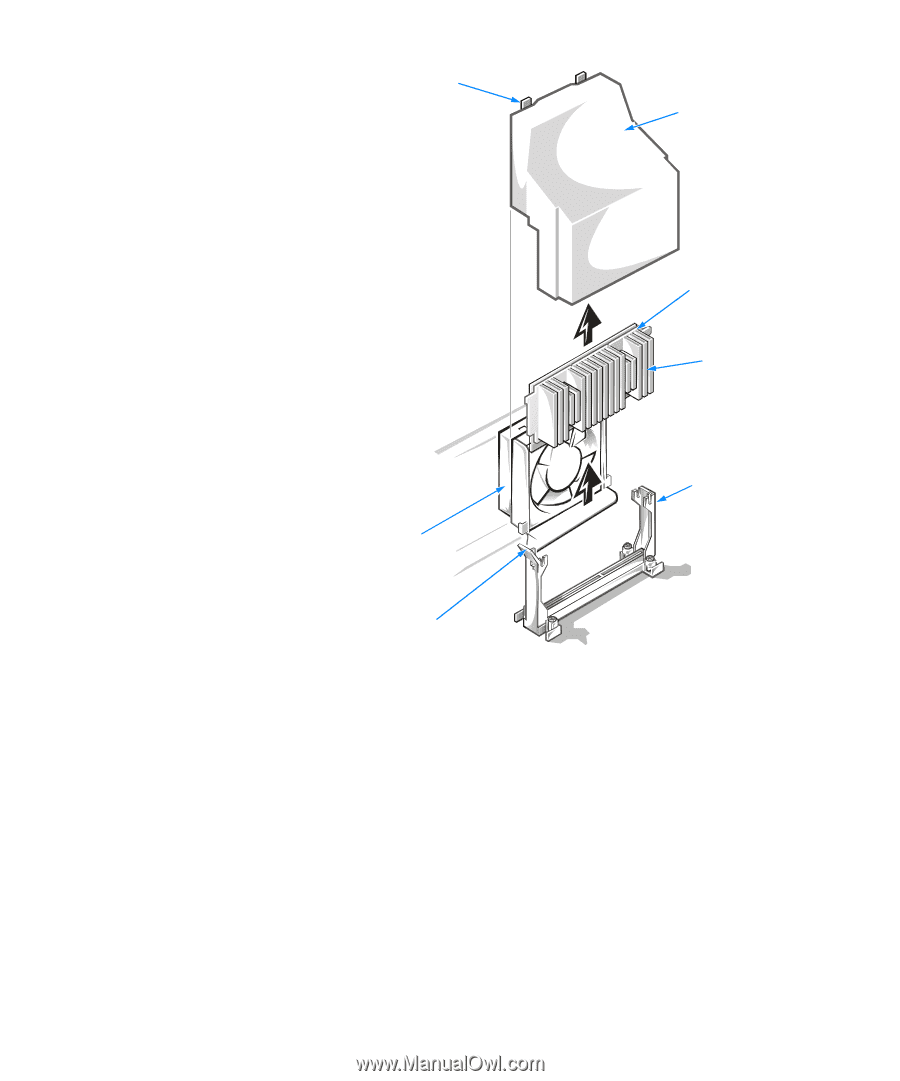
fan shroud tabs (2) fan shroud SECC2 package heat sink fan assembly guide bracket assembly guide-bracket assembly latch 3. Gently pull out the guide-bracket assembly latch, grasp the SECC2 package firmly, and pull straight up to remove it from the guide bracket assembly. You must use up to 15 pounds of force to disengage the SECC2 package from the connector. Do not rock the package while removing it. 4. Slide the SECC2 package into the guide bracket assembly, with the heat sink toward the front of the computer, and firmly seat the microprocessor/heat sink assembly. You must use up to 25 pounds of force to seat the SECC2 package. Do not rock the package while inserting it into the connector. 5. Place the fan shroud over the fan assembly and the guide bracket assembly. Then gently press down the shroud until the two fan shroud tabs snap into the two slots on top of the fan assembly. 6-10 Dell Dimension XPS Txxx and Txxxr Systems Reference and Troubleshooting Guide
-
 1
1 -
2
-
3
-
4
-
5
-
6
-
7
-
8
-
9
-
10
-
11
-
12
-
13
-
14
-
15
-
16
-
17
-
18
-
19
-
20
-
21
-
22
-
23
-
24
-
25
-
26
-
27
-
28
-
29
-
30
-
31
-
32
-
33
-
34
-
35
-
36
-
37
-
38
-
39
-
40
-
41
-
42
-
43
-
44
-
45
-
46
-
47
-
48
-
49
-
50
-
51
-
52
-
53
-
54
-
55
-
56
-
57
-
58
-
59
-
60
-
61
-
62
-
63
-
64
-
65
-
66
-
67
-
68
-
69
-
70
-
71
-
72
-
73
-
74
-
75
-
76
-
77
-
78
-
79
-
80
-
81
-
82
-
83
-
84
-
85
-
86
-
87
-
88
-
89
-
90
-
91
-
92
-
93
-
94
-
95
-
96
-
97
-
98
-
 99
99 -
 100
100 -
 101
101 -
 102
102 -
 103
103 -
 104
104 -
 105
105 -
 106
106 -
 107
107 -
 108
108 -
 109
109 -
110
-
111
-
112
-
113
-
114
-
115
-
116
-
117
-
118
-
119
-
120
-
121
-
122
-
123
-
124
-
125
-
126
-
127
-
128
-
129
-
130
-
131
-
132
-
133
-
134
-
135
-
136
-
137
-
138
-
139
-
140
-
141
-
142
-
143
-
144
-
145
-
146
-
147
-
148
-
149
-
150
-
151
-
152
-
153
-
154
-
155
-
156
-
157
-
158
-
159
-
160
-
161
-
162
-
163
-
164
-
165
-
166
-
167
-
168
-
169
-
170
-
171
-
172
-
173
-
174
-
175
-
176
-
177
-
178
-
179
-
180
-
181
-
182
-
183
-
184
-
185
-
186
-
187
-
188
-
189
-
190
-
191
-
192
-
193
-
194
-
195
-
196
 |
 |