Dell E515dw Dell Color Multifunction Printer Users Guide - Page 65
Change the Paper Source (Windows®), Advanced Printing Methods (Windows®)
 |
View all Dell E515dw manuals
Add to My Manuals
Save this manual to your list of manuals |
Page 65 highlights
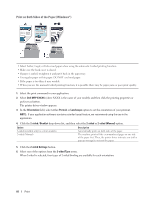
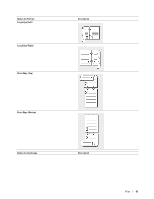
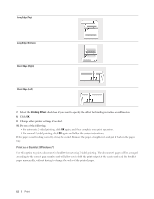
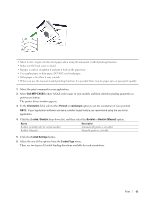
Divide into Sets This option prints the whole booklet in smaller individual booklet sets, allowing you to fold at the center of the smaller individual booklet sets without having to change the order of the printed pages. You can specify the number of sheets in each smaller booklet set (from 1-15). This option can be helpful when folding a printed booklet that has a large number of pages. 8. Select the Binding Offset check box if you want to specify the offset for binding in inches or millimeters. 9. Click OK. 10. Change other printer settings if needed. 11. Do one of the following: • For automatic booklet printing, click OK again, and then complete your print operation. • For manual booklet printing, click OK again and follow the screen instructions. Change the Paper Source (Windows®) Select a paper source setting that matches your print conditions or purpose. 1. Select the print command in your application. 2. Select Dell MFP EXXXX (where XXXX is the name of your model), and then click the printing properties or preferences button. The printer driver window appears. 3. Click the First Page and Other Pages drop-down lists to select your paper tray from each list. Option Auto Select Tray1 Manual Description The machine will automatically select the tray to use if the paper type and paper size configured on the machine match the printer driver settings. The paper size and paper type for each tray must be configured correctly on the machine. The machine will exclusively use tray #1 when printing. The machine will exclusively use the Manual Feed Slot when printing. NOTE: You can specify different trays for printing the first page of your document and for printing from the second page onwards. 4. Click OK. 5. Complete your print operation. Advanced Printing Methods (Windows®) • Print in Toner Save Mode (Windows®) Print 65
-
 1
1 -
2
-
3
-
4
-
5
-
6
-
7
-
8
-
9
-
10
-
11
-
12
-
13
-
14
-
15
-
16
-
17
-
18
-
19
-
20
-
21
-
22
-
23
-
24
-
25
-
26
-
27
-
28
-
29
-
30
-
31
-
32
-
33
-
34
-
35
-
36
-
37
-
38
-
39
-
40
-
41
-
42
-
43
-
44
-
45
-
46
-
47
-
48
-
49
-
50
-
51
-
52
-
53
-
54
-
55
-
56
-
57
-
58
-
59
-
 60
60 -
 61
61 -
 62
62 -
 63
63 -
 64
64 -
 65
65 -
 66
66 -
 67
67 -
 68
68 -
 69
69 -
 70
70 -
71
-
72
-
73
-
74
-
75
-
76
-
77
-
78
-
79
-
80
-
81
-
82
-
83
-
84
-
85
-
86
-
87
-
88
-
89
-
90
-
91
-
92
-
93
-
94
-
95
-
96
-
97
-
98
-
99
-
100
-
101
-
102
-
103
-
104
-
105
-
106
-
107
-
108
-
109
-
110
-
111
-
112
-
113
-
114
-
115
-
116
-
117
-
118
-
119
-
120
-
121
-
122
-
123
-
124
-
125
-
126
-
127
-
128
-
129
-
130
-
131
-
132
-
133
-
134
-
135
-
136
-
137
-
138
-
139
-
140
-
141
-
142
-
143
-
144
-
145
-
146
-
147
-
148
-
149
-
150
-
151
-
152
-
153
-
154
-
155
-
156
-
157
-
158
-
159
-
160
-
161
-
162
-
163
-
164
-
165
-
166
-
167
-
168
-
169
-
170
-
171
-
172
-
173
-
174
-
175
-
176
-
177
-
178
-
179
-
180
-
181
-
182
-
183
-
184
-
185
-
186
-
187
-
188
-
189
-
190
-
191
-
192
-
193
-
194
-
195
-
196
-
197
-
198
-
199
-
200
-
201
-
202
-
203
-
204
-
205
-
206
-
207
-
208
-
209
-
210
-
211
-
212
-
213
-
214
-
215
-
216
-
217
-
218
-
219
-
220
-
221
-
222
-
223
-
224
-
225
-
226
-
227
-
228
-
229
-
230
-
231
-
232
-
233
-
234
-
235
-
236
-
237
-
238
-
239
-
240
-
241
-
242
-
243
-
244
-
245
-
246
-
247
-
248
-
249
-
250
-
251
-
252
-
253
-
254
-
255
-
256
-
257
-
258
-
259
-
260
-
261
-
262
-
263
-
264
-
265
-
266
-
267
-
268
-
269
-
270
-
271
-
272
-
273
-
274
-
275
-
276
-
277
-
278
-
279
-
280
-
281
-
282
-
283
-
284
-
285
-
286
-
287
-
288
-
289
-
290
-
291
-
292
-
293
-
294
-
295
-
296
-
297
-
298
-
299
-
300
-
301
-
302
-
303
-
304
-
305
-
306
-
307
-
308
-
309
-
310
-
311
-
312
-
313
-
314
-
315
-
316
-
317
-
318
-
319
-
320
-
321
-
322
-
323
-
324
-
325
-
326
-
327
-
328
-
329
-
330
-
331
-
332
-
333
-
334
-
335
-
336
-
337
-
338
-
339
-
340
-
341
-
342
-
343
-
344
-
345
-
346
-
347
-
348
-
349
-
350
-
351
-
352
-
353
-
354
-
355
-
356
-
357
-
358
-
359
-
360
-
361
-
362
-
363
-
364
-
365
-
366
-
367
-
368
-
369
-
370
-
371
-
372
-
373
-
374
-
375
-
376
-
377
-
378
-
379
-
380
-
381
-
382
-
383
-
384
-
385
-
386
 |
 |