Dell E515dw Dell Color Multifunction Printer Users Guide - Page 95
Scan, Before Scanning, Con Network Scanning for Windows®
 |
View all Dell E515dw manuals
Add to My Manuals
Save this manual to your list of manuals |
Page 95 highlights
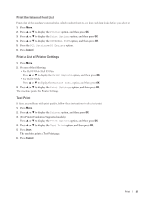
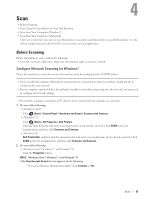
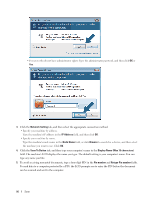
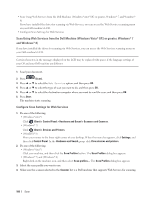
4 Scan • Before Scanning • Scan Using the Scan Button on Your Dell Machine • Scan from Your Computer (Windows®) • Scan from Your Computer (Macintosh) There are several ways you can use your Macintosh to scan photos and documents on your Dell machine. Use the software applications provided by Dell or your favorite scanning application. Before Scanning Before attempting to scan, confirm the following: • For USB or network cable users: Make sure the interface cable is correctly inserted. Configure Network Scanning for Windows® To use the machine as a network scanner, the machine must be configured with a TCP/IP address. • If you installed the machine following the instructions for a network user, then the machine should already be configured for your network. • If your computer is protected by a firewall and is unable to scan when connecting over the network, you may need to configure the firewall settings. • For network scanning, a maximum of 25 clients can be connected to one machine on a network. 1. Do one of the following: • (Windows Vista®) Click (Start) > Control Panel > Hardware and Sound > Scanners and Cameras. • (Windows® 7) Click (Start) > All Programs > Dell Printers. Click the drop-down list and select your model name (if not already selected). Click SCAN in the left navigation bar, and then click Scanners and Cameras. • (Windows® 8) Dell Printer Hub, and then click the drop-down list and select your model name (if not already selected). Click SCAN in the left navigation bar, and then click Scanners and Cameras. 2. Do one of the following: • (Windows Vista®, Windows® 7 and Windows® 8) Click the Properties button. NOTE: (Windows Vista®, Windows® 7 and Windows® 8) If the User Account Control screen appears, do the following: • For users who have administrator rights: Click Continue or Yes. Scan 95
-
 1
1 -
2
-
3
-
4
-
5
-
6
-
7
-
8
-
9
-
10
-
11
-
12
-
13
-
14
-
15
-
16
-
17
-
18
-
19
-
20
-
21
-
22
-
23
-
24
-
25
-
26
-
27
-
28
-
29
-
30
-
31
-
32
-
33
-
34
-
35
-
36
-
37
-
38
-
39
-
40
-
41
-
42
-
43
-
44
-
45
-
46
-
47
-
48
-
49
-
50
-
51
-
52
-
53
-
54
-
55
-
56
-
57
-
58
-
59
-
60
-
61
-
62
-
63
-
64
-
65
-
66
-
67
-
68
-
69
-
70
-
71
-
72
-
73
-
74
-
75
-
76
-
77
-
78
-
79
-
80
-
81
-
82
-
83
-
84
-
85
-
86
-
87
-
88
-
89
-
 90
90 -
 91
91 -
 92
92 -
 93
93 -
 94
94 -
 95
95 -
 96
96 -
 97
97 -
 98
98 -
 99
99 -
 100
100 -
101
-
102
-
103
-
104
-
105
-
106
-
107
-
108
-
109
-
110
-
111
-
112
-
113
-
114
-
115
-
116
-
117
-
118
-
119
-
120
-
121
-
122
-
123
-
124
-
125
-
126
-
127
-
128
-
129
-
130
-
131
-
132
-
133
-
134
-
135
-
136
-
137
-
138
-
139
-
140
-
141
-
142
-
143
-
144
-
145
-
146
-
147
-
148
-
149
-
150
-
151
-
152
-
153
-
154
-
155
-
156
-
157
-
158
-
159
-
160
-
161
-
162
-
163
-
164
-
165
-
166
-
167
-
168
-
169
-
170
-
171
-
172
-
173
-
174
-
175
-
176
-
177
-
178
-
179
-
180
-
181
-
182
-
183
-
184
-
185
-
186
-
187
-
188
-
189
-
190
-
191
-
192
-
193
-
194
-
195
-
196
-
197
-
198
-
199
-
200
-
201
-
202
-
203
-
204
-
205
-
206
-
207
-
208
-
209
-
210
-
211
-
212
-
213
-
214
-
215
-
216
-
217
-
218
-
219
-
220
-
221
-
222
-
223
-
224
-
225
-
226
-
227
-
228
-
229
-
230
-
231
-
232
-
233
-
234
-
235
-
236
-
237
-
238
-
239
-
240
-
241
-
242
-
243
-
244
-
245
-
246
-
247
-
248
-
249
-
250
-
251
-
252
-
253
-
254
-
255
-
256
-
257
-
258
-
259
-
260
-
261
-
262
-
263
-
264
-
265
-
266
-
267
-
268
-
269
-
270
-
271
-
272
-
273
-
274
-
275
-
276
-
277
-
278
-
279
-
280
-
281
-
282
-
283
-
284
-
285
-
286
-
287
-
288
-
289
-
290
-
291
-
292
-
293
-
294
-
295
-
296
-
297
-
298
-
299
-
300
-
301
-
302
-
303
-
304
-
305
-
306
-
307
-
308
-
309
-
310
-
311
-
312
-
313
-
314
-
315
-
316
-
317
-
318
-
319
-
320
-
321
-
322
-
323
-
324
-
325
-
326
-
327
-
328
-
329
-
330
-
331
-
332
-
333
-
334
-
335
-
336
-
337
-
338
-
339
-
340
-
341
-
342
-
343
-
344
-
345
-
346
-
347
-
348
-
349
-
350
-
351
-
352
-
353
-
354
-
355
-
356
-
357
-
358
-
359
-
360
-
361
-
362
-
363
-
364
-
365
-
366
-
367
-
368
-
369
-
370
-
371
-
372
-
373
-
374
-
375
-
376
-
377
-
378
-
379
-
380
-
381
-
382
-
383
-
384
-
385
-
386
 |
 |
