Dell Force10 S25-01-GE-24V Installing the S25N and S25V Systems - Page 34
Inserting Tandem PSUs into a Rack, Connecting the DC-to-DC Cable,
 |
View all Dell Force10 S25-01-GE-24V manuals
Add to My Manuals
Save this manual to your list of manuals |
Page 34 highlights
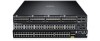
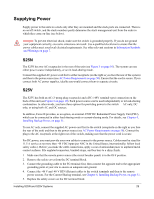
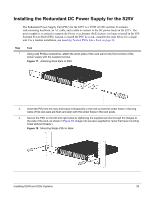
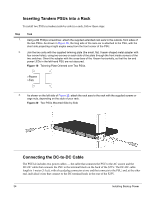
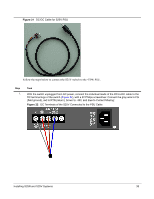
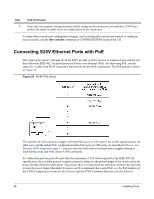
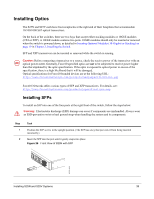
Inserting Tandem PSUs into a Rack To install two PSUs in tandem (side-by-side) in a rack, follow these steps: Step 1. 2. Task Using a #2 Phillips screwdriver, attach the supplied extended rack ears to the outside, front sides of the two PSUs. As shown in Figure 20, the long side of the rack ear is attached to the PSU, with the short side projecting at right angles away from the front corner of the PSU. Join the two units with the supplied twinning plate (the small, flat, I-beam-shaped metal adapter with four screw holes), using two screws on each side of the plate through the front inside corners of the two switches. Orient the adapter with the cross-bars of the I-beam horizontally, so that the fan and power LEDs in the left-hand PSU are not obscured. Figure 19 Twinning Plate Oriented over Two PSUs Power Fan 3. As shown on the left side of Figure 20, attach the rack ears to the rack with the supplied screws or cage nuts, depending on the style of your rack. Figure 20 Two PSUs Mounted Side-by-Side Connecting the DC-to-DC Cable The PSU kit includes two power cables - the cable that connects the PSU to the AC source and the DC-DC cable that connects the PSU to the terminal block on the back of the S25V. The DC-DC cable length is 1 meter (3 feet), with a keyed plug connector at one end that connects to the PSU, and, at the other end, individual wires that connect to the DC terminal leads in the rear of the S25V. 34 Installing Backup Power
-
 1
1 -
2
-
3
-
4
-
5
-
6
-
7
-
8
-
9
-
10
-
11
-
12
-
13
-
14
-
15
-
16
-
17
-
18
-
19
-
20
-
21
-
22
-
23
-
24
-
25
-
26
-
27
-
28
-
 29
29 -
 30
30 -
 31
31 -
 32
32 -
 33
33 -
 34
34 -
 35
35 -
 36
36 -
 37
37 -
 38
38 -
 39
39 -
40
-
41
-
42
-
43
-
44
-
45
-
46
-
47
-
48
-
49
-
50
-
51
-
52
-
53
-
54
 |
 |