Dell Force10 S4820T Getting Started Guide - Page 25
Installing the Switch, 1U Front-rack Installation
 |
View all Dell Force10 S4820T manuals
Add to My Manuals
Save this manual to your list of manuals |
Page 25 highlights
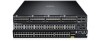
Installing the Switch You can mount the switch in the 1U front-rack or 1U two-post (flush and center) configurations. The following is an example of a 1U front-rack configuration. For the 1U two-post (flush and center) configurations, you can slide the switch into the rails in the same manner as the four-post configurations. 1U Front-rack Installation You must configure the rails that are attached to the switch. 1 Attach the switch rails (inner chassis members) to the S4820T switch. Figure 1-9, item 1 shows the detail for the front standoff with the locking tab. Figure 1-9. Attaching the Switch Rails Installation 19
-
 1
1 -
2
-
3
-
4
-
5
-
6
-
7
-
8
-
9
-
10
-
11
-
12
-
13
-
14
-
15
-
16
-
17
-
18
-
19
-
 20
20 -
 21
21 -
 22
22 -
 23
23 -
 24
24 -
 25
25 -
 26
26 -
 27
27 -
 28
28 -
 29
29 -
 30
30 -
31
-
32
-
33
-
34
-
35
-
36
-
37
-
38
-
39
 |
 |

Installation
19
Installing the Switch
You can mount the switch in the 1U front-rack or 1U two-post (flush and
center) configurations. The following is an example of a 1U front-rack
configuration. For the 1U two-post (flush and center) configurations, you can
slide the switch into the rails in the same manner as the four-post
configurations.
1U Front-rack Installation
You must configure the rails that are attached to the switch.
1
Attach the switch rails (inner chassis members) to the S4820T switch.
Figure 1-9, item 1 shows the detail for the front standoff with the locking
tab.
Figure 1-9.
Attaching the Switch Rails