Dell Inspiron Small Desktop 3647 Inspiron 3647 Owners Manual - Page 43
Postrequisites, Replace the fan shroud. See Replacing the Fan Shroud
 |
View all Dell Inspiron Small Desktop 3647 manuals
Add to My Manuals
Save this manual to your list of manuals |
Page 43 highlights
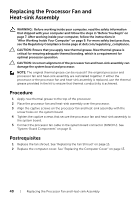
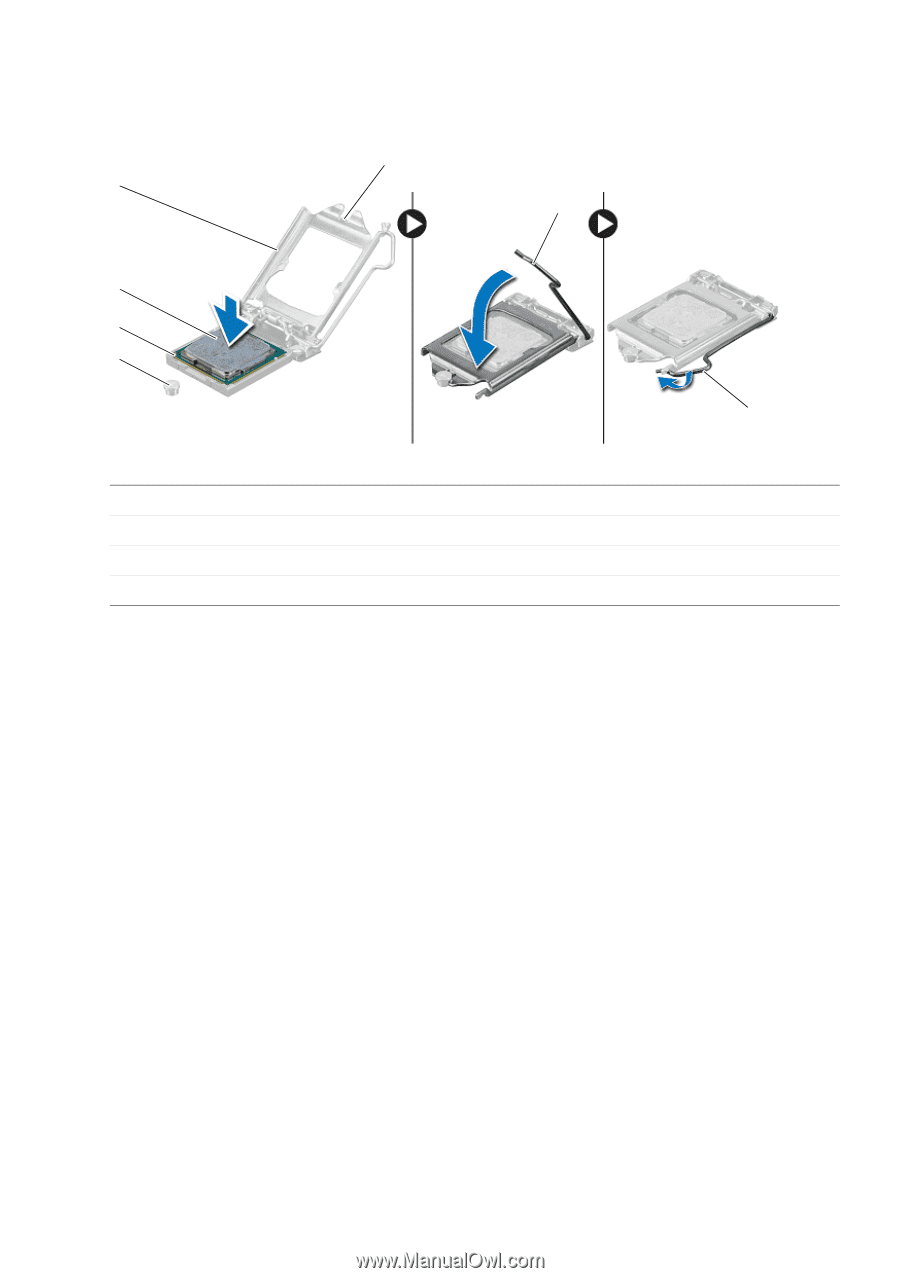
5 When the processor is fully seated in the socket, close the processor cover. 6 Pivot the release lever. 5 4 6 3 2 1 7 1 alignment post 3 processor 5 processor-cover notch 7 securing tab 2 processor pin-1 corner 4 processor cover 6 release lever Postrequisites 1 Replace the processor fan and heat sink. See "Replacing the Processor Fan and Heat-sink Assembly" on page 40. 2 Replace the fan shroud. See "Replacing the Fan Shroud" on page 15. 3 Replace the computer cover. See "Replacing the Computer Cover" on page 13. 4 Follow the instructions in "After Working Inside Your Computer" on page 9. Replacing the Processor | 43
-
 1
1 -
2
-
3
-
4
-
5
-
6
-
7
-
8
-
9
-
10
-
11
-
12
-
13
-
14
-
15
-
16
-
17
-
18
-
19
-
20
-
21
-
22
-
23
-
24
-
25
-
26
-
27
-
28
-
29
-
30
-
31
-
32
-
33
-
34
-
35
-
36
-
37
-
 38
38 -
 39
39 -
 40
40 -
 41
41 -
 42
42 -
 43
43 -
 44
44 -
 45
45 -
 46
46 -
 47
47 -
 48
48 -
49
-
50
-
51
-
52
 |
 |
Replacing the Processor
|
43
5
When the processor is fully seated in the socket, close the processor cover.
6
Pivot the release lever.
Postrequisites
1
Replace the processor fan and heat sink. See "Replacing the Processor Fan and
Heat-sink Assembly" on page 40.
2
Replace the fan shroud. See "Replacing the Fan Shroud" on page 15.
3
Replace the computer cover. See "Replacing the Computer Cover" on page 13.
4
Follow the instructions in "After Working Inside Your Computer" on page 9.
1
alignment post
2
processor pin-1 corner
3
processor
4
processor cover
5
processor-cover notch
6
release lever
7
securing tab
2
1
5
3
6
7
4