Dell Latitude 2100 Service Manual - Page 22
Display Assembly - power
 |
View all Dell Latitude 2100 manuals
Add to My Manuals
Save this manual to your list of manuals |
Page 22 highlights
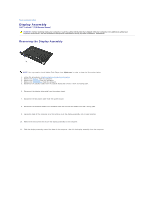
Back to Contents Page Display Assembly Dell™ Latitude™ 2100 Service Manual WARNING: Before working inside your computer, read the safety information that shipped with your computer. For additional safety best practices information, see the Regulatory Compliance Homepage at www.dell.com/regulatory_compliance. Removing the Display Assembly NOTE: You may need to install Adobe Flash Player from Adobe.com in order to view the illustrations below. 1. Follow the procedures in Before Working Inside Your Computer. 2. Remove the battery from the computer. 3. Remove the keyboard from the computer. 4. Remove the access panel from the computer. 5. Disconnect the speaker cable from the system board and remove it from its routing path. 6. Disconnect the display data cable from the system board. 7. Disconnect the DC power cable from the system board. 8. Disconnect the antenna cables from the WLAN card and remove the cables from their routing path. 9. Laying the base of the computer on a flat surface, pivot the display assembly into its open position. 10. Remove the two screws the secure the display assembly to the computer. 11. Slide the display assembly toward the base of the computer, then lift the display assembly from the computer.
-
 1
1 -
2
-
3
-
4
-
5
-
6
-
7
-
8
-
9
-
10
-
11
-
12
-
13
-
14
-
15
-
16
-
 17
17 -
 18
18 -
 19
19 -
 20
20 -
 21
21 -
 22
22 -
 23
23 -
 24
24 -
 25
25 -
 26
26 -
 27
27 -
28
-
29
-
30
-
31
-
32
-
33
-
34
-
35
-
36
-
37
 |
 |