Dell OptiPlex 330 Quick Reference - Page 47
Replacing the Computer Cover, Solving Problems - parts
 |
View all Dell OptiPlex 330 manuals
Add to My Manuals
Save this manual to your list of manuals |
Page 47 highlights
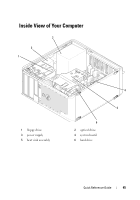
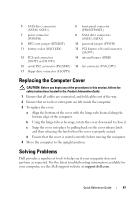
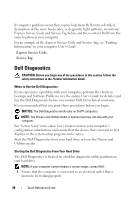
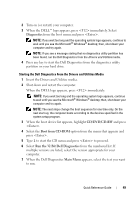
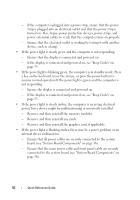
5 SATA drive connectors (SATA0, SATA1) 7 power connector (POWER) 9 RTC reset jumper (RTCRST) 11 battery socket (BATTERY) 13 PCI card connectors (SLOT2 and SLOT3) 15 serial/ PS/2 connector (PS2/SER2) 17 floppy drive connector (FLOPPY) 6 front-panel connector (FRONTPANEL) 8 SATA drive connectors (SATA2, SATA3) 10 password jumper (PSWD) 12 PCI Express x16 card connector (SLOT1) 14 internal buzzer (SPKR) 16 fan connector (FAN_CPU) Replacing the Computer Cover CAUTION: Before you begin any of the procedures in this section, follow the safety instructions located in the Product Information Guide. 1 Ensure that all cables are connected, and fold cables out of the way. 2 Ensure that no tools or extra parts are left inside the computer. 3 To replace the cover: a Align the bottom of the cover with the hinge tabs located along the bottom edge of the computer. b Using the hinge tabs as leverage, rotate the cover downward to close it. c Snap the cover into place by pulling back on the cover release latch and then releasing the latch when the cover is properly seated. d Ensure that the cover is seated correctly before moving the computer. 4 Move the computer to the upright position. Solving Problems Dell provides a number of tools to help you if your computer does not perform as expected. For the latest troubleshooting information available for your computer, see the Dell support website at support.dell.com. Quick Reference Guide 47
-
 1
1 -
2
-
3
-
4
-
5
-
6
-
7
-
8
-
9
-
10
-
11
-
12
-
13
-
14
-
15
-
16
-
17
-
18
-
19
-
20
-
21
-
22
-
23
-
24
-
25
-
26
-
27
-
28
-
29
-
30
-
31
-
32
-
33
-
34
-
35
-
36
-
37
-
38
-
39
-
40
-
41
-
 42
42 -
 43
43 -
 44
44 -
 45
45 -
 46
46 -
 47
47 -
 48
48 -
 49
49 -
 50
50 -
 51
51 -
 52
52 -
53
-
54
-
55
-
56
-
57
-
58
-
59
-
60
-
61
-
62
-
63
-
64
-
65
-
66
-
67
-
68
-
69
-
70
-
71
-
72
-
73
-
74
-
75
-
76
-
77
-
78
-
79
-
80
-
81
-
82
-
83
-
84
-
85
-
86
-
87
-
88
-
89
-
90
-
91
-
92
-
93
-
94
-
95
-
96
-
97
-
98
-
99
-
100
-
101
-
102
-
103
-
104
-
105
-
106
-
107
-
108
-
109
-
110
-
111
-
112
-
113
-
114
-
115
-
116
-
117
-
118
-
119
-
120
-
121
-
122
-
123
-
124
-
125
-
126
-
127
-
128
-
129
-
130
-
131
-
132
-
133
-
134
-
135
-
136
-
137
-
138
-
139
-
140
-
141
-
142
-
143
-
144
-
145
-
146
-
147
-
148
-
149
-
150
-
151
-
152
-
153
-
154
-
155
-
156
-
157
-
158
-
159
-
160
-
161
-
162
-
163
-
164
-
165
-
166
-
167
-
168
-
169
-
170
-
171
-
172
-
173
-
174
-
175
-
176
-
177
-
178
-
179
-
180
-
181
-
182
-
183
-
184
-
185
-
186
-
187
-
188
-
189
-
190
-
191
-
192
-
193
-
194
-
195
-
196
-
197
-
198
-
199
-
200
-
201
-
202
-
203
-
204
-
205
-
206
 |
 |