Dell OptiPlex GX520 Quick Reference Guide - Page 26
You must complete all the steps to properly set up your computer. See the appropriate s
 |
View all Dell OptiPlex GX520 manuals
Add to My Manuals
Save this manual to your list of manuals |
Page 26 highlights
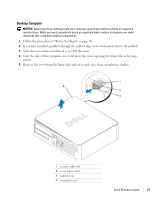
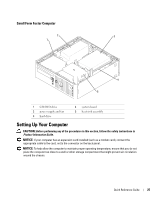
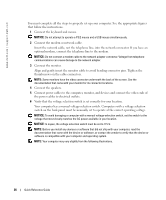
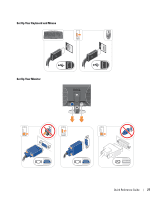
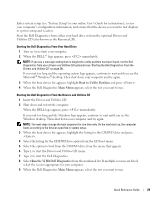
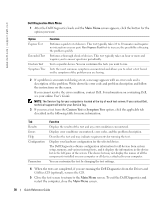
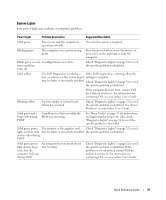
www.dell.com | support.dell.com You must complete all the steps to properly set up your computer. See the appropriate figures that follow the instructions. 1 Connect the keyboard and mouse. NOTICE: Do not attempt to operate a PS/2 mouse and a USB mouse simultaneously. 2 Connect the modem or network cable. Insert the network cable, not the telephone line, into the network connector. If you have an optional modem, connect the telephone line to the modem. NOTICE: Do not connect a modem cable to the network adapter connector. Voltage from telephone communications can cause damage to the network adapter. 3 Connect the monitor. Align and gently insert the monitor cable to avoid bending connector pins. Tighten the thumbscrews on the cable connectors. NOTE: Some monitors have the video connector underneath the back of the screen. See the documentation that came with your monitor for its connector locations. 4 Connect the speakers. 5 Connect power cables to the computer, monitor, and devices and connect the other ends of the power cables to electrical outlets. 6 Verify that the voltage selection switch is set correctly for your location. Your computer has a manual voltage-selection switch. Computers with a voltage selection switch on the back panel must be manually set to operate at the correct operating voltage. NOTICE: To avoid damaging a computer with a manual voltage-selection switch, set the switch to the voltage that most closely matches the AC power available in your location. NOTICE: In Japan, the voltage selection switch must be set to 115-V. NOTE: Before you install any devices or software that did not ship with your computer, read the documentation that came with the device or software, or contact the vendor to verify that the device or software is compatible with your computer and operating system. NOTE: Your computer may vary slightly from the following illustrations. 26 Quick Reference Guide
-
 1
1 -
2
-
3
-
4
-
5
-
6
-
7
-
8
-
9
-
10
-
11
-
12
-
13
-
14
-
15
-
16
-
17
-
18
-
19
-
20
-
 21
21 -
 22
22 -
 23
23 -
 24
24 -
 25
25 -
 26
26 -
 27
27 -
 28
28 -
 29
29 -
 30
30 -
 31
31 -
32
-
33
-
34
-
35
-
36
-
37
-
38
-
39
-
40
-
41
-
42
-
43
-
44
-
45
-
46
-
47
-
48
-
49
-
50
-
51
-
52
-
53
-
54
-
55
-
56
-
57
-
58
-
59
-
60
-
61
-
62
-
63
-
64
-
65
-
66
-
67
-
68
-
69
-
70
-
71
-
72
-
73
-
74
-
75
-
76
-
77
-
78
-
79
-
80
-
81
-
82
-
83
-
84
-
85
-
86
-
87
-
88
-
89
-
90
-
91
-
92
-
93
-
94
-
95
-
96
-
97
-
98
-
99
-
100
-
101
-
102
-
103
-
104
-
105
-
106
-
107
-
108
-
109
-
110
-
111
-
112
-
113
-
114
-
115
-
116
-
117
-
118
-
119
-
120
-
121
-
122
-
123
-
124
-
125
-
126
-
127
-
128
 |
 |
