Dell PU705 User Guide - Page 9
Setup: Dell™ Travel Mouse With Bluetooth - software
 |
View all Dell PU705 manuals
Add to My Manuals
Save this manual to your list of manuals |
Page 9 highlights
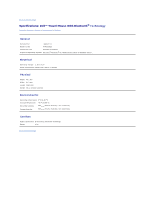
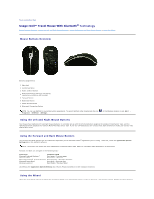
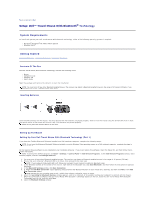
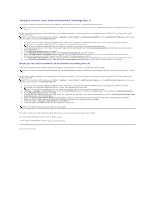
Back to Contents Page Setup: Dell™ Travel Mouse With Bluetooth® Technology System Requirements To install and operate your Dell Travel Mouse With Bluetooth Technology, either of the following operating systems is required: l Microsoft® Windows® XP, Media Center Edition l Windows Vista™ Getting Started Contents Of The Box • Inserting Batteries • Setting Up The Mouse Contents Of The Box The Dell Travel Mouse With Bluetooth Technology includes the following items: l Mouse l AA Batteries (2) l Software CD l User's Guide Open the package and remove the contents to start the installation. NOTE: You must turn off any other Bluetooth-enabled mouse. The receiver may detect a Bluetooth-enabled mouse in the range of 10 meters (30 feet). If you experience any issues, complete all the steps again. Inserting Batteries Insert two AA batteries into the mouse. You must ensure that the batteries are placed properly. Then turn on the mouse using the On/Off switch on its base. The optical sensor of the mouse will turn on (red) if the batteries are placed properly. NOTE: Do not press the Connect button at this time. Setting Up The Mouse Setting Up Your Dell Travel Mouse With Bluetooth Technology (Part 1) If you have the Toshiba Bluetooth Software installed on a Dell notebook computer, complete the following steps: NOTE: If you have the Widcomm Bluetooth Software installed or use the Windows Vista operating system on a Dell notebook computer, complete the steps in part 2 or part 3. All the required mouse software is pre-installed on your notebook computer. If you must restore this software, insert the Setup CD, and then follow the onscreen instructions. NOTE: To uninstall the SetPoint program, click Start ® Settings ® Control Panel ® Add/Remove Programs. In the Add/Remove Programs window, select SetPoint program, and then click Change/Remove. 1. You must turn off any other Bluetooth-enabled mouse. The receiver may detect a Bluetooth-enabled mouse in the range of 10 meters (30 feet). 2. Ensure that your computer's Bluetooth LED is on (blue), then proceed to the next step. NOTE: If your computer's Bluetooth LED is off, follow your computer's user manual to enable the Bluetooth radio. 3. In the Windows taskbar at the bottom of the screen, right-click on the Bluetooth icon, click Start Bluetooth, and then follow the instructions to activate Bluetooth. 4. In the Bluetooth Settings window, click New Connection. 5. D. When the Add New Connection wizard appears, press and hold the Bluetooth button on your mouse for 2 seconds, and then click Next in the Add New Connection wizard. NOTE: Ensure that you complete steps 6 and 7 within three minutes; otherwise, return to step 3. 6. When the Searching for Bluetooth Devices window appears, wait for a minimum of 20 seconds to allow your computer to connect with the mouse. 7. When the connection is complete and Dell Travel Mouse With Bluetooth Technology appears in the list, select the Dell Travel Mouse With Bluetooth Technology from the list, and then click Next. 8. Close the Bluetooth Settings window.
-
 1
1 -
2
-
3
-
 4
4 -
 5
5 -
 6
6 -
 7
7 -
 8
8 -
 9
9 -
 10
10 -
 11
11 -
 12
12 -
 13
13 -
 14
14
 |
 |