Dell PowerEdge 1750 Information Update (.pdf)
Dell PowerEdge 1750 Manual
 |
View all Dell PowerEdge 1750 manuals
Add to My Manuals
Save this manual to your list of manuals |
Dell PowerEdge 1750 manual content summary:
- Dell PowerEdge 1750 | Information Update (.pdf) - Page 1
Dell™ Systems Installing or Replacing an ERA/O Card ERA/O 卡 Installation ou remplacement d'une carte ERA/O Installieren oder Austauschen einer ERA/O-Karte ERA/O ERA/O Instalación o sustitución de una tarjeta ERA/O www.dell.com | support.dell.com - Dell PowerEdge 1750 | Information Update (.pdf) - Page 2
- Dell PowerEdge 1750 | Information Update (.pdf) - Page 3
Dell™ Systems Installing or Replacing an ERA/O Card www.dell.com | support.dell.com - Dell PowerEdge 1750 | Information Update (.pdf) - Page 4
to hardware or loss of data and tells you how to avoid the problem. CAUTION: A CAUTION indicates a potential for property damage, personal injury, or of Dell Computer Corporation is strictly forbidden. Trademarks used in this text: Dell, PowerEdge, and the DELL logo are trademarks of Dell Computer - Dell PowerEdge 1750 | Information Update (.pdf) - Page 5
record the system configuration settings. View the system configuration screens in the System Setup program and make a note of each setting. See your User's Guide for instructions about using the System Setup program. Installing an ERA/O Card CAUTION: Only trained service technicians are authorized - Dell PowerEdge 1750 | Information Update (.pdf) - Page 6
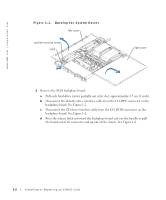
www.dell.com | support.dell.com Figure 1-1. Opening the System Covers left cover optional security screw latch right cover 6 Remove the SCSI backplane board: a Pull each hard-drive carrier partially out of its slot, approximately 2.5 cm (1 inch). b Disconnect the diskette-drive interface cable - Dell PowerEdge 1750 | Information Update (.pdf) - Page 7
Board CD drive interface connector (CD_ROM) diskette drive interface connector (FLOPPY) handle release latch tabs (2) 7 If the system has an and Troubleshooting Guide. 8 Unpack the ERA/O card. If you are replacing an ERA/O card, see "Removing an ERA/O Card" for removal instructions before - Dell PowerEdge 1750 | Information Update (.pdf) - Page 8
dell.com | support.dell.com Figure 1-3. Removing the ROMB Backup Battery ROMB backup battery ROMB card ERA/O card connector battery standoffs (2) RAID BATTERY connector 9 Install the ERA/O card in the ERA/O card connector (EMBEDDED_REMOTE_ ASSISTANT) on the system clips on the system board. b - Dell PowerEdge 1750 | Information Update (.pdf) - Page 9
Card" in your Installation and Troubleshooting Guide. 11 Replace the SCSI backplane. See Figure 1-2. a Fit the metal tabs at each end of the backplane into the slots in the chassis wall, and lower the backplane into the chassis, ensuring that the CD and diskette drive interface cables are not caught - Dell PowerEdge 1750 | Information Update (.pdf) - Page 10
Ethernet connector 18 Update the ERA/O card with the latest version of the ERA/O firmware, available at the Dell Support website at support.dell.com. See the RAC documentation provided on the documentation CD for information about updating the firmware. 1-6 Installing or Replacing an ERA/O Card - Dell PowerEdge 1750 | Information Update (.pdf) - Page 11
your System Information Guide for complete information about safety precautions, working inside the computer, and protecting against electrostatic discharge. 1 Perform steps 1-7 in "Installing an ERA/O Card." 2 Push open the two retention clips nearest the ERA/O card connector while lifting that end - Dell PowerEdge 1750 | Information Update (.pdf) - Page 12
www.dell.com | support.dell.com 1-8 Installing or Replacing an ERA/O Card - Dell PowerEdge 1750 | Information Update (.pdf) - Page 13
Dell™ 系统 ERA/O 卡 www.dell.com | support.dell.com - Dell PowerEdge 1750 | Information Update (.pdf) - Page 14
2003 Dell Computer Corporation Dell Computer Corporation Dell PowerEdge 和 DELL 徽标是 Dell Computer Corporation Dell Computer Corporation 2003 年 2 月 P/N K0238 Rev. A00 - Dell PowerEdge 1750 | Information Update (.pdf) - Page 15
ERA/O) 卡 开始之前 ERA/O CD RAC Dell 支持 Web 站点 support.dell.com Dell III (DRAC III) DRAC III/XT ERA) 和 ERA/O PowerEdge RAC RAC ERA/O 安装 ERA/O 卡 1 2 3 2-1 4 5 ERA/O 卡 2-1 - Dell PowerEdge 1750 | Information Update (.pdf) - Page 16
www.dell.com | support.dell.com 图 2-1 左侧机盖 右侧机盖 6 卸下 SCSI 底板 a 2.5 厘米 1 英寸 b FLOPPY 2-2 c CD_ROM CD 2-2 d 2-2 2-2 ERA/O 卡 - Dell PowerEdge 1750 | Information Update (.pdf) - Page 17
图 2-2 SCSI 底板 CD CD_ROM) FLOPPY) 手柄 2 个 7 ROMB ROMB ROMB ERA/O 2-3 ROMB 卡 8 打开 ERA/O ERA/O ERA/O ERA/O 卡 2-3 - Dell PowerEdge 1750 | Information Update (.pdf) - Page 18
www.dell.com | support.dell.com 图 2-3 卸下 ROMB ROMB ERA/O ROMB 卡 2 个 RAID BATTERY 连接器 9 将 ERA/O ERA/O EMBEDDED_REMOTE_ ASSISTANT 2-4 a 将 ERA/O ERA/O b 2-4 ERA/O 卡 - Dell PowerEdge 1750 | Information Update (.pdf) - Page 19
图 2-4 安装 ERA/O 卡 ERA/O 卡 ERA/O 固定夹 4 个 10 7 ROMB 2-3 ROMB 卡 11 装回 SCSI 2-2 a CD b c d 将 CD CD_ROM 连接器 e FLOPPY 连接器 f SCSI 12 13 2-1 14 15 ERA/O 卡 2-5 - Dell PowerEdge 1750 | Information Update (.pdf) - Page 20
www.dell.com | support.dell.com 16 100-Mbps RAC 2-5 17 RAC 2-5 图 2-5 RAC RAC 18 ERA/O ERA/O 卡 Dell 支持 Web 站点 support.dell.com CD RAC 2-6 ERA/O 卡 - Dell PowerEdge 1750 | Information Update (.pdf) - Page 21
卸下 ERA/O 卡 1 ERA/O 1 至 7 2 ERA/O 2-4 3 4 ERA/O 10 至 15 5 从 RAC 2-5 ERA/O 卡 2-7 - Dell PowerEdge 1750 | Information Update (.pdf) - Page 22
www.dell.com | support.dell.com 2-8 ERA/O 卡 - Dell PowerEdge 1750 | Information Update (.pdf) - Page 23
Systèmes Dell™ Installation ou remplacement d'une carte ERA/O www.dell.com | support.dell.com - Dell PowerEdge 1750 | Information Update (.pdf) - Page 24
de quelque manière que ce soit sans l'autorisation écrite de Dell Computer Corporation est strictement interdite. Marques utilisées dans ce document : Dell, PowerEdge et le logo DELL sont des marques de Dell Computer Corporation. Tous les autres noms de marques et marques commerciales utilis - Dell PowerEdge 1750 | Information Update (.pdf) - Page 25
carte ERA/O, enregistrez les paramètres de configuration du système. Affichez les écrans de configuration du système dans le programme System Setup et notez chaque paramètre. Pour savoir comment utiliser le programme System Setup, reportez-vous au Guide de l'utilisateur. Installation d'une carte ERA - Dell PowerEdge 1750 | Information Update (.pdf) - Page 26
www.dell.com | support.dell.com Figure 3-1. Ouverture des capots du système capot gauche vis de fixation optionnelle loquet capot droit 6 Retirez la carte de fond de panier SCSI : a Dégagez partiellement chaque support de disque dur de son emplacement (de 2,5 cm environ). b Déconnectez le câble - Dell PowerEdge 1750 | Information Update (.pdf) - Page 27
fond de panier SCSI connecteur d'interface du lecteur de CD (CD-ROM) connecteur d'interface du lecteur de disquette (FLOPPY) 3-3 ; reportez-vous également à la section « Retrait d'une carte ROMB » dans le Guide d'installation et de dépannage. 8 Déballez la carte ERA/O. Si vous remplacez une carte - Dell PowerEdge 1750 | Information Update (.pdf) - Page 28
www.dell.com | support.dell.com Figure 3-3. Retrait de la batterie de sauvegarde ROMB batterie de sauvegarde ROMB carte ROMB connecteur de la carte ERA/O picots de batterie (2) connecteur de batterie RAID 9 Installez la carte ERA/O dans le connecteur de la carte ERA/O (EMBEDDED_REMOTE_ - Dell PowerEdge 1750 | Information Update (.pdf) - Page 29
reportez-vous également à la section « Installation d'une carte ROMB » dans le Guide d'installation et de dépannage. 11 Réinstallez le fond de panier SCSI. Voir la du châssis. d Connectez le câble d'interface du lecteur de CD au connecteur de CD-ROM de la carte de fond de panier. e Connectez le câble - Dell PowerEdge 1750 | Information Update (.pdf) - Page 30
en installant la dernière version du microcode ERA/O, disponible sur le site Web d'assistance technique de Dell, support.dell.com. Reportez-vous à la documentation RAC sur le CD de documentation pour plus d'informations sur la mise à jour du microcode. 3-6 Installation ou remplacement d'une carte - Dell PowerEdge 1750 | Information Update (.pdf) - Page 31
/O ATTENTION : Seuls les techniciens de maintenance qualifiés sont habilités à retirer le capot du système et à accéder à ses composants. Reportez-vous au Guide Informations sur le système pour obtenir des informations complètes sur les précautions en matière de sécurité, les opérations à réaliser - Dell PowerEdge 1750 | Information Update (.pdf) - Page 32
www.dell.com | support.dell.com 3-8 Installation ou remplacement d'une carte ERA/O - Dell PowerEdge 1750 | Information Update (.pdf) - Page 33
Dell™-Systeme Installieren oder Austauschen einer ERA/O-Karte www.dell.com | support.dell.com - Dell PowerEdge 1750 | Information Update (.pdf) - Page 34
Hardware oder den Verlust von Daten hingewiesen und erläutert, wie dieses Problem vermieden werden kann. VORSICHT: VORSICHT weist darauf hin, dass Gefahr eines der Dell Computer Corporation erlaubt. Die in diesem Text verwendeten Marken Dell und PowerEdge sowie das DELL-Logo sind Marken der Dell - Dell PowerEdge 1750 | Information Update (.pdf) - Page 35
im Lieferumfang Ihres Systems enthaltenen Dokumentations-CD oder auf der Dell Support-Website unter support.dell.com. ANMERKUNG: Dell™ Remote Access System-Setup-Programm die Systemkonfigurationsbildschirme auf, und notieren Sie die einzelnen Einstellungen. Hinweise zur Verwendung des System-Setup - Dell PowerEdge 1750 | Information Update (.pdf) - Page 36
www.dell.com | support.dell.com Abbildung 4-1. Öffnen der Systemabdeckungen Linke Abdeckung Optionale Sicherheitsschraube auf der Rückwandplatine ab. Siehe Abbildung 4-2. c Ziehen Sie das Schnittstellenkabel des CD-ROM-Laufwerks vom Anschluss "CD_ROM" auf der Rückwandplatine ab. Siehe Abbildung 4-2. - Dell PowerEdge 1750 | Information Update (.pdf) - Page 37
Abbildung 4-2. SCSI-Rückwandplatine Schnittstellenanschluss CD-ROMLaufwerk (CD_ROM) Schnittstellenanschluss Diskettenlaufwerk (FLOPPY) Handgriff Sperrklinke Zungen (2) 7 Wenn im System eine optionale ROMB-Karte installiert ist, müssen Sie die ROMBBackup-Batterie entfernen (nicht die ROMB-Karte - Dell PowerEdge 1750 | Information Update (.pdf) - Page 38
www.dell.com | support.dell.com Abbildung 4-3. Entfernen der ROMB-Backup-Batterie ROMB-BackupBatterie ROMB-Karte ERA/OKartenanschluss Batteriehalter (2) RAID-Batterieanschluss 9 Installieren Sie die ERA/O-Karte im ERA/O-Kartenanschluss (EMBEDDED_REMOTE_ ASSISTANT) auf der Systemplatine. Siehe - Dell PowerEdge 1750 | Information Update (.pdf) - Page 39
in die Schlitze in der Gehäusewand, und senken Sie die Rückwandplatine in das Gehäuse ab. Achten Sie darauf, dass die Schnittstellenkabel des CD-ROM-Laufwerks und des Diskettenlaufwerks nicht unter der Rückwandplatine eingeklemmt werden. b Drücken Sie fest auf den Griff, so dass die Rückwandplatine - Dell PowerEdge 1750 | Information Update (.pdf) - Page 40
/s-Ethernet-Anschluss des RAC auf der Rückseite des Systems noch nicht verwendet worden ist, müssen Sie die Firmware. Diese finden Sie auf der Dell Support-Website unter support.dell.com. Informationen zur Aktualisierung der Firmware finden Sie in der Dokumentation zum RAC auf der Dokumentations-CD - Dell PowerEdge 1750 | Information Update (.pdf) - Page 41
Entfernen einer ERA/O-Karte VORSICHT: Nur geschulte Servicetechniker dürfen die Systemabdeckung entfernen und die Komponenten auf der Systeminnenseite warten. Ausführliche Informationen zu den Sicherheitsvorkehrungen beim Arbeiten im Inneren des Computers und zum Schutz vor elektrischer Entladung - Dell PowerEdge 1750 | Information Update (.pdf) - Page 42
www.dell.com | support.dell.com 4-8 Installieren oder Austauschen einer ERA/O-Karte - Dell PowerEdge 1750 | Information Update (.pdf) - Page 43
Dell ERA/O www.dell.com | support.dell.com - Dell PowerEdge 1750 | Information Update (.pdf) - Page 44
2003 Dell Computer Corporation Dell Computer Corporation Dell、PowerEdge DELL ロゴは Dell Computer Corporation Dell Computer Corporation 2003 年 2 月 P/N K0238 Rev. A00 - Dell PowerEdge 1750 | Information Update (.pdf) - Page 45
Embedded Remote Access Option(ERA/O はじめに メモ:ERA/O CD Web サイト support.dell.com RAC Dell™ Remote Access Card III(DRAC III)、DRAC III/XT、Embedded Remote Access (ERA ERA/O は、PowerEdge RAC RAC ERA/O ERA/O 1 2 3 5-1 4 5 ERA/O 5-1 - Dell PowerEdge 1750 | Information Update (.pdf) - Page 46
www.dell.com | support.dell.com 図 5-1. シ X ラッチ 6 SCSI a 2.5 cm b FLOPPY 5-2 c CD CD_ROM 5-2 d 5-2 5-2 ERA/O - Dell PowerEdge 1750 | Information Update (.pdf) - Page 47
図 5-2. SCSI CD CD_ROM) FLOPPY) ハンドル タブ(2) 7 ROMB ROMB ERA/O ROMB 図 5-3 Installation and Troubleshooting Guide Removing a ROMB Card」(ROMB 8 ERA/O ERA/O ERA/O ERA/O 5-3 - Dell PowerEdge 1750 | Information Update (.pdf) - Page 48
www.dell.com | support.dell.com 図 5-3. ROMB ROMB ERA/O ROMB カード 2) RAID BATTERY 9 ERA/O ERA/O EMBEDDED_REMOTE_ ASSISTANT 5-4 a ERA/O ERA/O 4 b 5-4 ERA/O - Dell PowerEdge 1750 | Information Update (.pdf) - Page 49
図 5-4. ERA/O ERA/O カード ERA/O 4) 10 手順 7 で ROMB 5-3 Installation and Troubleshooting Guide Installing a ROMB Card」(ROMB 11 SCSI 5-2 a CD b c d CD CD_ROM コ e FLOPPY f SCSI コネク ERA/O 5-5 - Dell PowerEdge 1750 | Information Update (.pdf) - Page 50
www.dell.com | support.dell.com 12 13 5-1 14 15 16 100-Mbps RAC Ethernet 5-5 17 RAC Ethernet 5-5 図 5-5. RAC Ethernet RAC Ethernet 18 Web サイト support.dell.com から ERA/O ERA/O CD RAC 5-6 ERA/O - Dell PowerEdge 1750 | Information Update (.pdf) - Page 51
ERA/O 1 「ERA/O 1 ~ 7 2 ERA/O 2 5-4 3 残る 2 4 「ERA/O 10 ~ 15 5 RAC Ethernet 5-5 ERA/O 5-7 - Dell PowerEdge 1750 | Information Update (.pdf) - Page 52
www.dell.com | support.dell.com 5-8 ERA/O - Dell PowerEdge 1750 | Information Update (.pdf) - Page 53
Dell ERA/O www.dell.com | support.dell.com - Dell PowerEdge 1750 | Information Update (.pdf) - Page 54
2003 Dell Computer Corporation Dell Computer Corporation Dell, PowerEdge 및 DELL 로고는 Dell Computer Corporation Dell Computer Corporation 2003년 2월 P/N K0238 Rev. A00 - Dell PowerEdge 1750 | Information Update (.pdf) - Page 55
ERA/O(Embedded Remote Access Option 주: ERA/O CD 의 RAC(Remote Access Controller Dell support.dell.com DRAC III(Dell™ Remote Access Card III), DRAC III/XT, ERA(Embedded Remote Access) 및 ERA/O는 PowerEdge RAC RAC ERA/O System Setup System Setup ERA/O 1 2 3 6-1 4 5 ERA - Dell PowerEdge 1750 | Information Update (.pdf) - Page 56
www.dell.com | support.dell.com 그림 6-1 6 SCSI a 2.5cm(1 b FLOPPY 6-2 c CD_ROM CD 6-2 d 6-2 6-2 ERA/O - Dell PowerEdge 1750 | Information Update (.pdf) - Page 57
그림 6-2. SCSI CD CD_ROM) FLOPPY) 핸들 2) 7 ROMB ROMB ROMB ERA/O 그림 6-3 ROMB 8 ERA/O ERA/O ERA/O ERA/O 6-3 - Dell PowerEdge 1750 | Information Update (.pdf) - Page 58
www.dell.com | support.dell.com 그림 6-3. ROMB ROMB ERA/O ROMB 카드 2) RAID 9 ERA/O EMBEDDED_REMOTE_ ASSISTANT)에 ERA/O 6-4 a ERA/O ERA/O 4 b 6-4 ERA/O - Dell PowerEdge 1750 | Information Update (.pdf) - Page 59
그림 6-4. ERA/O ERA/O 카드 ERA/O 4) 10 7 ROMB 6-3 ROMB 11 SCSI 6-2 a CD b c d CD_ROM CD e FLOPPY f SCSI 12 ERA/O 6-5 - Dell PowerEdge 1750 | Information Update (.pdf) - Page 60
www.dell.com | support.dell.com 13 6-1 14 15 16 100Mbps RAC 6-5 17 RAC 6-5 그림 6-5. RAC RAC 18 Dell support.dell.com에서 ERA/O ERA/O CD RAC 6-6 ERA/O - Dell PowerEdge 1750 | Information Update (.pdf) - Page 61
ERA/O 1 「ERA/O 1단계~7 2 ERA/O 6-4 3 4 「ERA/O 10단계~15 5 RAC 6-5 ERA/O 6-7 - Dell PowerEdge 1750 | Information Update (.pdf) - Page 62
www.dell.com | support.dell.com 6-8 ERA/O - Dell PowerEdge 1750 | Information Update (.pdf) - Page 63
Sistemas Dell™ Instalación o sustitución de una tarjeta ERA/O www.dell.com | support.dell.com - Dell PowerEdge 1750 | Information Update (.pdf) - Page 64
su reproducción en cualquier medio sin la autorización por escrito de Dell Computer Corporation. Marcas comerciales utilizadas en este documento: Dell, PowerEdge, y el logotipo de DELL son marcas comerciales de Dell Computer Corporation. Las demás marcas registradas y nombres comerciales que puedan - Dell PowerEdge 1750 | Information Update (.pdf) - Page 65
de la controladora de acceso remoto (RAC) que se facilita en el CD de la documentación que se incluye con el sistema o bien en el sitio Web de Dell Support en la dirección support.dell.com. NOTA: La tarjeta de acceso remoto Dell™ III (DRAC III), DRAC III/XT, el acceso remoto incorporado (ERA) y ERA - Dell PowerEdge 1750 | Information Update (.pdf) - Page 66
www.dell.com | support.dell.com Figura 7-1. Apertura de las cubiertas del sistema cubierta encuentra en la placa. Consulte la Figura 7-2. c Desconecte el cable de interfaz de la unidad de CD del conector CD_ROM que se encuentra en la placa. Consulte la Figura 7-2. d Pulse el pestillo de liberaci - Dell PowerEdge 1750 | Information Update (.pdf) - Page 67
Figura 7-2. Placa SCSI conector de la interfaz de la unidad de CD (CD_ROM) conector de la interfaz de la unidad de disquete (FLOPPY) asa pestillo de liberación lengüetas (2) 7 Si el sistema tiene instalada una tarjeta opcional - Dell PowerEdge 1750 | Information Update (.pdf) - Page 68
www.dell.com | support.dell.com Figura 7-3. Retirada de la batería de seguridad ROMB Batería de seguridad ROMB tarjeta ROMB conector de la tarjeta ERA/O separadores de batería (2) Conector RAID BATTERY 9 Instale la tarjeta ERA/O en el conector de tarjeta ERA/O (EMBEDDED_REMOTE_ ASSISTANT) que - Dell PowerEdge 1750 | Information Update (.pdf) - Page 69
el chasis, asegurándose de que los cables de interfaz del disquete y el CD no quedan atrapados bajo la placa. b Presione hacia abajo firmemente el asa para de sujeción del chasis. d Conecte el cable de interfaz de la unidad de CD al conector CD_ROM de la placa. e Conecte el cable de interfaz de la - Dell PowerEdge 1750 | Information Update (.pdf) - Page 70
conector. Puede introducir un dedo bajo la banda plateada de la parte superior de la cubierta para retirarla. En la Figura 7-5 puede observar firmware de la tarjeta ERA/O, que puede obtener en el sitio Web de Dell Support en la dirección support.dell.com. Consulte la documentación de RAC incluida en el CD - Dell PowerEdge 1750 | Information Update (.pdf) - Page 71
Extracción de una tarjeta ERA/O PRECAUCIÓN: Sólo técnicos de servicio cualificados están autorizados para retirar la cubierta del sistema y acceder a cualquier componente de su interior. Consulte la Guía de información del sistema para obtener información completa sobre las precauciones de seguridad - Dell PowerEdge 1750 | Information Update (.pdf) - Page 72
www.dell.com | support.dell.com 7-8 Instalación o sustitución de una tarjeta ERA/O - Dell PowerEdge 1750 | Information Update (.pdf) - Page 73
- Dell PowerEdge 1750 | Information Update (.pdf) - Page 74
Printed in the U.S.A Imprimé aux Etats-Unis. Gedruckt in U.S.A Impreso en EE.UU. 0K0238A00 P/N K0238 Rev. A00 www.dell.com | support.dell.com - Dell PowerEdge 1750 | Information Update (.pdf) - Page 75
- Dell PowerEdge 1750 | Information Update (.pdf) - Page 76
Printed in Malaysia Imprimé en Malaisie Gedruckt in Malaysia Impreso en Malasia 0K0238A00 P/N K0238 Rev. A00 www.dell.com | support.dell.com - Dell PowerEdge 1750 | Information Update (.pdf) - Page 77
- Dell PowerEdge 1750 | Information Update (.pdf) - Page 78
Printed in Brazil Imprimé au Brésil Gedruckt in Brasilien Impreso en Brasil 0K0238A00 P/N K0238 Rev. A00 www.dell.com | support.dell.com - Dell PowerEdge 1750 | Information Update (.pdf) - Page 79
- Dell PowerEdge 1750 | Information Update (.pdf) - Page 80
Printed in China Printed on recycled paper Imprimé en Chine Gedruckt in China Impreso en China 0K0238A00 P/N K0238 Rev. A00 www.dell.com | support.dell.com - Dell PowerEdge 1750 | Information Update (.pdf) - Page 81
- Dell PowerEdge 1750 | Information Update (.pdf) - Page 82
Printed in Ireland Imprimé en Irelande Gedruckt in Ireland Impreso en Irelanda 0K0238A00 P/N K0238 Rev. A00 www.dell.com | support.dell.com
-
 1
1 -
 2
2 -
 3
3 -
 4
4 -
 5
5 -
 6
6 -
 7
7 -
8
-
9
-
10
-
11
-
12
-
13
-
14
-
15
-
16
-
17
-
18
-
19
-
20
-
21
-
22
-
23
-
24
-
25
-
26
-
27
-
28
-
29
-
30
-
31
-
32
-
33
-
34
-
35
-
36
-
37
-
38
-
39
-
40
-
41
-
42
-
43
-
44
-
45
-
46
-
47
-
48
-
49
-
50
-
51
-
52
-
53
-
54
-
55
-
56
-
57
-
58
-
59
-
60
-
61
-
62
-
63
-
64
-
65
-
66
-
67
-
68
-
69
-
70
-
71
-
72
-
73
-
74
-
75
-
76
-
77
-
78
-
79
-
80
-
81
-
82
 |
 |
www.dell.com | support.dell.com
Dell™ Systems
Installing or Replacing
an ERA/O Card
安装或更换
ERA/O
卡
Installation ou remplacement d'une carte ERA/O
Installieren oder Austauschen einer ERA/O-Karte
ERA/O
カードの取り付けおよび取り外し
ERA/O
카드 설치 또는 교체
Instalación o sustitución de una tarjeta ERA/O