Dell PowerEdge 1750 Information Update (.pdf) - Page 11
Removing an ERA/O Card - how to open
 |
View all Dell PowerEdge 1750 manuals
Add to My Manuals
Save this manual to your list of manuals |
Page 11 highlights
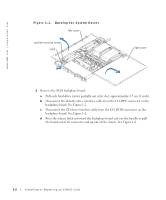
Removing an ERA/O Card CAUTION: Only trained service technicians are authorized to remove the system cover and access any of the components inside the system. See your System Information Guide for complete information about safety precautions, working inside the computer, and protecting against electrostatic discharge. 1 Perform steps 1-7 in "Installing an ERA/O Card." 2 Push open the two retention clips nearest the ERA/O card connector while lifting that end of the card from the connector. See Figure 1-4. 3 Push open the remaining two retention clips and remove the card completely. 4 Perform steps 10-15 in "Installing an ERA/O Card." 5 Disconnect the network cable from the RAC Ethernet connector (if applicable). See Figure 1-5. Installing or Replacing an ERA/O Card 1-7
-
 1
1 -
2
-
3
-
4
-
5
-
 6
6 -
 7
7 -
 8
8 -
 9
9 -
 10
10 -
 11
11 -
 12
12 -
 13
13 -
 14
14 -
 15
15 -
 16
16 -
17
-
18
-
19
-
20
-
21
-
22
-
23
-
24
-
25
-
26
-
27
-
28
-
29
-
30
-
31
-
32
-
33
-
34
-
35
-
36
-
37
-
38
-
39
-
40
-
41
-
42
-
43
-
44
-
45
-
46
-
47
-
48
-
49
-
50
-
51
-
52
-
53
-
54
-
55
-
56
-
57
-
58
-
59
-
60
-
61
-
62
-
63
-
64
-
65
-
66
-
67
-
68
-
69
-
70
-
71
-
72
-
73
-
74
-
75
-
76
-
77
-
78
-
79
-
80
-
81
-
82
 |
 |
