Dell PowerEdge 2400 Installing Redundant Power Supplies - Page 3
Checking Inside the Computer - power supply
 |
View all Dell PowerEdge 2400 manuals
Add to My Manuals
Save this manual to your list of manuals |
Page 3 highlights
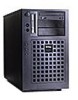
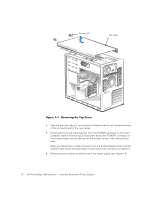
This document provides instructions on upgrading your Dell system with dual, redundant hot-plug power supplies and a power-supply distribution board (PSDB). 1. Remove the front bezel and both computer covers. For instructions, see Chapter 7, Checking Inside the Computer, in the Installation and Troubleshooting Guide. 2. Disconnect the AC power cable from the AC power receptacle on the back of the power supply. 3. Remove the two screws at the front edge of the top cover (see Figure 1-1). Dell PowerEdge 2400 Systems - Installing Redundant Power Supplies 1-1
-
 1
1 -
 2
2 -
 3
3 -
 4
4 -
 5
5 -
 6
6 -
 7
7 -
 8
8
 |
 |

Dell PowerEdge 2400 Systems — Installing Redundant Power Supplies
1-1
±²³³´µ¶·¸²¹º»¼²´µ½¾¿¿µÀÁÂòÄÂ
ÅÆÂÃdz³ÈƼµÉ²»ÊÆ»ÇÆõ¶·¸²¹µ
ÀÊË˳ȲÂ
This document provides instructions on upgrading your Dell system with dual, redun-
dant hot-plug power supplies and a power-supply distribution board (PSDB).
±²³´µ´¶·¸¹º»¼½º¸¾¼¿¸Àº½»¼½Á¸Âú¸À½¼ÄºÅ¿½ºÆ¸ÇȸÂÃÇƸżĿÁºÈÂɸ¾¼¿¸Á¿Æ¸
¿½È¸¼»»¸Âú¸Ä¼ÁÀ¿Âº½¸ÊÈŸÅÇÆļÈȺĸǸ»½¼Á¸Âú¸ºËºÄ½ÇÄÊ˸¼¿Â˺Â̸ͼ½¸Á¼½º¸
ÇÈ»¼½ÁÊÂǼÈɸ½º»º½¸Â¼¸ÎÏÊ»ºÂ¾¸ÍǽÆ°ͼ½¸!¼¿¸ÊÈŸ!¼¿½¸"¼ÁÀ¿Âº½Î¸ÇȸÂú¸
±²³´µ²¶·¸¹º³
Ì
±²³´µ´¶·¸#¼¸È¼Â¸½ºÁ¼$º¸Âú¸Ä¼$º½¸»½¼Á¸Âú¸%Ï#¹Ì¸´¼¸¿Æº½&ƺ½$ÇĺÊ'˺¸
ÀʽÂƸʽº¸ÇÈÆÇź¸ÂÃÇƸÊÆƺÁ'˾Ì
±²³´µ¶¶·²¸ ´¹º »¼½¾
´()µ"*·¸Ïºº¸Î%½¼ÂºÄÂÇÈ+¸²+ÊÇÈƸ*˺Ľ¼ÆÂÊÂÇĸ#ÇÆÄÃʽ+ºÎ¸ÇȸÂú¸ÆÊ»ºÂ¾¸
ÇÈƽ¿ÄÂǼÈƸÇȸÂú¸
±²³´µ²¶·¸¹º³
̸
1.
Remove the front bezel and both computer covers.
For instructions, see Chapter 7,
Î
Checking Inside the Computer,
Î
in the
Installa-
tion and Troubleshooting Guide
.
2.
Disconnect the AC power cable from the AC power receptacle on the back of the
power supply.
3.
Remove the two screws at the front edge of the top cover (see Figure 1-1).