Dell PowerEdge 4600 Microprocessor Upgrade Installation Guide - Page 3
Adding or Replacing a Microprocessor - cover remove
 |
View all Dell PowerEdge 4600 manuals
Add to My Manuals
Save this manual to your list of manuals |
Page 3 highlights
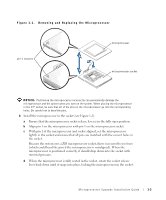
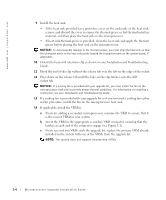
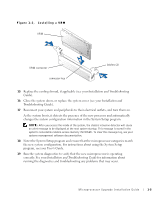
This document provides instructions about adding or replacing microprocessors. To take advantage of future options in speed and functionality, you can add secondary microprocessors or replace microprocessors in your system. NOTICE: Before you add or replace a microprocessor, check the latest system BIOS information on the Dell Support website at support.dell.com, and upgrade the BIOS if necessary. Each microprocessor and its associated cache memory are contained in a pin-grid array (PGA) package that is installed in a ZIF socket on the system board. The following subsection describes how to install or replace the microprocessor in either the primary or secondary microprocessor sockets. NOTE: In a single microprocessor system, the microprocessor must be installed in the primary microprocessor socket. Adding or Replacing a Microprocessor NOTICE: The secondary microprocessors must be the same speed as the primary microprocessor. In addition to the ZIF socket for the primary microprocessor on the system board, other ZIF sockets might be present to accommodate secondary microprocessors. The following items are included in the microprocessor upgrade kit: • A microprocessor • A heat sink • Heat-sink retention clip(s) • A VRM, if applicable Your upgrade kit may also include a cooling fan. CAUTION: Before you perform this procedure, read the safety instructions in your System Information document. 1 Turn off the system, including any peripherals, and disconnect the power cable from the electrical outlet. 2 Open the system doors, or remove the system cover (see your Installation and Troubleshooting Guide). CAUTION: See "Protecting Against Electrostatic Discharge" in the safety instructions in the System Information document. 3 Remove the cooling shroud, if applicable (see your Installation and Troubleshooting Guide). Microprocessor Upgrade Installation Guide 1-1
-
 1
1 -
 2
2 -
 3
3 -
 4
4 -
 5
5 -
 6
6 -
 7
7 -
 8
8 -
 9
9 -
10
-
11
-
12
-
13
-
14
-
15
-
16
-
17
-
18
-
19
-
20
-
21
-
22
-
23
-
24
-
25
-
26
-
27
-
28
-
29
-
30
-
31
-
32
-
33
-
34
-
35
-
36
-
37
-
38
-
39
-
40
-
41
-
42
-
43
-
44
-
45
-
46
-
47
-
48
-
49
-
50
-
51
-
52
-
53
-
54
-
55
-
56
 |
 |