Dell PowerEdge 4600 Microprocessor Upgrade Installation Guide - Page 5
Because the system uses a ZIF microprocessor socket, there is no need to use force, the socket.
 |
View all Dell PowerEdge 4600 manuals
Add to My Manuals
Save this manual to your list of manuals |
Page 5 highlights
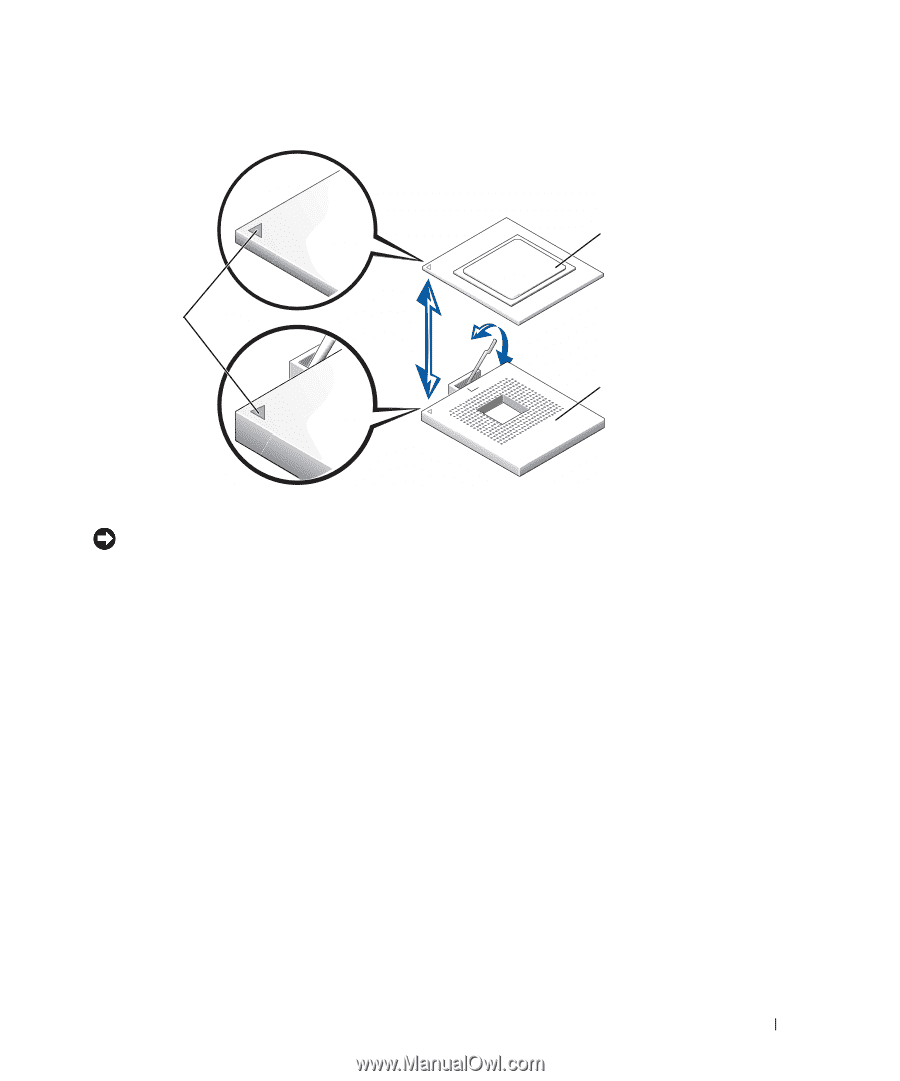
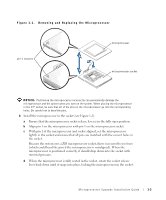
Figure 1-1. Removing and Replacing the Microprocessor pin-1 locators microprocessor microprocessor socket NOTICE: Positioning the microprocessor incorrectly can permanently damage the microprocessor and the system when you turn on the system. When placing the microprocessor in the ZIF socket, be sure that all of the pins on the microprocessor go into the corresponding holes. Be careful not to bend the pins. 8 Install the microprocessor in the socket (see Figure 1-1). a Ensure that the microprocessor socket release lever is in the fully open position. b Align pin 1 on the microprocessor with pin 1 on the microprocessor socket. c With pin 1 of the microprocessor and socket aligned, set the microprocessor lightly in the socket and ensure that all pins are matched with the correct holes in the socket. Because the system uses a ZIF microprocessor socket, there is no need to use force (which could bend the pins if the microprocessor is misaligned). When the microprocessor is positioned correctly, it should drop down into the socket with minimal pressure. d When the microprocessor is fully seated in the socket, rotate the socket release lever back down until it snaps into place, locking the microprocessor in the socket. Microprocessor Upgrade Installation Guide 1-3
-
 1
1 -
 2
2 -
 3
3 -
 4
4 -
 5
5 -
 6
6 -
 7
7 -
 8
8 -
 9
9 -
 10
10 -
 11
11 -
12
-
13
-
14
-
15
-
16
-
17
-
18
-
19
-
20
-
21
-
22
-
23
-
24
-
25
-
26
-
27
-
28
-
29
-
30
-
31
-
32
-
33
-
34
-
35
-
36
-
37
-
38
-
39
-
40
-
41
-
42
-
43
-
44
-
45
-
46
-
47
-
48
-
49
-
50
-
51
-
52
-
53
-
54
-
55
-
56
 |
 |