Dell PowerEdge 6850 Installation and Troubleshooting Guide (.htm) - Page 15
Installing the RapidRails Slide Assemblies
 |
View all Dell PowerEdge 6850 manuals
Add to My Manuals
Save this manual to your list of manuals |
Page 15 highlights
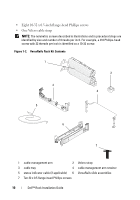
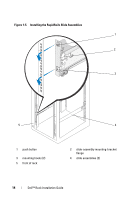
Installing the RapidRails Slide Assemblies 1 At the front of the rack cabinet, position one of the RapidRails slide assemblies so that its mounting-bracket flange fits in the appropriate location on the rack (see Figure 1-5). The top mounting hook on the rail assembly's front-mounting bracket flange should enter the top hole between the marks on the vertical rails. 2 Push the slide assembly forward until the top mounting hook enters the square hole just below the upper marks or tape you placed on the vertical rail. Next, push down on the mounting-bracket flange until the mounting hooks seat in the square holes and the push button pops out and clicks (see Figure 1-5). 3 At the back of the cabinet, pull back on the mounting-bracket flange until the mounting hooks are in the appropriate holes, and then push down on the flange until the mounting hooks seat in the square holes and the push button pops out and clicks. 4 Repeat steps 1 through 3 for the slide assembly on the other side of the rack. NOTE: Ensure that the rails are mounted at the same vertical position on both sides of the rack. Dell™ Rack Installation Guide 13
-
 1
1 -
2
-
3
-
4
-
5
-
6
-
7
-
8
-
9
-
 10
10 -
 11
11 -
 12
12 -
 13
13 -
 14
14 -
 15
15 -
 16
16 -
 17
17 -
 18
18 -
 19
19 -
 20
20 -
21
-
22
-
23
-
24
-
25
-
26
-
27
-
28
-
29
-
30
-
31
-
32
-
33
-
34
-
35
-
36
-
37
-
38
-
39
-
40
-
41
-
42
-
43
-
44
-
45
-
46
-
47
-
48
-
49
-
50
-
51
-
52
-
53
-
54
-
55
-
56
-
57
-
58
-
59
-
60
-
61
-
62
-
63
-
64
-
65
-
66
-
67
-
68
-
69
-
70
-
71
-
72
-
73
-
74
-
75
-
76
-
77
-
78
-
79
-
80
-
81
-
82
-
83
-
84
-
85
-
86
-
87
-
88
-
89
-
90
-
91
-
92
-
93
-
94
-
95
-
96
-
97
-
98
-
99
-
100
-
101
-
102
-
103
-
104
-
105
-
106
-
107
-
108
-
109
-
110
-
111
-
112
-
113
-
114
-
115
-
116
-
117
-
118
-
119
-
120
-
121
-
122
-
123
-
124
-
125
-
126
-
127
-
128
-
129
-
130
-
131
-
132
-
133
-
134
-
135
-
136
-
137
-
138
-
139
-
140
-
141
-
142
 |
 |